问题导读
1.从云硬盘启动实例,源码是如何实现的?
2.如何从镜像启动实例?
3.二者有何不同?

云硬盘启动虚拟机
先使用cinder创建云硬盘,然后在nova中创建示例的时候,会先在_prep_block_device中挂载cinder中创建的卷,然后创建虚拟机
流程如下:
[mw_shl_code=bash,true](1)从cinder创建系统盘的流程
cinder.volume.rpcapi.VolumeAPI.create_volume
->cinder.volume.manager.VolumeManager.create_volume
->cinder.volume.flows.manager.create_volume.get_flow
->cinder.volume.flows.manager.create_volume.CreateVolumeFromSpecTask.execute
->cinder.volume.flows.manager.create_volume.CreateVolumeFromSpecTask._create_from_image (_create_raw_volume、_create_from_snapshot)
->cinder.volume.derivers.glusterfs.create_volume (这里是具体驱动的create_volume, VS底层使用glusterfs)
->cinder.volume.derivers.glusterfs._do_create_volume (这里很重要,可能是我们的切入点)
->cinder.volume.derivers.remotefs._create_sparsed_file(class GlusterfsDriver(remotefs_drv.RemoteFSSnapDriver)会调到父类的方法)
->cinder.volume.flows.manager.create_volume.CreateVolumeFromSpecTask._copy_image_to_volume
->cinder.volume.derivers.remotefs.copy_image_to_volume(class GlusterfsDriver(remotefs_drv.RemoteFSSnapDriver)会调到父类的方法)
->cinder.image.image_utils.fetch_to_raw
->cinder.image.image_utils.fetch_to_volume_format
->cinder.image.image_utils.fetch (从fetch到fetch再到download和2.6中的流程很像了)
->cinder.image.glance.download(从glance下载镜像到卷)
->cinder.volume.flows.manager.create_volume.CreateVolumeFromSpecTask._handle_bootable_volume_glance_meta (设置为可启动)
创建镜像完毕
(2)nova中从云硬盘启动虚拟机的流程
从云硬盘启动还是从虚拟机启动,在如下地方有差别:
A 在Nova.virt.libvirt.driver._create_image中有差别
nova.api.openstack.compute.servers.Controller.create
->nova.compute.api.API.create
->nova.compute.api.API._create_instance
->nova.comductor.ComputeTaskAPI.build_instances
->nova.conductor. rpcapi.ComputeTaskAPI.build_instances
->nova.conductor. manager.ComputeTaskAPI.build_instances
->nova.compute.rpcapi.ComputeManager.build_and_run_instance
->nova.compute.manager.ComputeManager.build_and_run_instance
->nova.compute.manager.ComputeManager._locked_do_build_and_run_instance
->nova.compute.manager.ComputeManager._do_build_and_run_instance
->nova.compute.manager.ComputeManager._build_and_run_instance
->nova.compute.manager.ComputeManager._build_networks_for_instance //准备网络资源
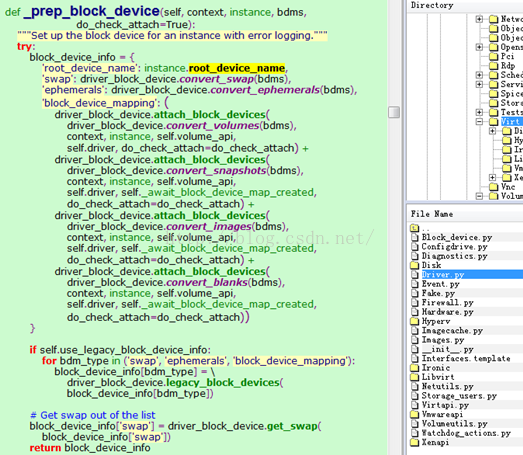
->nova.compute.manager.ComputeManager._prep_block_device //准备块设备
->nova.compute.manager.ComputeManager.attach_block_devices
->nova.virt.block_device.DriverImageBlockDevice.attach:volume_api.attach
->Nova.volume.API.attach
->nova.volume.cinder.API.attach
-> client = cinderclient(context) ; client.volumes.attach(size, **kwargs)//挂载cinder创建好的卷(云硬盘)
->nova.virt.libvirt.driver.LibvirtDriver.spawn
->Nova.virt.libvirt.driver._create_image //创建系统盘
这里会检查是从云硬盘启动,还是不从云硬盘启动:
booted_from_volume = self._is_booted_from_volume(
instance, disk_mapping)
...
if not booted_from_volume:
->Nova.virt.libvirt.driver._try_fetch_image_cache
->Nova.virt.libvirt.imagebackend.Image.cache
->Nova.virt.libvirt.imagebackend.Qcow2.create_image
->Nova.virt.libvirt.imagebackend.Qcow2.create_image:prepare_template即fetch_image
->Nova.virt.libvirt.utils.fetch_image
->Nova.virt.images.fetch_to_raw
->Nova.virt.images.fetch #下载系统镜像到/var/lib/nova/instances/_base/目录
->nova.image.glance.GlanceImageService.download
->nova.image.glance.GlanceClientWrapper.call
->Nova.virt.images.convert_image #若镜像不是raw格式,且nova.conf中force_raw_images=True,则将backing file强制转换为raw格式
->Nova.virt.libvirt.imagebackend.Qcow2.create_image:copy_qcow2_image
->nova.virt.libvirt.utils.create_cow_image [/mw_shl_code]
镜像启动
nova还有一种启动方式:“从镜像启动(创建一个新卷)”
这个流程中,nova会在_prep_block_device中的attach_block_device去调用cinder的create创建一个卷
然后会在_prep_block_device中的attach_block_device去调用cinder的attach挂载这个卷
然后才去spawn,孵化虚拟机,在spawn中会调用_create_image来创建镜像,这里创建镜像不是创建卷,卷是在_prep_block_device创建好的,除非是“从镜像启动”才会在
_create_image创建卷。
下面看下nova中“从镜像启动(创建一个新卷)”创建虚拟机的流程:
[mw_shl_code=bash,true]nova.api.openstack.compute.servers.Controller.create
->nova.compute.api.API.create
->nova.compute.api.API._create_instance
->nova.comductor.ComputeTaskAPI.build_instances
->nova.conductor. rpcapi.ComputeTaskAPI.build_instances
->nova.conductor. manager.ComputeTaskAPI.build_instances
->nova.compute.rpcapi.ComputeManager.build_and_run_instance
->nova.compute.manager.ComputeManager._do_build_and_run_instance
->nova.compute.manager.ComputeManager._build_and_run_instance //直到这里,流程仍与前两种创建虚拟机的情况相同,看看最终是哪里有差别
->nova.compute.manager.ComputeManager._build_resources
->nova.compute.manager.ComputeManager._build_networks_for_instance //准备网络资源
->nova.compute.manager.ComputeManager._prep_block_device //准备块设备
->nova.compute.manager.ComputeManager.attach_block_devices
->nova.virt.block_device.attach_block_devices
->nova.virt.block_device.DriverImageBlockDevice.attach
->nova.virt.driver.create
->nova.virt.libvrit.driver.create 创建一个新卷
->nova.virt.block_device.DriverVolumeBlockDevice.attach (DriverVolumeBlockDevice是DriverImageBlockDevice的父类)
->nova.virt.driver.attach
->nova.virt.libvirt.driver.attach 挂载这个卷
->nova.virt.libvirt.driver.LibvirtDriver.spawn
//再回过头来梳理下spawn,是不是这时候块设备都有了呢?之前的流程是不是有点问题?
//是不是块设备在_prep_block_device都建好了,后面只是向里面填不同的内容?
//那么spawn中的_create_image 又做了什么呢?上面的_prep_block_device和spawn中的_create_image分别做什么?看起来都像建卷?
//事实上,是一个建卷(_prep_block_device只是块设备,里面没有东西)而一个是在卷上组织镜像(_create_image之前卷已经存在,这里只是组织镜像)
//另外考虑分支情况:(1)如果卷存在_prep_block_device流程怎么走?(2)如果从云硬盘启动_create_image流程怎么走
//也就是说把分支情况也要考虑好
接上面:
->nova.virt.libvirt.driver.LibvirtDriver.spawn
->Nova.virt.libvirt.driver._create_image //组织镜像
这里会检查是从云硬盘启动,还是不从云硬盘启动:
booted_from_volume = self._is_booted_from_volume(
instance, disk_mapping)
...
if not booted_from_volume:
->Nova.virt.libvirt.driver._try_fetch_image_cache
->Nova.virt.libvirt.imagebackend.Image.cache
->Nova.virt.libvirt.imagebackend.Qcow2.create_image
->Nova.virt.libvirt.imagebackend.Qcow2.create_image:prepare_template即fetch_image
->Nova.virt.libvirt.utils.fetch_image
->Nova.virt.images.fetch_to_raw
->Nova.virt.images.fetch #下载系统镜像到/var/lib/nova/instances/_base/目录
->nova.image.glance.GlanceImageService.download
->nova.image.glance.GlanceClientWrapper.call
->Nova.virt.images.convert_image #若镜像不是raw格式,且nova.conf中force_raw_images=True,则将backing file强制转换为raw格式
->Nova.virt.libvirt.imagebackend.Qcow2.create_image:copy_qcow2_image
->nova.virt.libvirt.utils.create_cow_image [/mw_shl_code]
差异
在前面跟踪分析了:“从镜像启动”、“从镜像启动(创建一个新卷)”过程中,卷的创建是在_build_resources->_prep_block_device中创建的,而不是在
spawm->_create_image中创建的,而_create_image只是来在卷上创建镜像,或者说来组织镜像。
在这里看一下“从云硬盘启动”和“从镜像启动”、“从镜像启动(创建一个卷)”,在_prep_block_device中的差异.
(1)“从云硬盘启动”可以先不关注,肯定是在cinder这边创建的卷,不过是怎么_prep_block_device的?
(2)“从镜像启动(创建一个新卷)”确定是在cinder中创建的,nova调用了cinderclient的创建卷的命令,但其_prep_block_device做了什么?
(3)“从镜像启动”这里的卷(_base + disk)是在nova中创建的还是调cinder创建的?在_prep_block_device中做了什么?
(4)除了创建卷,还做了什么?不管在哪里建卷,都要_prep_block_device,是准备哪些东西?
再深入看一下_prep_block_device的流程:
[mw_shl_code=bash,true]->nova.compute.manager.ComputeManager._prep_block_device //准备块设备
->nova.compute.manager.ComputeManager.attach_block_devices
->nova.virt.block_device.attach_block_devices
->nova.virt.block_device.DriverImageBlockDevice.attach:volume_api.create //怀疑这里在不同的创建方式下走不同的流程
->Nova.volume.API.create
->nova.volume.cinder.API.create
-> client = cinderclient(context) ; client.volumes.create(size, **kwargs)//调用cinder创建卷 [/mw_shl_code]
确认:
nova.virt.block_device.DriverImageBlockDevice.attach:volume_api.create //怀疑这里在不同的创建方式下走不同的流程
确认这里在“从云硬盘启动”、“从镜像启动”、“从镜像启动(创建一个新卷)”三种方式下会走不同的流程
(1)“从镜像启动”:
从镜像启动时,那几个类:DriverImageBlockDevice、DriverSnapshotBlockDevice、DriverBlankBlockDevice中的attach一个也没有调用
看下nova.compute.manager.ComputeManager.attach_block_devices 有没有被调用

接下来调到哪儿去了?“从镜像启动”创建云硬盘,应该是在_create_image中做的,这里attach什么呢?是不是也要准备块设备?_create_image中只是下载?
看这时候有没有卷信息呢?
��看下nova.compute.manager.ComputeManager.attach_block_devices 有没有被调用?那几个类:DriverImageBlockDevice、DriverSnapshotBlockDevice、DriverBlankBlockDevice中的attach一个也没有调用
“从镜像启动”的_prep_block_device:在attach_block_devices这里就直接返回了,如下是“从镜像启动”的打印:

看这时候有没有卷信息呢?从镜像启动时,那几个类:DriverImageBlockDevice、DriverSnapshotBlockDevice、DriverBlankBlockDevice中的attach一个也没有调用
看下nova.compute.manager.ComputeManager.attach_block_devices 有没有被调用
“从镜像启动(创建一个新卷)”的_prep_block_device:这里会去调用cinder的create建卷,和调用cinder的attach去挂载云硬盘。如下是“从镜像启动(创建一个新卷)”的log:

这里的调用流程:
[mw_shl_code=bash,true]->nova.compute.manager.ComputeManager._prep_block_device //准备块设备
->nova.compute.manager.ComputeManager.attach_block_devices
->nova.virt.block_device.attach_block_devices
->nova.virt.block_device.DriverImageBlockDevice.attach
->nova.virt.driver.create
->nova.virt.libvrit.driver.create 创建一个新卷
->nova.virt.block_device.DriverVolumeBlockDevice.attach (DriverVolumeBlockDevice是DriverImageBlockDevice的父类)
->nova.virt.driver.attach
->nova.virt.libvirt.driver.attach 挂载这个卷 [/mw_shl_code]
“从云硬盘启动”的_prep_block_device:这里不会去创建卷,因为卷已经存在了,所以这里会直接调用attach去挂载云硬盘。如下是“从云硬盘启动”的Log:

流程如下:
[mw_shl_code=bash,true]->nova.compute.manager.ComputeManager._prep_block_device //准备块设备
->nova.compute.manager.ComputeManager.attach_block_devices
->nova.virt.block_device.attach_block_devices
->nova.virt.block_device.DriverVolumeBlockDevice.attach (DriverVolumeBlockDevice是DriverImageBlockDevice的父类)
->nova.virt.driver.attach
->nova.virt.libvirt.driver.attach 挂载这个卷 [/mw_shl_code]
也就是说,在_prep_block_device中的差别:
“从镜像启动”,这里不会去创建卷,也不会去调用任何attach,因为这时候不存在一个卷,这个卷要在后面_create_image中创建
“从云硬盘启动”这里卷早已经建好了,但是会去调用cinder的attach,去挂载这个卷,或者说挂载这个块设备,就是做block_device_mapping
“从镜像启动(创建一个新卷)”:这里会调用调用cinder的create去创建一个卷,并且会去调用cinder的attach去挂载这个卷
这里的_prep_block_device方法的更深入的原理是什么?

【需要搞清楚】对这里的流程清楚了,就是调到了哪里。但原理还不够清楚,怎么调过去的,为什么就调到后面的nova.compute.manager.ComputeManager.attach_block_devices了,后面的nova.compute.manager.ComputeManager.attach_block_devices为什么有的会调create和attach,有的会调用attach而不调用create,有的create和attach都不会调用?【需要搞清楚】
详细解析:
这里主要是以attach_block_devices的返回值作为block_device_mapping的成员,所以attach_block_devices返回什么很重要。
attach_block_devices:

要明白map(func, {{},{}})是什么意思,map是将第二个参数中的所有成员,在第一个参数的函数中执行一遍!
“从镜像启动(创建一个新卷)”打印:


这里可以看到,会去调用_log_and_attach,去调用实际的create和attach去创建卷和挂载卷。
“从镜像启动”打印:
这里可以看到,不会去调用_log_and_attach,这里不会去建卷,更不会去挂载卷,都在后面的_create_image中来处理。这里经过再次确认,确实不会调用。
“从云硬盘启动”,打印:


这里也会去执行map中的回调函数:_log_and_attach函数,去挂载已经创建好的云硬盘。
这里最根本的是要搞清楚:
block_device_mapping是什么?
map(_log_and_attach, block_device_mapping)做了什么?
这里还没搞明白,后面再研究。
来自:csdn
作者:lilicheung
|
 /2
/2 