本帖最后由 levycui 于 2018-8-21 14:45 编辑
问题导读:
1、如何实现非线性SVM?
2、如何创建预测内核函数?
3、如何实现多类SVM?
4、如何在额外维度上调用TensorFlow的batch_matmul?
关注最新经典文章,欢迎关注公众号

上一篇:TensorFlow ML cookbook 第四章2、3节 减少到线性回归和在TensorFlow中使用内核
实现非线性SVM
对于此章节,我们将应用非线性内核来拆分数据集。
做好准备
在本节中,我们将在实际数据上实现前面的高斯核SVM。 我们将加载虹膜数据集并为I. setosa创建分类器(与非setosa相比)。 我们将看到各种伽马值(gamma)对分类的影响。
怎么做…
1.我们首先加载必要的库,其中包括scikit学习数据集,以便我们可以加载虹膜数据。 然后我们将开始一个图形会话。 使用以下代码:
[mw_shl_code=python,true]import matplotlib.pyplot as plt
import numpy as np
import tensorflow as tf
from sklearn import datasets
sess = tf.Session() [/mw_shl_code]
2.接下来我们将加载虹膜数据,提取萼片长度和花瓣宽度,并将每个类的x和y值分开(以便以后绘图),如下所示:
[mw_shl_code=python,true]iris = datasets.load_iris()
x_vals = np.array([[x[0], x[3]] for x in iris.data])
y_vals = np.array([1 if y==0 else -1 for y in iris.target])
class1_x = [x[0] for i,x in enumerate(x_vals) if y_vals==1]
class1_y = [x[1] for i,x in enumerate(x_vals) if y_vals==1]
class2_x = [x[0] for i,x in enumerate(x_vals) if y_vals==-1]
class2_y = [x[1] for i,x in enumerate(x_vals) if y_vals==-1] [/mw_shl_code]
3.现在我们声明我们的批量大小(首选大批量),占位符和模型变量b,如下所示:
[mw_shl_code=python,true]batch_size = 100
x_data = tf.placeholder(shape=[None, 2], dtype=tf.float32)
y_target = tf.placeholder(shape=[None, 1], dtype=tf.float32)
prediction_grid = tf.placeholder(shape=[None, 2], dtype=tf. float32)
b = tf.Variable(tf.random_normal(shape=[1,batch_size])) [/mw_shl_code]
4.接下来我们宣布我们的高斯核。 该内核取决于伽马值(gamma),我们将在本文后面的各个伽玛值对分类的影响进行说明。 使用以下代码:
[mw_shl_code=python,true]gamma = tf.constant(-10.0)
dist = tf.reduce_sum(tf.square(x_data), 1)
dist = tf.reshape(dist, [-1,1])
sq_dists = tf.add(tf.sub(dist, tf.mul(2., tf.matmul(x_data, tf.transpose(x_data)))), tf.transpose(dist))
my_kernel = tf.exp(tf.mul(gamma, tf.abs(sq_dists))) [/mw_shl_code]
我们现在计算双优化问题的损失,如下所示:
[mw_shl_code=python,true]model_output = tf.matmul(b, my_kernel)
first_term = tf.reduce_sum(b)
b_vec_cross = tf.matmul(tf.transpose(b), b)
y_target_cross = tf.matmul(y_target, tf.transpose(y_target))
second_term = tf.reduce_sum(tf.mul(my_kernel, tf.mul(b_vec_cross, y_target_cross)))
loss = tf.neg(tf.sub(first_term, second_term)) [/mw_shl_code]
5.为了使用SVM执行预测,我们必须创建预测内核函数。 之后,我们还会声明精确度计算,这只是正确分类的点数的百分比。 使用以下代码:
[mw_shl_code=python,true]rA = tf.reshape(tf.reduce_sum(tf.square(x_data), 1),[-1,1])
rB = tf.reshape(tf.reduce_sum(tf.square(prediction_grid), 1),[- 1,1])
pred_sq_dist = tf.add(tf.sub(rA, tf.mul(2., tf.matmul(x_data, tf.transpose(prediction_grid)))), tf.transpose(rB))
pred_kernel = tf.exp(tf.mul(gamma, tf.abs(pred_sq_dist)))
prediction_output = tf.matmul(tf.mul(tf.transpose(y_target),b), pred_kernel)
prediction = tf.sign(prediction_output-tf.reduce_mean(prediction_ output))
accuracy = tf.reduce_mean(tf.cast(tf.equal(tf.squeeze(prediction), tf.squeeze(y_target)), tf.float32)) [/mw_shl_code]
6.接下来我们声明我们的优化器函数并初始化变量,如下所示:
[mw_shl_code=python,true]my_opt = tf.train.GradientDescentOptimizer(0.01)
train_step = my_opt.minimize(loss)
init = tf.initialize_all_variables()
sess.run(init) [/mw_shl_code]
7.现在我们可以开始训练循环了。 我们运行循环300次迭代并存储损失值和批次精度。 使用以下代码:
[mw_shl_code=python,true]loss_vec = []
batch_accuracy = []
for i in range(300):
rand_index = np.random.choice(len(x_vals), size=batch_size)
rand_x = x_vals[rand_index]
rand_y = np.transpose([y_vals[rand_index]])
sess.run(train_step, feed_dict={x_data: rand_x, y_target: rand_y})
temp_loss = sess.run(loss, feed_dict={x_data: rand_x, y_ target: rand_y})
loss_vec.append(temp_loss)
acc_temp = sess.run(accuracy, feed_dict={x_data: rand_x,y_target: rand_y,prediction_ grid:rand_x})
batch_accuracy.append(acc_temp) [/mw_shl_code]
8.为了绘制决策边界,我们将创建一个x,y点的网格,并评估我们在所有这些点上创建的预测函数,如下所示:
[mw_shl_code=python,true]x_min, x_max = x_vals[:, 0].min() - 1, x_vals[:, 0].max() + 1
y_min, y_max = x_vals[:, 1].min() - 1, x_vals[:, 1].max() + 1
xx, yy = np.meshgrid(np.arange(x_min, x_max, 0.02),
np.arange(y_min, y_max, 0.02))
grid_points = np.c_[xx.ravel(), yy.ravel()]
[grid_predictions] = sess.run(prediction, feed_dict={x_data: rand_x,
y_target: rand_y,
prediction_ grid: grid_points})
grid_predictions = grid_predictions.reshape(xx.shape) [/mw_shl_code]
9.为简洁起见,我们只展示如何用决策边界绘制点。 有关gamma的图和效果,请参阅本配方的下一部分。 使用以下代码:
[mw_shl_code=python,true]plt.contourf(xx, yy, grid_predictions, cmap=plt.cm.Paired, alpha=0.8)
plt.plot(class1_x, class1_y, 'ro', label='I. setosa')
plt.plot(class2_x, class2_y, 'kx', label='Non setosa')
plt.title('Gaussian SVM Results on Iris Data')
plt.xlabel('Pedal Length')
plt.ylabel('Sepal Width')
plt.legend(loc='lower right')
plt.ylim([-0.5, 3.0])
plt.xlim([3.5, 8.5])
plt.show()
[/mw_shl_code]
怎么运行的…
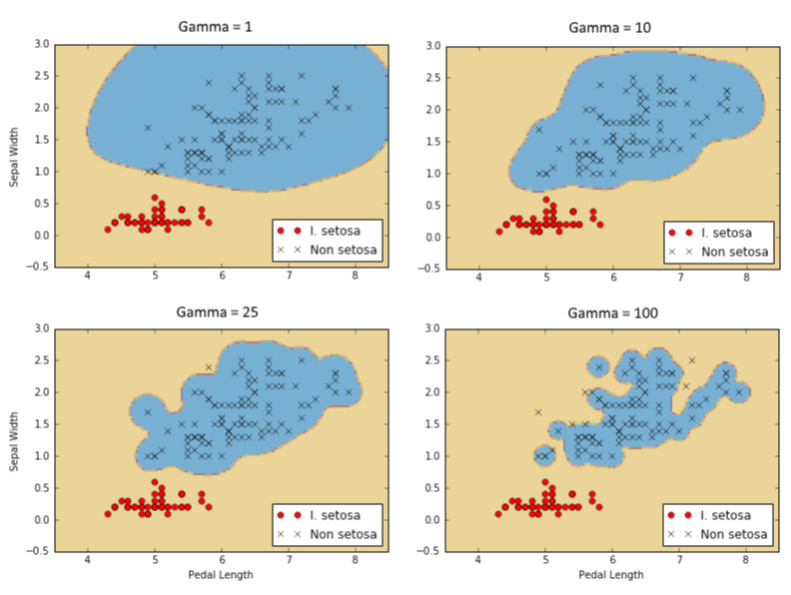
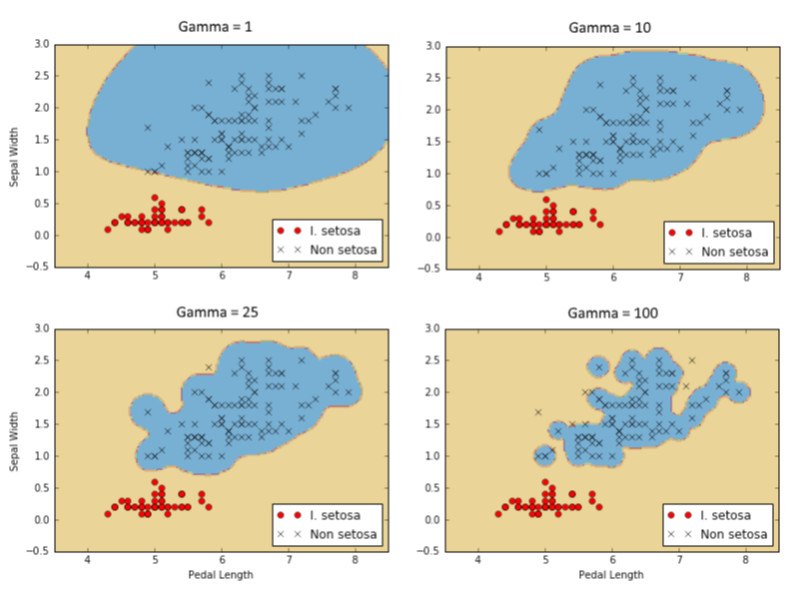
以下是四种不同伽马值(1,10,25,100)的I. setosa结果的分类。 注意伽玛值越高,每个单独点对分类边界的影响越大。

图9:使用具有四个不同伽马值的高斯核SVM的I. setosa的分类结果。
实现多类SVM
我们还可以使用SVM对多个类进行分类,而不仅仅是两个类。在本文中,我们将使用多类SVM对虹膜数据集中的三种类型的花进行分类。
做好准备
通过设计,SVM算法是二元分类器。但是,有一些策略可以让他们在多个类上工作。这两个主要策略分别称为一对一,一对一。
一对一是一种策略,其中为每个可能的类对创建二进制分类器。然后对具有最多投票的类的点进行预测。这可能在计算上很难,因为我们必须创建k!/(k-2)!2! k类的分类器。
实现多类分类器的另一种方法是执行一个与所有策略,我们为每个类创建一个分类器。点的预测类将是创建最大SVM边距的类。这是我们将在本节中实施的策略。
在这里,我们将加载虹膜数据集并使用高斯内核执行多类非线性SVM。虹膜数据集是理想的,因为有三个类(I. setosa,I。virginica和I. versicolor)。我们将为每个类创建三个高斯核SVM,并预测存在最高边距的点。
怎么做…
1.首先,我们加载我们需要的库并启动图表,如下所示:
[mw_shl_code=python,true]import matplotlib.pyplot as plt
import numpy as np
import tensorflow as tf
from sklearn import datasets
sess = tf.Session()
[/mw_shl_code]
2.接下来,我们将加载虹膜数据集并拆分每个类的目标。 我们将仅使用萼片长度和花瓣宽度来说明,因为我们希望能够绘制输出。 我们还将每个类的x和y值分开,以便最后进行绘图。 使用以下代码:
[mw_shl_code=python,true]iris = datasets.load_iris()
x_vals = np.array([[x[0], x[3]] for x in iris.data])
y_vals1 = np.array([1 if y==0 else -1 for y in iris.target])
y_vals2 = np.array([1 if y==1 else -1 for y in iris.target])
y_vals3 = np.array([1 if y==2 else -1 for y in iris.target])
y_vals = np.array([y_vals1, y_vals2, y_vals3])
class1_x = [x[0] for i,x in enumerate(x_vals) if iris. target==0]
class1_y = [x[1] for i,x in enumerate(x_vals) if iris. target==0]
class2_x = [x[0] for i,x in enumerate(x_vals) if iris. target==1]
class2_y = [x[1] for i,x in enumerate(x_vals) if iris. target==1]
class3_x = [x[0] for i,x in enumerate(x_vals) if iris. target==2]
class3_y = [x[1] for i,x in enumerate(x_vals) if iris. target==2][/mw_shl_code]
3.与实施非线性SVM配方相比,本例中我们所做的最大改变是许多维度都会改变(我们现在有三个分类而不是一个)。 我们还将利用矩阵广播和重塑技术一次计算所有三个SVM。 由于我们同时执行此操作,因此我们的y_target占位符现在具有维度[3,无],并且我们的模型变量b将初始化为size [3,batch_size]。 使用以下代码:
[mw_shl_code=python,true]batch_size = 50
x_data = tf.placeholder(shape=[None, 2], dtype=tf.float32)
y_target = tf.placeholder(shape=[3, None], dtype=tf.float32)
prediction_grid = tf.placeholder(shape=[None, 2], dtype=tf. float32)
b = tf.Variable(tf.random_normal(shape=[3,batch_size])) [/mw_shl_code]
4.接下来我们计算高斯核。 由于这仅取决于x数据,因此该代码不会改变先前的配方。 使用以下代码:
[mw_shl_code=python,true]gamma = tf.constant(-10.0)
dist = tf.reduce_sum(tf.square(x_data), 1)
dist = tf.reshape(dist, [-1,1])
sq_dists = tf.add(tf.sub(dist, tf.mul(2., tf.matmul(x_data, tf.transpose(x_data)))), tf.transpose(dist))
my_kernel = tf.exp(tf.mul(gamma, tf.abs(sq_dists))) [/mw_shl_code]
5.一个很大的变化是我们将进行批量矩阵乘法。 我们最终会得到三维矩阵,我们希望在第三个索引上广播矩阵乘法。 我们没有为此设置数据和目标矩阵。 为了使诸如跨越额外维度的操作,我们创建一个函数来扩展这样的矩阵,将矩阵重新整形为转置,然后在额外维度上调用TensorFlow的batch_matmul。 使用以下代码:
[mw_shl_code=python,true]def reshape_matmul(mat):
v1 = tf.expand_dims(mat, 1)
v2 = tf.reshape(v1, [3, batch_size, 1])
return(tf.batch_matmul(v2, v1)) [/mw_shl_code]
6.创建此功能后,我们现在可以计算双重损失功能,如下所示:
[mw_shl_code=python,true]model_output = tf.matmul(b, my_kernel)
first_term = tf.reduce_sum(b)
b_vec_cross = tf.matmul(tf.transpose(b), b)
y_target_cross = reshape_matmul(y_target)
second_term = tf.reduce_sum(tf.mul(my_kernel, tf.mul(b_vec_cross, y_target_cross)),[1,2])
loss = tf.reduce_sum(tf.neg(tf.sub(first_term, second_term)))[/mw_shl_code]
7.现在我们可以创建预测内核。 请注意,我们必须小心使用reduce_sum函数,而不是减少所有三个SVM预测,因此我们必须告诉TensorFlow不要用第二个索引参数对所有内容求和。 使用以下代码:
[mw_shl_code=python,true]rA = tf.reshape(tf.reduce_sum(tf.square(x_data), 1),[-1,1])
rB = tf.reshape(tf.reduce_sum(tf.square(prediction_grid), 1),[- 1,1])
pred_sq_dist = tf.add(tf.sub(rA, tf.mul(2., tf.matmul(x_data, tf.transpose(prediction_grid)))), tf.transpose(rB))
pred_kernel = tf.exp(tf.mul(gamma, tf.abs(pred_sq_dist))) [/mw_shl_code]
8.当我们完成预测内核时,我们可以创建预测。 这里的一个重大变化是预测不是输出的符号()。 由于我们正在实施一对一策略,因此预测是具有最大输出的分类器。 为此,我们使用TensorFlow内置的argmax()函数,如下所示:
[mw_shl_code=python,true]prediction_output = tf.matmul(tf.mul(y_target,b), pred_kernel)
prediction = tf.arg_max(prediction_output-tf.expand_dims(tf. reduce_mean(prediction_output,1), 1), 0)
accuracy = tf.reduce_mean(tf.cast(tf.equal(prediction, tf.argmax(y_target,0)), tf.float32)) [/mw_shl_code]
9.现在我们已经设置了内核,丢失和预测功能,我们只需要声明我们的优化器函数并初始化我们的变量,如下所示:
[mw_shl_code=python,true]my_opt = tf.train.GradientDescentOptimizer(0.01)
train_step = my_opt.minimize(loss)
init = tf.initialize_all_variables()
sess.run(init) [/mw_shl_code]
10.这种算法收敛速度相对较快,因此我们不会超过100次迭代运行训练循环。 我们使用以下代码执行此操作:
[mw_shl_code=python,true]loss_vec = []
batch_accuracy = []
for i in range(100):
rand_index = np.random.choice(len(x_vals), size=batch_size)
rand_x = x_vals[rand_index]
rand_y = y_vals[:,rand_index]
sess.run(train_step, feed_dict={x_data: rand_x, y_target: rand_y})
temp_loss = sess.run(loss, feed_dict={x_data: rand_x, y_ target: rand_y})
loss_vec.append(temp_loss)
acc_temp = sess.run(accuracy, feed_dict={x_data: rand_x, y_ target: rand_y, prediction_grid:rand_x})
batch_accuracy.append(acc_temp)
if (i+1)%25==0:
print('Step #' + str(i+1))
print('Loss = ' + str(temp_loss))
Step #25
Loss = -2.8951
Step #50
Loss = -27.9612
Step #75
Loss = -26.896
Step #100
Loss = -30.2325[/mw_shl_code]
11.我们现在可以创建点的预测网格并对所有点运行预测函数,如下所示:
[mw_shl_code=python,true]x_min, x_max = x_vals[:, 0].min() - 1, x_vals[:, 0].max() + 1
y_min, y_max = x_vals[:, 1].min() - 1, x_vals[:, 1].max() + 1
xx, yy = np.meshgrid(np.arange(x_min, x_max, 0.02),
np.arange(y_min, y_max, 0.02))
grid_points = np.c_[xx.ravel(), yy.ravel()]
grid_predictions = sess.run(prediction, feed_dict={x_data: rand_x,y_target: rand_y,prediction_ grid: grid_points})
grid_predictions = grid_predictions.reshape(xx.shape) [/mw_shl_code]
12.以下是绘制结果,批次准确度和损失函数的代码。 为简洁起见,我们只显示最终结果:
[mw_shl_code=python,true]plt.contourf(xx, yy, grid_predictions, cmap=plt.cm.Paired, alpha=0.8)
plt.plot(class1_x, class1_y, 'ro', label='I. setosa')
plt.plot(class2_x, class2_y, 'kx', label='I. versicolor')
plt.plot(class3_x, class3_y, 'gv', label='I. virginica')
plt.title('Gaussian SVM Results on Iris Data')
plt.xlabel('Pedal Length')
plt.ylabel('Sepal Width')
plt.legend(loc='lower right')
plt.ylim([-0.5, 3.0])
plt.xlim([3.5, 8.5])
plt.show()
plt.plot(batch_accuracy, 'k-', label='Accuracy')
plt.title('Batch Accuracy')
plt.xlabel('Generation')
plt.ylabel('Accuracy')
plt.legend(loc='lower right')
plt.show()
plt.plot(loss_vec, 'k-')
plt.title('Loss per Generation')
plt.xlabel('Generation')
plt.ylabel('Loss')
plt.show()[/mw_shl_code]

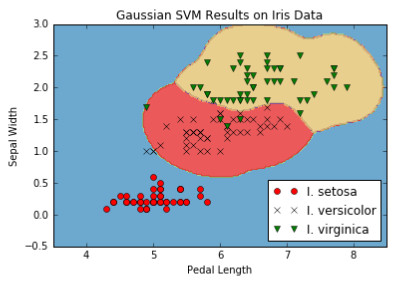
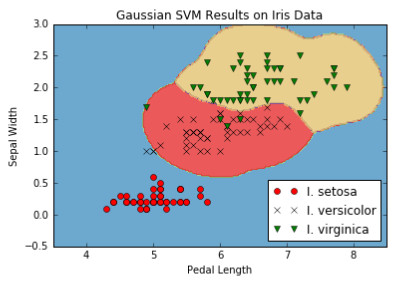
图10:在γ= 10的虹膜数据集上的多类(三类)非线性高斯SVM结果。
怎么运行的…
在这个方法中要注意的重点是我们如何改变算法以同时优化三个SVM模型。 我们的模型参数b具有额外的维度以考虑所有三个模型。 在这里我们可以看到,由于TensorFlow的内置功能可以处理额外的维度,因此算法扩展到多个类似的算法相对容易。
原文:
Implementing a Non-Linear SVM
For this recipe, we will apply a non-linear kernel to split a dataset.
Getting ready
In this section, we will implement the preceding Gaussian kernel SVM on real data. We will load the iris data set and create a classifier for I. setosa (versus non-setosa). We will see the effect of various gamma values on the classification.
How to do it…
1.We first load the necessary libraries, which includes the scikit learn datasets so that we can load the iris data. Then we will start a graph session. Use the following code:
import matplotlib.pyplot as plt
import numpy as np
import tensorflow as tf
from sklearn import datasets
sess = tf.Session()
2.Next we will load the iris data, extract the sepal length and petal width, and separated the x and y values for each class (for plotting purposes later) , as follows:
iris = datasets.load_iris()
x_vals = np.array([[x[0], x[3]] for x in iris.data])
y_vals = np.array([1 if y==0 else -1 for y in iris.target])
class1_x = [x[0] for i,x in enumerate(x_vals) if y_vals==1]
class1_y = [x[1] for i,x in enumerate(x_vals) if y_vals==1]
class2_x = [x[0] for i,x in enumerate(x_vals) if y_vals==-1]
class2_y = [x[1] for i,x in enumerate(x_vals) if y_vals==-1]
3.Now we declare our batch size (larger batches are preferred), placeholders, and the model variable, b, as follows:
batch_size = 100
x_data = tf.placeholder(shape=[None, 2], dtype=tf.float32)
y_target = tf.placeholder(shape=[None, 1], dtype=tf.float32)
prediction_grid = tf.placeholder(shape=[None, 2], dtype=tf. float32)
b = tf.Variable(tf.random_normal(shape=[1,batch_size]))
4.Next we declare our Gaussian kernel. This kernel is dependent on the gamma value, and we will illustrate the effects of various gamma values on the classification later in this recipe. Use the following code:
gamma = tf.constant(-10.0)
dist = tf.reduce_sum(tf.square(x_data), 1)
dist = tf.reshape(dist, [-1,1])
sq_dists = tf.add(tf.sub(dist, tf.mul(2., tf.matmul(x_data, tf.transpose(x_data)))), tf.transpose(dist))
my_kernel = tf.exp(tf.mul(gamma, tf.abs(sq_dists)))
We now compute the loss for the dual optimization problem, as follows:
model_output = tf.matmul(b, my_kernel)
first_term = tf.reduce_sum(b)
b_vec_cross = tf.matmul(tf.transpose(b), b)
y_target_cross = tf.matmul(y_target, tf.transpose(y_target))
second_term = tf.reduce_sum(tf.mul(my_kernel, tf.mul(b_vec_cross, y_target_cross)))
loss = tf.neg(tf.sub(first_term, second_term))
5.In order to perform predictions using an SVM, we must create a prediction kernel function. After that we also declare an accuracy calculation, which will just be a percentage of points correctly classified. Use the following code:
rA = tf.reshape(tf.reduce_sum(tf.square(x_data), 1),[-1,1])
rB = tf.reshape(tf.reduce_sum(tf.square(prediction_grid), 1),[- 1,1])
pred_sq_dist = tf.add(tf.sub(rA, tf.mul(2., tf.matmul(x_data, tf.transpose(prediction_grid)))), tf.transpose(rB))
pred_kernel = tf.exp(tf.mul(gamma, tf.abs(pred_sq_dist)))
prediction_output = tf.matmul(tf.mul(tf.transpose(y_target),b), pred_kernel)
prediction = tf.sign(prediction_output-tf.reduce_mean(prediction_ output))
accuracy = tf.reduce_mean(tf.cast(tf.equal(tf.squeeze(prediction), tf.squeeze(y_target)), tf.float32))
6.Next we declare our optimizer function and initialize the variables, as follows:
my_opt = tf.train.GradientDescentOptimizer(0.01)
train_step = my_opt.minimize(loss)
init = tf.initialize_all_variables()
sess.run(init)
7.Now we can start the training loop. We run the loop for 300 iterations and will store the loss value and the batch accuracy. Use the following code:
loss_vec = []
batch_accuracy = []
for i in range(300):
rand_index = np.random.choice(len(x_vals), size=batch_size)
rand_x = x_vals[rand_index]
rand_y = np.transpose([y_vals[rand_index]])
sess.run(train_step, feed_dict={x_data: rand_x, y_target: rand_y})
temp_loss = sess.run(loss, feed_dict={x_data: rand_x, y_ target: rand_y})
loss_vec.append(temp_loss)
acc_temp = sess.run(accuracy, feed_dict={x_data: rand_x, y_target: rand_y, prediction_ grid:rand_x})
batch_accuracy.append(acc_temp)
8.In order to plot the decision boundary, we will create a mesh of x, y points and evaluate the prediction function we created on all of these points, as follows:
x_min, x_max = x_vals[:, 0].min() - 1, x_vals[:, 0].max() + 1
y_min, y_max = x_vals[:, 1].min() - 1, x_vals[:, 1].max() + 1
xx, yy = np.meshgrid(np.arange(x_min, x_max, 0.02),
np.arange(y_min, y_max, 0.02))
grid_points = np.c_[xx.ravel(), yy.ravel()]
[grid_predictions] = sess.run(prediction, feed_dict={x_data: rand_x,
y_target: rand_y,
prediction_ grid: grid_points})
grid_predictions = grid_predictions.reshape(xx.shape)
9.For succinctness, we will only show how to plot the points with the decision boundaries. For the plot and effect of gamma, see the next section in this recipe. Use the following code:
plt.contourf(xx, yy, grid_predictions, cmap=plt.cm.Paired, alpha=0.8)
plt.plot(class1_x, class1_y, 'ro', label='I. setosa')
plt.plot(class2_x, class2_y, 'kx', label='Non setosa')
plt.title('Gaussian SVM Results on Iris Data')
plt.xlabel('Pedal Length')
plt.ylabel('Sepal Width')
plt.legend(loc='lower right')
plt.ylim([-0.5, 3.0])
plt.xlim([3.5, 8.5])
plt.show()
How it works…
Here is the classification of I. setosa results for four different gamma values (1, 10, 25, 100). Notice how the higher the gamma value, the more of an effect each individual point has on the classification boundary.

Implementing a Multi-Class SVM
We can also use SVMs to categorize multiple classes instead of just two. In this recipe, we will use a multi-class SVM to categorize the three types of flowers in the iris dataset.
Getting ready
By design, SVM algorithms are binary classifiers. However, there are a few strategies employed to get them to work on multiple classes. The two main strategies are called one versus all, and one versus one.
One versus one is a strategy where a binary classifier is created for each possible pair of classes. Then a prediction is made for a point for the class that has the most votes. This can be computationally hard as we must create k!/(k-2)!2! classifiers for k classes.
Another way to implement multi-class classifiers is to do a one versus all strategy where we create a classifier for each of the classes. The predicted class of a point will be the class that creates the largest SVM margin. This is the strategy we will implement in this section.
Here, we will load the iris dataset and perform multiclass nonlinear SVM with a Gaussian kernel. The iris dataset is ideal because there are three classes (I. setosa, I. virginica, and I. versicolor). We will create three Gaussian kernel SVMs for each class and make the prediction of points where the highest margin exists.
How to do it…
1.First we load the libraries we need and start a graph, as follows:
import matplotlib.pyplot as plt
import numpy as np
import tensorflow as tf
from sklearn import datasets
sess = tf.Session()
2.Next, we will load the iris dataset and split apart the targets for each class. We will only be using the sepal length and petal width to illustrate because we want to be able to plot the outputs. We also separate the x and y values for each class for plotting purposes at the end. Use the following code:
iris = datasets.load_iris()
x_vals = np.array([[x[0], x[3]] for x in iris.data])
y_vals1 = np.array([1 if y==0 else -1 for y in iris.target])
y_vals2 = np.array([1 if y==1 else -1 for y in iris.target])
y_vals3 = np.array([1 if y==2 else -1 for y in iris.target])
y_vals = np.array([y_vals1, y_vals2, y_vals3])
class1_x = [x[0] for i,x in enumerate(x_vals) if iris. target==0]
class1_y = [x[1] for i,x in enumerate(x_vals) if iris. target==0]
class2_x = [x[0] for i,x in enumerate(x_vals) if iris. target==1]
class2_y = [x[1] for i,x in enumerate(x_vals) if iris. target==1]
class3_x = [x[0] for i,x in enumerate(x_vals) if iris. target==2]
class3_y = [x[1] for i,x in enumerate(x_vals) if iris. target==2]
3.The biggest change we have in this example, as compared to the Implementing a Non-Linear SVM recipe, is that a lot of the dimensions will change (we have three classifiers now instead of one). We will also make use of matrix broadcasting and reshaping techniques to calculate all three SVMs at once. Since we are doing this all at once, our y_target placeholder now has the dimensions [3, None] and our model variable, b, will be initialized to be size [3, batch_size]. Use the following code:
batch_size = 50
x_data = tf.placeholder(shape=[None, 2], dtype=tf.float32)
y_target = tf.placeholder(shape=[3, None], dtype=tf.float32)
prediction_grid = tf.placeholder(shape=[None, 2], dtype=tf. float32)
b = tf.Variable(tf.random_normal(shape=[3,batch_size]))
4.Next we calculate the Gaussian kernel. Since this is only dependent on the x data, this code doesn't change from the prior recipe. Use the following code:
gamma = tf.constant(-10.0)
dist = tf.reduce_sum(tf.square(x_data), 1)
dist = tf.reshape(dist, [-1,1])
sq_dists = tf.add(tf.sub(dist, tf.mul(2., tf.matmul(x_data, tf.transpose(x_data)))), tf.transpose(dist))
my_kernel = tf.exp(tf.mul(gamma, tf.abs(sq_dists)))
5.One big change is that we will do batch matrix multiplication. We will end up with three-dimensional matrices and we will want to broadcast matrix multiplication across the third index. Our data and target matrices are not set up for this. In order for an operation such as to work across an extra dimension, we create a function to expand such matrices, reshape the matrix into a transpose, and then call TensorFlow's batch_matmul across the extra dimension. Use the following code:
def reshape_matmul(mat):
v1 = tf.expand_dims(mat, 1)
v2 = tf.reshape(v1, [3, batch_size, 1])
return(tf.batch_matmul(v2, v1))
6.With this function created, we can now compute the dual loss function, as follows:
model_output = tf.matmul(b, my_kernel)
first_term = tf.reduce_sum(b)
b_vec_cross = tf.matmul(tf.transpose(b), b)
y_target_cross = reshape_matmul(y_target)
second_term = tf.reduce_sum(tf.mul(my_kernel, tf.mul(b_vec_cross, y_target_cross)),[1,2])
loss = tf.reduce_sum(tf.neg(tf.sub(first_term, second_term)))
7.Now we can create the prediction kernel. Notice that we have to be careful with the reduce_sum function and not reduce across all three SVM predictions, so we have to tell TensorFlow not to sum everything up with a second index argument. Use the following code:
rA = tf.reshape(tf.reduce_sum(tf.square(x_data), 1),[-1,1])
rB = tf.reshape(tf.reduce_sum(tf.square(prediction_grid), 1),[- 1,1])
pred_sq_dist = tf.add(tf.sub(rA, tf.mul(2., tf.matmul(x_data, tf.transpose(prediction_grid)))), tf.transpose(rB))
pred_kernel = tf.exp(tf.mul(gamma, tf.abs(pred_sq_dist)))
8.When we are done with the prediction kernel, we can create predictions. A big change here is that the predictions are not the sign() of the output. Since we are implementing a one versus all strategy, the prediction is the classifier that has the largest output. To accomplish this, we use TensorFlow's built in argmax() function, as follows:
prediction_output = tf.matmul(tf.mul(y_target,b), pred_kernel)
prediction = tf.arg_max(prediction_output-tf.expand_dims(tf. reduce_mean(prediction_output,1), 1), 0)
accuracy = tf.reduce_mean(tf.cast(tf.equal(prediction, tf.argmax(y_target,0)), tf.float32))
9.Now that we have the kernel, loss, and prediction capabilities set up, we just have to declare our optimizer function and initialize our variables, as follows:
my_opt = tf.train.GradientDescentOptimizer(0.01)
train_step = my_opt.minimize(loss)
init = tf.initialize_all_variables()
sess.run(init)
10.This algorithm converges relatively quickly, so we won't have run the training loop for more than 100 iterations. We do so with the following code:
loss_vec = []
batch_accuracy = []
for i in range(100):
rand_index = np.random.choice(len(x_vals), size=batch_size)
rand_x = x_vals[rand_index]
rand_y = y_vals[:,rand_index]
sess.run(train_step, feed_dict={x_data: rand_x, y_target: rand_y})
temp_loss = sess.run(loss, feed_dict={x_data: rand_x, y_ target: rand_y})
loss_vec.append(temp_loss)
acc_temp = sess.run(accuracy, feed_dict={x_data: rand_x, y_ target: rand_y, prediction_grid:rand_x})
batch_accuracy.append(acc_temp)
if (i+1)%25==0:
print('Step #' + str(i+1))
print('Loss = ' + str(temp_loss))
Step #25
Loss = -2.8951
Step #50
Loss = -27.9612
Step #75
Loss = -26.896
Step #100
Loss = -30.2325
11.We can now create the prediction grid of points and run the prediction function on all of them, as follows:
x_min, x_max = x_vals[:, 0].min() - 1, x_vals[:, 0].max() + 1
y_min, y_max = x_vals[:, 1].min() - 1, x_vals[:, 1].max() + 1
xx, yy = np.meshgrid(np.arange(x_min, x_max, 0.02),
np.arange(y_min, y_max, 0.02))
grid_points = np.c_[xx.ravel(), yy.ravel()]
grid_predictions = sess.run(prediction, feed_dict={x_data: rand_x,
y_target: rand_y,
prediction_ grid: grid_points})
grid_predictions = grid_predictions.reshape(xx.shape)
12.The following is code to plot the results, batch accuracy, and loss function. For succinctness we will only display the end result:
plt.contourf(xx, yy, grid_predictions, cmap=plt.cm.Paired, alpha=0.8)
plt.plot(class1_x, class1_y, 'ro', label='I. setosa')
plt.plot(class2_x, class2_y, 'kx', label='I. versicolor')
plt.plot(class3_x, class3_y, 'gv', label='I. virginica')
plt.title('Gaussian SVM Results on Iris Data')
plt.xlabel('Pedal Length')
plt.ylabel('Sepal Width')
plt.legend(loc='lower right')
plt.ylim([-0.5, 3.0])
plt.xlim([3.5, 8.5])
plt.show()
plt.plot(batch_accuracy, 'k-', label='Accuracy')
plt.title('Batch Accuracy')
plt.xlabel('Generation')
plt.ylabel('Accuracy')
plt.legend(loc='lower right')
plt.show()
plt.plot(loss_vec, 'k-')
plt.title('Loss per Generation')
plt.xlabel('Generation')
plt.ylabel('Loss')
plt.show()

Figure 10: Multi-class (three classes) nonlinear Gaussian SVM results on the iris dataset with gamma = 10.
How it works…
The important point to notice in this recipe is how we changed our algorithm to optimize over three SVM models at once. Our model parameter, b, has an extra dimension to take into account all three models. Here we can see that the extension of an algorithm to multiple similar algorithms was made relatively easy owing to TensorFlow's built-in capabilities to deal with extra dimensions.
|
 /2
/2 