问题导读:
1、如何理解递归神经网络(RNN)?
2、如何使用RNN进行垃圾邮件预测?
3、如何创建优化函数并初始化模型变量?
4、如何遍历我们的数据并训练模型?

上一篇:TensorFlow ML cookbook 第八章5节 实现DeepDream
递归神经网络
在本章中,我们将介绍递归神经网络(RNN)以及如何在TensorFlow中实现它们。 我们将首先演示如何使用RNN来预测垃圾邮件,然后将介绍一种用于创建莎士比亚文本的RNN的变体,最后将创建一个RNN序列到序列模型以将英语翻译成德语:
- 实施RNN以进行垃圾邮件预测
- 实施LSTM模型
- 堆叠多个LSTM层
- 创建序列到序列模型
- 训练连体相似度
请注意,本章的所有代码都可以在https://github.com/nfmcclure/tensorflow_cookbook上在线找到。
介绍
到目前为止,在我们考虑过的所有机器学习算法中,没有一个将数据视为序列。为了考虑序列数据,我们扩展了存储先前迭代输出的神经网络。 这种神经网络称为递归神经网络(RNN),请考虑完全连接的网络公式:

在这里,权重由A乘以输入层x给出,然后通过激活函数运行
 ,该函数给出输出层y。如果我们有一系列输入数据,
 ,我们可以使完全连接的层适应 考虑先前的输入,如下所示:

在此循环迭代的基础上,获得下一个输入,我们希望获得概率分布输出,如下所示:

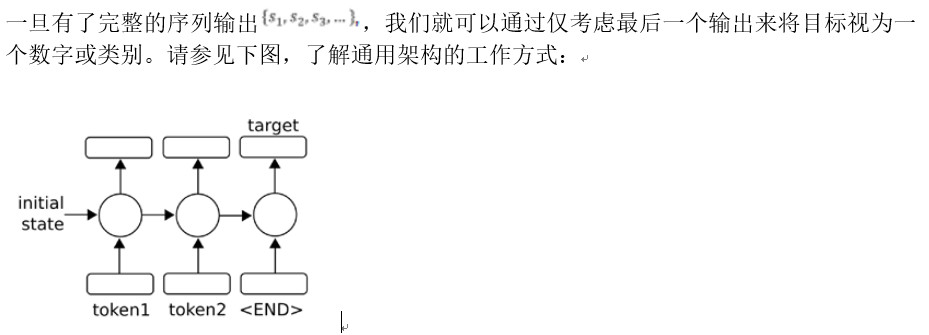
图1:要预测单个数字或类别,我们采用一系列输入(令牌)并将最终输出视为预测输出。
我们还可以将序列本身视为输出,作为序列到序列模型:

图2:为了预测序列,我们还可以将输出反馈到模型中以生成多个输出。
随时间变化的梯度。因此,存在消失或爆炸的梯度问题。 在本章的后面,我们将通过将RNN单元扩展为长短期记忆(LSTM)单元来探索解决此问题的方法。主要思想是LSTM单元引入了另一种操作,称为gates,它控制着门 通过序列的信息流。 我们将在后面的章节中详细介绍。
在处理用于NLP的RNN模型时,编码是一个术语,用于描述将数据(NLP中的单词或字符)转换为数字RNN特征的过程。 术语解码是将RNN数值特征转换为输出单词或字符的过程。
实施RNN进行垃圾邮件预测
要启动,我们将应用标准RNN单元预测奇异数字输出。
做好准备
在这个配方,我们将在TensorFlow实现标准RNN预测短信是否是垃圾邮件或火腿。我们将使用垃圾短信收集数据集从UCI.The架构,我们将使用预测将会从嵌入式文字输入RNN序列的ML库中,并且我们将采取最后RNN输出为垃圾邮件或火腿的预测( 1或0)。
怎么做…
1.我们首先加载此脚本所需的库:
[mw_shl_code=python,true]import os
import re
import io
import requests
import numpy as np
import matplotlib.pyplot as plt
import tensorflow as tf
from zipfile import ZipFile[/mw_shl_code]
2.接下来,我们开始一个图形会话并设置RNN模型参数。 我们将以20个时期运行数据,批量大小为250。我们将考虑的每个文本的最大长度为25个字; 我们会将较长的文本剪切为25或将零填充的较短文本剪切为零。 RNN的大小为10个单位,我们只会考虑词汇中出现至少10次的单词,每个单词都将嵌入大小为50的可训练向量中,辍学率将是一个占位符,我们可以将其设置为 训练期间0.5或评估期间1.0:
[mw_shl_code=python,true]sess = tf.Session()
epochs = 20
batch_size = 250
max_sequence_length = 25
rnn_size = 10
embedding_size = 50
min_word_frequency = 10
learning_rate = 0.0005
dropout_keep_prob = tf.placeholder(tf.float32) [/mw_shl_code]
3,现在我们得到了短信文本数据,首先检查一下是否已经下载了,如果已经下载了,则读取文件;否则,我们下载数据并保存:
[mw_shl_code=python,true]data_dir = 'temp'
data_file = 'text_data.txt'
if not os.path.exists(data_dir):
os.makedirs(data_dir)
if not os.path.isfile(os.path.join(data_dir, data_file)):
zip_url = 'http://archive.ics.uci.edu/ml/machine-learning-databases/00228/smsspamcollection.zip'
r = requests.get(zip_url)
z = ZipFile(io.BytesIO(r.content))
file = z.read('SMSSpamCollection')
# Format Data
text_data = file.decode()
text_data = text_data.encode('ascii',errors='ignore')
text_data = text_data.decode().split('\n')
# Save data to text file
with open(os.path.join(data_dir, data_file), 'w') as file_ conn:
for text in text_data:
file_conn.write("{}\n".format(text))
else:
# Open data from text file
text_data = []
with open(os.path.join(data_dir, data_file), 'r') as file_ conn:
for row in file_conn:
text_data.append(row)
text_data = text_data[:-1]
text_data = [x.split('\t') for x in text_data if len(x)>=1]
[text_data_target, text_data_train] = [list(x) for x in zip(*text_ data)] [/mw_shl_code]
4,为了减少词汇量,我们将通过删除特殊字符,多余的空格并将所有内容都小写的方式来清理输入文本:
[mw_shl_code=python,true]def clean_text(text_string):
text_string = re.sub(r'([^\s\w]|_|[0-9])+', '', text_string)
text_string = " ".join(text_string.split())
text_string = text_string.lower()
return(text_string)
# Clean texts
text_data_train = [clean_text(x) for x in text_data_train] [/mw_shl_code]
对于此配方,我们将不进行任何超参数调整。 如果读者朝这个方向前进,请记住在继续之前将数据集分成训练有效测试集。 一个很好的选择是Scikit学习功能model_selection.train_test_split()。
5,接下来我们声明损失函数,请记住使用TensorFlow的sparse_softmax函数,目标必须是整数索引(类型为int),logit必须是浮点数:
[mw_shl_code=python,true]losses = tf.nn.sparse_softmax_cross_entropy_with_logits(logits_ out, y_output)
loss = tf.reduce_mean(losses) [/mw_shl_code]
6,我们还需要一个精度函数,以便我们可以比较测试集和训练集上的算法:
[mw_shl_code=python,true]accuracy = tf.reduce_mean(tf.cast(tf.equal(tf.argmax(logits_out, 1), tf.cast(y_output, tf.int64)), tf.float32)) [/mw_shl_code]
7,接下来我们创建优化函数并初始化模型变量:
[mw_shl_code=python,true]optimizer = tf.train.RMSPropOptimizer(learning_rate)
train_step = optimizer.minimize(loss)
init = tf.initialize_all_variables()
sess.run(init) [/mw_shl_code]
8,现在我们可以开始遍历我们的数据并训练模型了,当多次遍历数据时,最好的做法是在每个时间点都对数据进行混洗以防止过度训练:
[mw_shl_code=python,true]train_loss = []
test_loss = []
train_accuracy = []
test_accuracy = []
# Start training
for epoch in range(epochs):
# Shuffle training data
shuffled_ix = np.random.permutation(np.arange(len(x_train)))
x_train = x_train[shuffled_ix]
y_train = y_train[shuffled_ix]
num_batches = int(len(x_train)/batch_size) + 1
for i in range(num_batches):
# Select train data
min_ix = i * batch_size
max_ix = np.min([len(x_train), ((i+1) * batch_size)])
x_train_batch = x_train[min_ix:max_ix]
y_train_batch = y_train[min_ix:max_ix]
# Run train step
train_dict = {x_data: x_train_batch, y_output: y_train_ batch, dropout_keep_prob:0.5}
sess.run(train_step, feed_dict=train_dict)
# Run loss and accuracy for training
temp_train_loss, temp_train_acc = sess.run([loss, accuracy], feed_dict=train_dict)
train_loss.append(temp_train_loss)
train_accuracy.append(temp_train_acc)
# Run Eval Step
test_dict = {x_data: x_test, y_output: y_test, dropout_keep_ prob:1.0}
temp_test_loss, temp_test_acc = sess.run([loss, accuracy], feed_dict=test_dict)
test_loss.append(temp_test_loss)
test_accuracy.append(temp_test_acc)
print('Epoch: {}, Test Loss: {:.2}, Test Acc: {:.2}'. format(epoch+1, temp_test_loss, temp_test_acc)) [/mw_shl_code]
9.这将产生以下输出:[mw_shl_code=python,true]Vocabulary Size: 933
80-20 Train Test split: 4459 -- 1115
Epoch: 1, Test Loss: 0.59, Test Acc: 0.83
Epoch: 2, Test Loss: 0.58, Test Acc: 0.83
Epoch: 19, Test Loss: 0.46, Test Acc: 0.86
Epoch: 20, Test Loss: 0.46, Test Acc: 0.86
[/mw_shl_code]
10.以下是绘制火车/测试损失和准确性的代码:
[mw_shl_code=python,true]epoch_seq = np.arange(1, epochs+1)
plt.plot(epoch_seq, train_loss, 'k--', label='Train Set')
plt.plot(epoch_seq, test_loss, 'r-', label='Test Set')
plt.title('Softmax Loss')
plt.xlabel('Epochs')
plt.ylabel('Softmax Loss')
plt.legend(loc='upper left')
plt.show()
# Plot accuracy over time
plt.plot(epoch_seq, train_accuracy, 'k--', label='Train Set')
plt.plot(epoch_seq, test_accuracy, 'r-', label='Test Set')
plt.title('Test Accuracy')
plt.xlabel('Epochs')
plt.ylabel('Accuracy')
plt.legend(loc='upper left')
plt.show()[/mw_shl_code]
这个怎么运作…
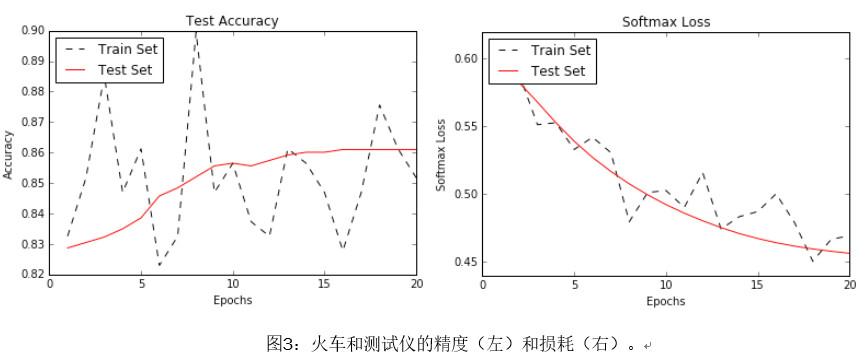
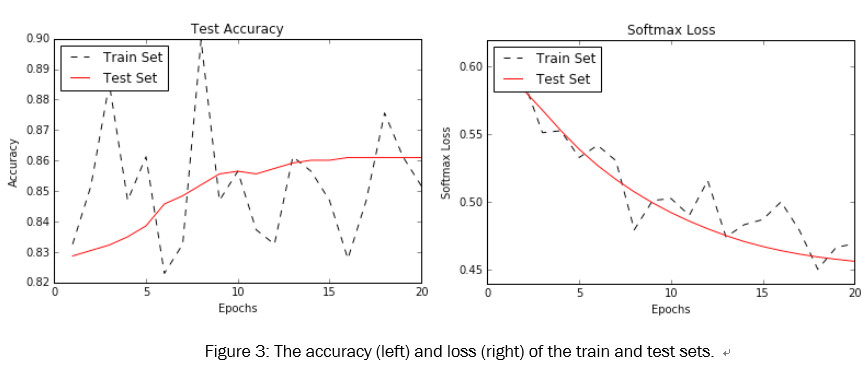
在此配方中,我们创建了一个RNN类别模型来预测SMS文本是垃圾邮件还是火腿。 我们在测试集上达到了约86%的准确性,以下是测试集和训练集上的准确性和损失图:
还有更多…
强烈建议对训练数据进行多次遍历以获取顺序数据(也建议将其用于非顺序数据),每次通过数据都被称为一个纪元,并且非常常见,强烈建议随机播放 每个时期之前的数据。
最新经典文章,欢迎关注公众号
原文:
Recurrent Neural Networks
In this chapter, we will cover recurrent neural networks (RNNs) and how to implement them in TensorFlow. We will start by demonstrating how to use an RNN to predict spam.We will then introduce a variant of RNNs for creating Shakespeare text.We will finish by creating an RNN sequence-to-sequence model to translate from English to German:
- Implementing RNNs for Spam Prediction
- Implementing an LSTM Model
- Stacking multiple LSTM Layers
- Creating Sequence-to-Sequence Models
- Training a Siamese Similarity Measure
As a note, all the code to this chapter can be found online at https://github.com/ nfmcclure/tensorflow_cookbook.
Introduction
Of all the machine-learning algorithms we have considered thus far, none have considered data as a sequence.To take sequence data into account, we extend neural networks that store outputs from prior iterations. This type of neural network is called a recurrent neural network (RNN).Consider the fully connected network formulation:
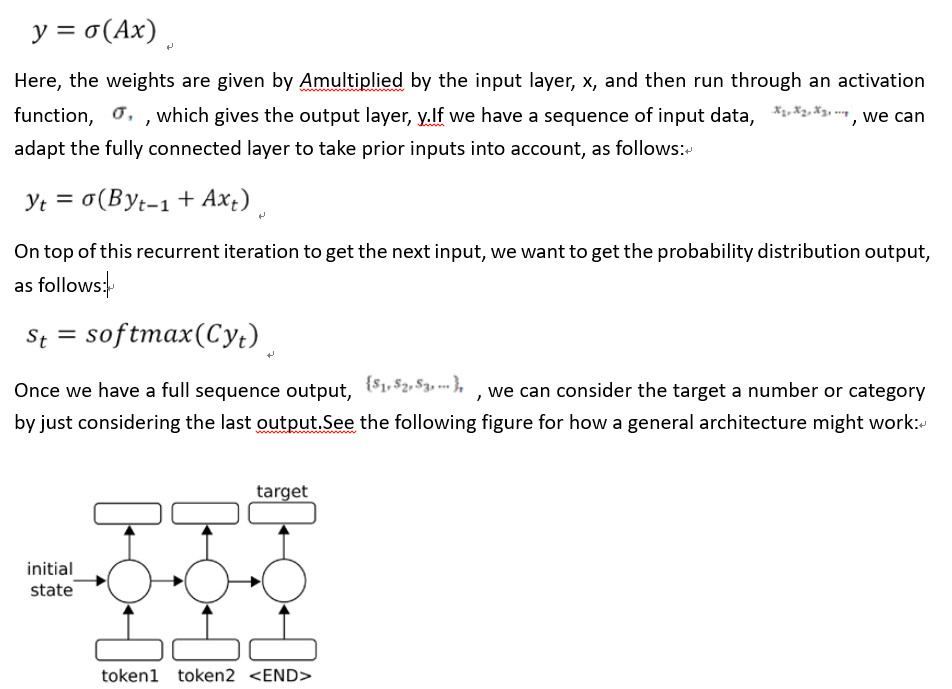
Figure 1: To predict a single number, or a category, we take a sequence of inputs (tokens) and consider the final output as the predicted output.
We can also consider the sequence itself as an output, as a sequence-to-sequence model:
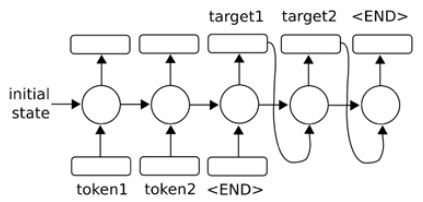
Figure 2: To predict a sequence, we may also feed the outputs back into the model to generate multiple outputs.
time-dependent gradients.Because of this, there exists a vanishing or exploding gradient problem. Later in this chapter, we will explore a solution to this problem by expanding the RNN cell into what is called a Long Short Term Memory(LSTM) cell.The main idea is that the LSTM cell introduces another operation, called gates, which controls the flow of information through the sequence. We will go over the details in a later chapters.
When dealing with RNN models for NLP, encoding is a term used to describe the process of converting data (words or characters in NLP) into numerical RNN features. The term decoding is the process of converting the RNN numerical features into output words or characters.
Implementing RNN for Spam Prediction
To start we will apply the standard RNN unit to predict a singular numerical output.
Getting ready
In this recipe, we will implement a standard RNN in TensorFlow to predict whether or not a text message is spam or ham. We will use the SMS spam-collection dataset from the ML repository at UCI.The architecture we will use for prediction will be an input RNN sequence from the embedded text, and we will take the last RNN output as a prediction of spam or ham (1 or 0).
How to do it…
1. We start by loading the libraries necessary for this script:
import os
import re
import io
import requests
import numpy as np
import matplotlib.pyplot as plt
import tensorflow as tf
from zipfile import ZipFile
2.Next we start a graph session and set the RNN model parameters. We will run the data through 20 epochs, in batch sizes of 250.The maximum length of each text we will consider is 25 words; we will cut longer texts to 25 or zero pad shorter texts. The RNN will be of size 10 units.We will only consider words that appear at least 10 times in our vocabulary, and every word will be embedded in a trainable vector of size 50.The dropout rate will be a placeholder that we can set at 0.5 during training time or 1.0 during evaluation:
sess = tf.Session()
epochs = 20
batch_size = 250
max_sequence_length = 25
rnn_size = 10
embedding_size = 50
min_word_frequency = 10
learning_rate = 0.0005
dropout_keep_prob = tf.placeholder(tf.float32)
3.Now we get the SMS text data.First, we check if it was already downloaded and, if so, read in the file.Otherwise, we download the data and save it:
data_dir = 'temp'
data_file = 'text_data.txt'
if not os.path.exists(data_dir):
os.makedirs(data_dir)
if not os.path.isfile(os.path.join(data_dir, data_file)):
zip_url = 'http://archive.ics.uci.edu/ml/machine-learning-databases/00228/smsspamcollection.zip'
r = requests.get(zip_url)
z = ZipFile(io.BytesIO(r.content))
file = z.read('SMSSpamCollection')
# Format Data
text_data = file.decode()
text_data = text_data.encode('ascii',errors='ignore')
text_data = text_data.decode().split('\n')
# Save data to text file
with open(os.path.join(data_dir, data_file), 'w') as file_ conn:
for text in text_data:
file_conn.write("{}\n".format(text))
else:
# Open data from text file
text_data = []
with open(os.path.join(data_dir, data_file), 'r') as file_ conn:
for row in file_conn:
text_data.append(row)
text_data = text_data[:-1]
text_data = [x.split('\t') for x in text_data if len(x)>=1]
[text_data_target, text_data_train] = [list(x) for x in zip(*text_ data)]
4.To reduce our vocabulary, we will clean the input texts by removing special characters, extra white space, and putting everything in lowercase:
def clean_text(text_string):
text_string = re.sub(r'([^\s\w]|_|[0-9])+', '', text_string)
text_string = " ".join(text_string.split())
text_string = text_string.lower()
return(text_string)
# Clean texts
text_data_train = [clean_text(x) for x in text_data_train]
For this recipe, we will not be doing any hyperparameter tuning. If the reader goes in this direction, remember to split up the dataset into train-test-valid sets before proceeding. A good option for this is the Scikit-learn function model_selection.train_test_split().
5.We declare our loss function next.Remember that with using the sparse_softmax function from TensorFlow, the targets have to be integer indices (of type int), and the logits have to be floats:
losses = tf.nn.sparse_softmax_cross_entropy_with_logits(logits_ out, y_output)
loss = tf.reduce_mean(losses)
6.We also need an accuracy function so that we can compare the algorithm on the test and train set:
accuracy = tf.reduce_mean(tf.cast(tf.equal(tf.argmax(logits_out, 1), tf.cast(y_output, tf.int64)), tf.float32))
7.Next we create the optimization function and initialize the model variables:
optimizer = tf.train.RMSPropOptimizer(learning_rate)
train_step = optimizer.minimize(loss)
init = tf.initialize_all_variables()
sess.run(init)
8.Now we can start looping through our data and training the model.When looping through the data multiple times, it is good practice to shuffle the data every epoch to prevent over-training:
train_loss = []
test_loss = []
train_accuracy = []
test_accuracy = []
# Start training
for epoch in range(epochs):
# Shuffle training data
shuffled_ix = np.random.permutation(np.arange(len(x_train)))
x_train = x_train[shuffled_ix]
y_train = y_train[shuffled_ix]
num_batches = int(len(x_train)/batch_size) + 1
for i in range(num_batches):
# Select train data
min_ix = i * batch_size
max_ix = np.min([len(x_train), ((i+1) * batch_size)])
x_train_batch = x_train[min_ix:max_ix]
y_train_batch = y_train[min_ix:max_ix]
# Run train step
train_dict = {x_data: x_train_batch, y_output: y_train_ batch, dropout_keep_prob:0.5}
sess.run(train_step, feed_dict=train_dict)
# Run loss and accuracy for training
temp_train_loss, temp_train_acc = sess.run([loss, accuracy], feed_dict=train_dict)
train_loss.append(temp_train_loss)
train_accuracy.append(temp_train_acc)
# Run Eval Step
test_dict = {x_data: x_test, y_output: y_test, dropout_keep_ prob:1.0}
temp_test_loss, temp_test_acc = sess.run([loss, accuracy], feed_dict=test_dict)
test_loss.append(temp_test_loss)
test_accuracy.append(temp_test_acc)
print('Epoch: {}, Test Loss: {:.2}, Test Acc: {:.2}'. format(epoch+1, temp_test_loss, temp_test_acc))
9.This results in the following output:
Vocabulary Size: 933
80-20 Train Test split: 4459 -- 1115
Epoch: 1, Test Loss: 0.59, Test Acc: 0.83
Epoch: 2, Test Loss: 0.58, Test Acc: 0.83
Epoch: 19, Test Loss: 0.46, Test Acc: 0.86
Epoch: 20, Test Loss: 0.46, Test Acc: 0.86
10.Here is the code to plot the train/test loss and accuracy:
epoch_seq = np.arange(1, epochs+1)
plt.plot(epoch_seq, train_loss, 'k--', label='Train Set')
plt.plot(epoch_seq, test_loss, 'r-', label='Test Set')
plt.title('Softmax Loss')
plt.xlabel('Epochs')
plt.ylabel('Softmax Loss')
plt.legend(loc='upper left')
plt.show()
# Plot accuracy over time
plt.plot(epoch_seq, train_accuracy, 'k--', label='Train Set')
plt.plot(epoch_seq, test_accuracy, 'r-', label='Test Set')
plt.title('Test Accuracy')
plt.xlabel('Epochs')
plt.ylabel('Accuracy')
plt.legend(loc='upper left')
plt.show()
How it works…
In this recipe, we created an RNN to category model to predict if an SMS text is spam or ham. We achieved about 86% accuracy on the test set.Here are the plots of accuracy and loss on both the test and training sets:
There's more…
It is highly recommended to go through the training dataset multiple times for sequential data (and is also recommended for non-sequential data, too).Each pass through the data is called an epoch.Also, it is very common and highly recommended to shuffle the data before each epoch.
|
|
 /2
/2 