问题导读:
1、如何理解张量数据结构?
2、如何使用TensorFlow处理张量?
3、什么是复杂的数字和分形?
4、如何实现随机数字?
5、如何求解偏微分方程?

上一篇:TensorFlow教程:1基本概念
在本章中,我们将介绍以下主题:
- 张量数据结构
- 用TensorFlow处理张量
- 复杂的数字和分形
- 计算衍生物
- 随机数字
- 求解偏微分方程
The tensor data structure
张量是TensorFlow中的基本数据结构。 正如我们已经说过的,它们代表了数据流图中的连接边。 张量只是标识一个多维数组或列表。
它可以通过三个参数rank,shape和type来标识:
- rank: Each tensor is described by a unit of dimensionality called rank. 它确定了张量的维数。 为此,已知秩为张量的阶或n维(例如,秩2张量是矩阵,秩1张量是矢量)。
- 形状:张量的形状是它所具有的行数和列数。
- 类型:分配给张量元素的数据类型。
那么,现在我们对这个基本的数据结构有信心。 为了建立一个张量,我们可以:
- 构建一个n维数组;例如,通过使用NumPy库
- 将n维数组转换成TensorFlow张量
一旦我们获得张量,我们可以使用TensorFlow操作符来处理它。 下图对介绍的概念进行了视觉解释:
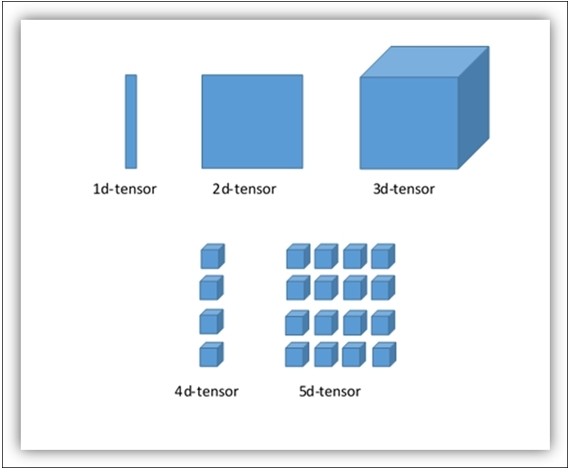
多维张量的可视化
One-dimensional tensors
要构建一维张量,我们使用Numpy数组(s)命令,其中s是一个Python列表:
[mw_shl_code=python,true]>>> import numpy as np
>>> tensor_1d = np.array([1.3, 1, 4.0, 23.99])[/mw_shl_code]
与Python列表不同,元素之间的逗号不显示:
[mw_shl_code=python,true]>>> print tensor_1d
[ 1.3 1. 4. 23.99] [/mw_shl_code]
索引与Python列表相同。 第一个元素有位置0,第三个元素有位置2,依此类推:
[mw_shl_code=python,true]>>> print tensor_1d[0]
1.3
>>> print tensor_1d[2]
4.0[/mw_shl_code]
最后,您可以查看张量的基本属性,张量的rank:
[mw_shl_code=python,true]>>> tensor_1d.ndim
1[/mw_shl_code]
张量维度的元组如下:
[mw_shl_code=python,true]>>> tensor_1d.shape
(4L,)
[/mw_shl_code]
张量的形状连续只有四个值。
张量中的data type:
[mw_shl_code=python,true]>>> tensor_1d.dtype
dtype('float64')[/mw_shl_code]
现在,让我们看看如何将一个NumPy数组转换成一个TensorFlow张量:
[mw_shl_code=python,true]import TensorFlow as tf[/mw_shl_code]
TensorFlow函数tf_convert_to_tensor将各种类型的Python对象转换为张量对象。 它接受张量对象,Numpy数组,Python列表和Python标量:
[mw_shl_code=python,true]tf_tensor=tf.convert_to_tensor(tensor_1d,dtype=tf.float64)[/mw_shl_code]
运行会话,我们可以看到张量及其元素如下:
[mw_shl_code=python,true]with tf.Session() as sess:
print sess.run(tf_tensor)
print sess.run(tf_tensor[0])
print sess.run(tf_tensor[2])[/mw_shl_code]
这给出了以下结果:
[mw_shl_code=python,true]>>
[ 1.3 1. 4. 23.99]
1.3
4.0
>>> [/mw_shl_code]
Two-dimensional tensors
要创建二维张量或矩阵,我们再次使用数组,但s将是一个数组的序列:
[mw_shl_code=python,true]>>> import numpy as np
>>> tensor_2d=np.array([(1,2,3,4),(4,5,6,7),(8,9,10,11),(12,13,14,15)])
>>> print tensor_2d
[[ 1 2 3 4]
[ 4 5 6 7]
[ 8 9 10 11]
[12 13 14 15]]
>>>
[/mw_shl_code]
tensor_2d中的值由表达式tensor_2d [row,col]来标识,其中行是行位置,col 是列位置:
[mw_shl_code=python,true]>>> tensor_2d[3][3]
15[/mw_shl_code]
您也可以使用切片运算符 : 提取一个子矩阵:
[mw_shl_code=python,true]>>> tensor_2d[0:2,0:2]
array([[1, 2],
[4, 5]])[/mw_shl_code]
在这种情况下,我们提取了一个2×2的子矩阵,包含行0和1,以及tensor_2d的列0和1。 TensorFlow有它自己的切片操作符。 在下一小节中,我们将看到如何使用它。
张量处理
我们来看看如何将更复杂的操作应用于这些数据结构。 考虑下面的代码:
1.导入库:
[mw_shl_code=python,true] import TensorFlow as tf
import numpy as np
[/mw_shl_code]
2.我们来构建两个整数数组。 这些代表两个3×3矩阵:
[mw_shl_code=python,true] matrix1 = np.array([(2,2,2),(2,2,2),(2,2,2)],dtype='int32')
matrix2 = np.array([(1,1,1),(1,1,1),(1,1,1)],dtype='int32') [/mw_shl_code]
3.可视化他们:
[mw_shl_code=python,true] print "matrix1 ="
print matrix1
print "matrix2 ="
print matrix2[/mw_shl_code]
4.要在我们的TensorFlow环境中使用这些矩阵,必须将它们转换为张量数据结构:
[mw_shl_code=python,true] matrix1 = tf.constant(matrix1)
matrix2 = tf.constant(matrix2) [/mw_shl_code]
5.我们使用TensorFlow 常量运算符来执行转换。
6.矩阵准备好用TensorFlow操作符来操作。 在这种情况下,我们计算矩阵乘法和矩阵和:
[mw_shl_code=python,true] matrix_product = tf.matmul(matrix1, matrix2)
matrix_sum = tf.add(matrix1,matrix2) [/mw_shl_code]
7.以下矩阵将用于计算矩阵行列式:
[mw_shl_code=python,true] matrix_3 = np.array([(2,7,2),(1,4,2),(9,0,2)],dtype='float32')
print "matrix3 ="
print matrix_3
matrix_det = tf.matrix_determinant(matrix_3)[/mw_shl_code]
8.现在是创建我们的图形并运行会话的时候,创建张量和运算符:
[mw_shl_code=python,true] with tf.Session() as sess:
result1 = sess.run(matrix_product)
result2 = sess.run(matrix_sum)
result3 = sess.run(matrix_det) [/mw_shl_code]
9.结果将通过运行以下命令打印出来:
[mw_shl_code=python,true] print "matrix1*matrix2 ="
print result1
print "matrix1 + matrix2 ="
print result2
print "matrix3 determinant result ="
print result3[/mw_shl_code]
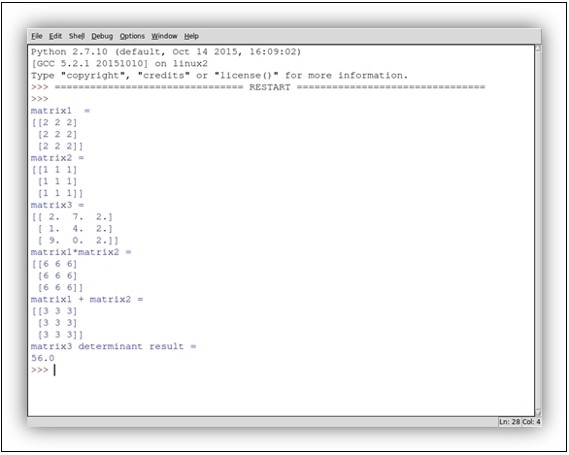
下图显示了运行代码后的结果:
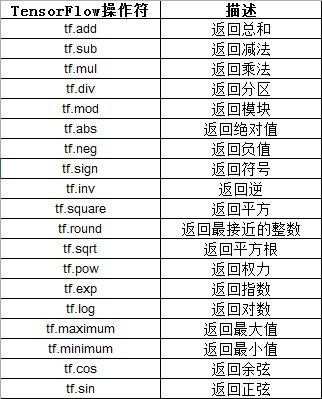
TensorFlow在张量上提供了众多的数学运算。 下表总结了它们:
Three-dimensional tensors
以下命令建立一个三维张量:
[mw_shl_code=python,true]>>> import numpy as np
>>> tensor_3d = np.array([[[1,2],[3,4]],[[5,6],[7,8]]])
>>> print tensor_3d
[[[1 2]
[3 4]]
[[5 6]
[7 8]]]
>>>[/mw_shl_code]
所创建的三维张量是一个2x2x2矩阵:
[mw_shl_code=python,true]>>> tensor_3d.shape
(2L, 2L, 2L)[/mw_shl_code]
为了从三维张量中检索一个元素,我们使用以下形式的表达式:
[mw_shl_code=python,true]tensor_3d[plane,row,col][/mw_shl_code]
遵循以下设置:
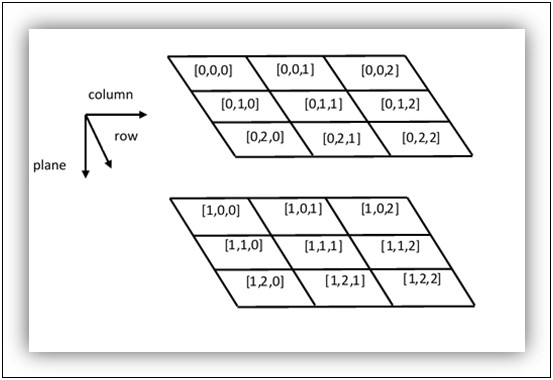
矩阵3×3表示
因此,由可变平面的值识别的第一平面中的所有四个元素等于零:
[mw_shl_code=python,true]>>> tensor_3d[0,0,0]
1
>>> tensor_3d[0,0,1]
2
>>> tensor_3d[0,1,0]
3
>>> tensor_3d[0,1,1]
4[/mw_shl_code]
三维张量允许引入与图像操作相关的下一个主题,但是更一般地介绍了我们在张量上作为简单变换操作。
Handling tensors with TensorFlow
TensorFlow被设计用于处理各种尺寸的张量和可以用来操纵它们的操作符。 在这个例子中,为了看到数组操作,我们将使用数字图像。 如您所知,彩色数字图像是一个MxNx3大小矩阵(三阶张量),其分量对应于图像中的红色,绿色和蓝色分量(RGB空间),意味着矩形中的每个特征用于RGB图像的框将由三个坐标来指定:i, j,和 ķ。
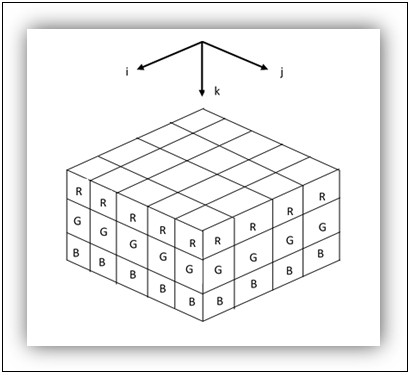
RGB张量
我想告诉你的第一件事是如何上传图像,然后使用TensorFlow切片运算符从原始图像中提取子图像。
Prepare the input data
在matplotlib中使用imread命令,我们导入标准格式颜色(JPG,BMP,TIF)的数字图像:
[mw_shl_code=python,true]import matplotlib.image as mp_image
filename = "packt.jpeg"
input_image = mp_image.imread(filename)[/mw_shl_code]
但是,我们可以看到张量的rank和形状
[mw_shl_code=python,true]print 'input dim = {}'.format(input_image.ndim)
print 'input shape = {}'.format(input_image.shape) [/mw_shl_code]
You'll see the output, which is (80, 144, 3). This means the image is 80 pixels high, 144 pixels wide, and 3 colors deep.
最后,使用matplotlib,可以显示导入的图像:
[mw_shl_code=python,true]import matplotlib.pyplot as plt
plt.imshow(input_image)
plt.show()
[/mw_shl_code]

起始的图像
在这个例子中,slice是起始图像的二维片段,每个像素都有RGB分量,所以我们需要一个占位符来存储片的所有值:
[mw_shl_code=python,true]import TensorFlow as tf
my_image = tf.placeholder("uint8",[None,None,3])[/mw_shl_code]
对于最后一个维度,我们只需要三个值。 然后我们使用TensorFlow操作符切片来创建一个子图像:
[mw_shl_code=python,true]slice = tf.slice(my_image,[10,0,0],[16,-1,-1])[/mw_shl_code]
最后一步是建立一个TensorFlow工作会议:
[mw_shl_code=python,true]with tf.Session() as session:
result = session.run(slice,feed_dict={my_image: input_image})
print(result.shape)
plt.imshow(result)
plt.show()
[/mw_shl_code]
最终的形状如下图所示:
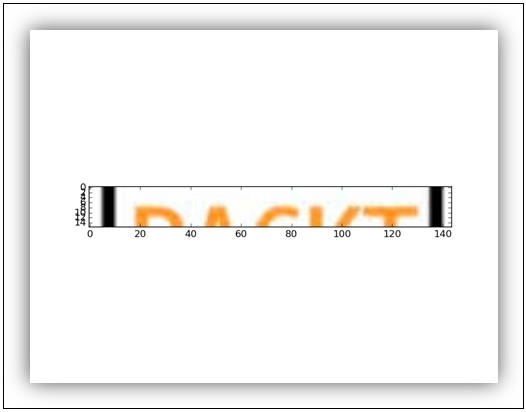
切片后的输入图像
在下一个例子中,我们将使用转置运算符来执行输入图像的几何变换:
[mw_shl_code=python,true]import TensorFlow as tf[/mw_shl_code]
我们将输入图像与一个我们称之为x的变量相关联:
[mw_shl_code=python,true]x = tf.Variable(input_image,name='x')[/mw_shl_code]
然后我们初始化我们的模型:
[mw_shl_code=python,true]model = tf.initialize_all_variables() [/mw_shl_code]
接下来,我们建立与我们运行我们的代码的会话:
[mw_shl_code=python,true]with tf.Session() as session: [/mw_shl_code]
要执行矩阵的转置,请使用TensorFlow的转置功能。 此方法在输入矩阵的轴0和1之间执行交换,而z轴保持不变:
[mw_shl_code=python,true] x = tf.transpose(x, perm=[1,0,2])
session.run(model)
result=session.run(x)
plt.imshow(result)
plt.show()
[/mw_shl_code]
结果如下:
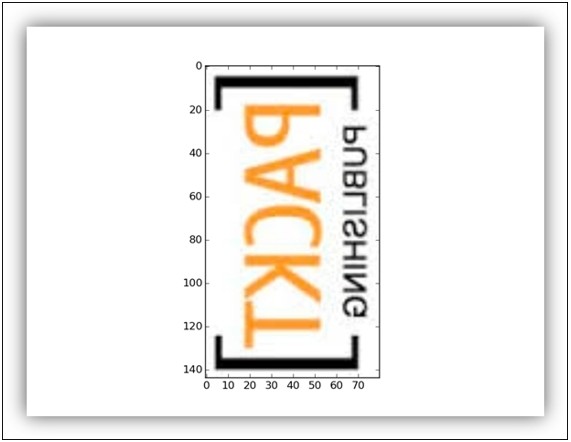
转置的图像
Complex numbers and fractals
首先,我们看看Python如何处理复数。 这是一件简单的事情。 例如,在Python中设置x = 5 + 4j,我们必须写下面的内容:
[mw_shl_code=python,true]>>> x = 5.+4j
[/mw_shl_code]
这意味着>>> x等于5 + 4j。
同时,你可以写下如下内容:
[mw_shl_code=python,true]>>> x = complex(5,4)
>>> x
(5+4j)
[/mw_shl_code]
我们也注意到:
Python在数学中使用j来表示√-1而不是i。
如果你在j之前加上一个数字,Python会认为它是一个虚数,否则就是它的一个变量。 It means that if you want to write the imaginary number i, you must write 1j rather than j.
为了得到Python复数的实部和虚部,可以使用下面的代码:
[mw_shl_code=python,true]>>> x.real
5.0
>>> x.imag
4.0
>>>[/mw_shl_code]
我们现在转向我们的问题,即如何用TensorFlow显示分形。 Mandelbrot集合是最着名的分形之一。 分形是一个几何对象,它的结构在不同的尺度上重复。 分形在自然界中是非常普遍的,例如英国的海岸。
Mandelbrot集是为复数c定义的,对此,下面的序列是真实的和有界的:

该组以其创作者BenoîtMandelbrot命名,这是一位以制作着名的分形而闻名的波兰数学家。 但是,只有在计算机编程的帮助下,他才能够对Mandelbrot进行形状或图形表示。 1985年,他在Scientific American上发表了第一个计算Mandelbrot集的算法。 该算法(针对每个点的复合点Z):

现在我们通过简单的步骤来看看如何使用TensorFlow来转换前面提到的算法。
Prepare the data for Mandelbrot set
导入必要的库到我们的例子中:
[mw_shl_code=python,true]import TensorFlow as tf
import numpy as np
import matplotlib.pyplot as plt[/mw_shl_code]
我们建立一个复杂的网格,将包含我们的Mandelbrot的集合。 The region of the complex plane is between -1.3 and +1.3 on the real axis and between -2j and +1j on the imaginary axis. Each pixel location in each image will represent a different complex value, z:
[mw_shl_code=python,true]Y, X = np.mgrid[-1.3:1.3:0.005, -2:1:0.005]
Z = X+1j*Y
c = tf.constant(Z.astype(np.complex64)) [/mw_shl_code]
然后我们定义数据结构,或张量TensorFlow,其中包含所有要包含在计算中的数据。 然后我们定义两个变量。 第一个是我们将在其上进行迭代的一个。 它具有与复杂网格相同的尺寸,但是它被声明为可变的,也就是说,它的值在计算过程中会发生变化:
[mw_shl_code=python,true]zs = tf.Variable(c) [/mw_shl_code]
下一个变量初始化为零。 它也和变量zs具有相同的大小:
[mw_shl_code=python,true]ns = tf.Variable(tf.zeros_like(c, tf.float32)) [/mw_shl_code]
Build and execute the Data Flow Graph for Mandelbrot's set
而不是引入一个会话,我们实例化一个InteractiveSession():
[mw_shl_code=python,true]sess = tf.InteractiveSession()[/mw_shl_code]
It requires, as we shall see, the Tensor.eval() and Operation.run() methods. 然后我们通过run()方法初始化所有涉及的变量:
[mw_shl_code=python,true]tf.initialize_all_variables().run()[/mw_shl_code]
开始迭代:
[mw_shl_code=python,true]zs_ = zs*zs + c[/mw_shl_code]
定义迭代的停止条件:
[mw_shl_code=python,true]not_diverged = tf.complex_abs(zs_) < 4[/mw_shl_code]
然后我们使用将多个操作分组的组操作符:
[mw_shl_code=python,true]step = tf.group(zs.assign(zs_),\
ns.assign_add(tf.cast(not_diverged, tf.float32)))[/mw_shl_code]
第一个操作是步骤迭代 Z(n + 1)= Z(n)2 + c 创造新的价值。
第二个操作将该值添加到ns中的通讯元素变量。 当op完成时,输入中的所有操作都已完成。 这个操作符没有输出。
然后我们运行两百步的操作员:
[mw_shl_code=python,true]for i in range(200): step.run()[/mw_shl_code]
Visualize the result for Mandelbrot's set
结果将是张量ns.eval()。 使用matplotlib,让我们看到结果:
[mw_shl_code=python,true]plt.imshow(ns.eval())
plt.show() [/mw_shl_code]
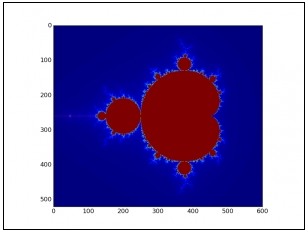
Mandelbrot集合
当然,Mandelbrot集并不是我们可以想象的唯一分形。 茱莉亚集是由加斯顿·莫里斯·朱莉娅在这个领域的工作命名的分形。 他们的建造过程与Mandelbrot套装的使用非常相似。
Prepare the data for Julia's set
我们来定义输出复数平面。 It is between -2 and +2 on the real axis and between -2j and +2j on the imaginary axis:
[mw_shl_code=python,true]Y, X = np.mgrid[-2:2:0.005, -2:2:0.005][/mw_shl_code]
而现在的位置:
[mw_shl_code=python,true]Z = X+1j*Y[/mw_shl_code]
Julia's集合的定义需要将Z重新定义为常量张量:
[mw_shl_code=python,true]Z = tf.constant(Z.astype("complex64")) [/mw_shl_code]
因此支持我们计算的输入张量如下:
[mw_shl_code=python,true]zs = tf.Variable(Z)
ns = tf.Variable(tf.zeros_like(Z, "float32"))[/mw_shl_code]
Build and execute the Data Flow Graph for Julia's set
和前面的例子一样,我们创建了自己的交互式会话:
[mw_shl_code=python,true]sess = tf.InteractiveSession()[/mw_shl_code]
然后我们初始化输入张量:
[mw_shl_code=python,true]tf.initialize_all_variables().run() [/mw_shl_code]
To compute the new values of the Julia set, we will use the iterative formula Z(n+1) = Z(n)2 – c, where the initial point c will be equal to the imaginary number 0.75i:
[mw_shl_code=python,true]c = complex(0.0,0.75)
zs_ = zs*zs - c[/mw_shl_code]
分组运算符和停止迭代的条件将与Mandelbrot计算中的相同:
[mw_shl_code=python,true]not_diverged = tf.complex_abs(zs_) < 4
step = tf.group(zs.assign(zs_),\
ns.assign_add(tf.cast(not_diverged, "float32"))) [/mw_shl_code]
最后,我们运营两百步:
[mw_shl_code=python,true]for i in range(200): step.run()[/mw_shl_code]
Visualize the result
要显示结果,请运行以下命令:
[mw_shl_code=python,true]plt.imshow(ns.eval())
plt.show()[/mw_shl_code]
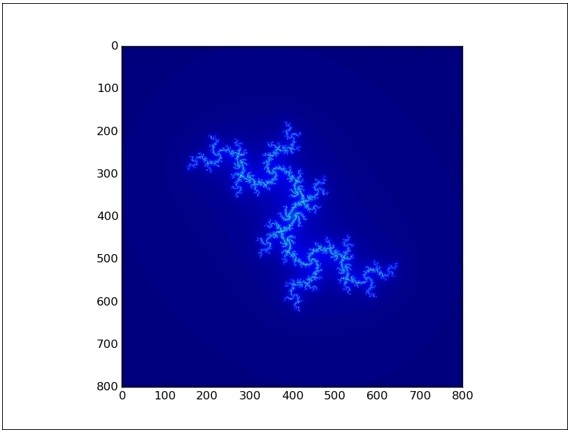
茱莉亚集
Computing gradients
TensorFlow具有解决其他更复杂任务的功能。 例如,我们将使用一个数学运算符来计算y相对于其表达式x的导数。 为此,我们使用tf.gradients()函数。
让我们考虑数学函数y = 2 x2。 我们要计算相对于x = 1的梯度di。 以下是计算此渐变的代码:
[mw_shl_code=python,true]1.首先,导入TensorFlow库:
import TensorFlow as tf
2.x变量​​是函数的独立变量:
x = tf.placeholder(tf.float32)
3.让我们来构建这个函数:
y = 2*x*x
4.最后,我们称之为 tf.gradients() 函数以y和x作为参数:
var_grad = tf.gradients(y, x)
5.要评估渐变,我们必须建立一个会话:
with tf.Session() as session:
6.梯度将在变量上进行评估 X = 1:
var_grad_val = session.run(var_grad,feed_dict={x:1})
7.var_grad_val值是要打印的供稿结果:
print(var_grad_val)
8.这给出了以下结果:
[4.0]
>>[/mw_shl_code]
Random numbers
随机数的生成在机器学习和训练算法中是必不可少的。 When random numbers are generated by a computer, they are generated by a Pseudo Random Number Generator (PRNG). 术语“伪”来源于这样一个事实,即计算机是一种只能模拟随机性的指令运行的逻辑运算。 尽管有这个逻辑限制,计算机在生成随机数字方面非常高效。 TensorFlow为运营商提供了不同分布的随机张量。
Uniform distribution
一般来说,当我们需要使用随机数时,我们会尝试以相同的频率获得重复的值,并且均匀分布。 运算符TensorFlow提供minval和maxval之间的值,所有这些都具有相同的概率。 我们来看一个简单的示例代码:
[mw_shl_code=python,true]random_uniform(shape, minval, maxval, dtype, seed, name) [/mw_shl_code]
我们导入TensorFlow库和matplotlib来显示结果:
[mw_shl_code=python,true]import TensorFlow as tf
import matplotlib.pyplot as plt [/mw_shl_code]
均匀变量​​是一维张量,元素100包含0到1之间的值,分布的概率相同:
[mw_shl_code=python,true]uniform = tf.random_uniform([100],minval=0,maxval=1,dtype=tf.float32) [/mw_shl_code]
我们来定义会话:
[mw_shl_code=python,true]sess = tf.Session()[/mw_shl_code]
在我们的会话中,我们使用eval()运算符来评估张量的均匀性:
[mw_shl_code=python,true]with tf.Session() as session:
print uniform.eval()
plt.hist(uniform.eval(),normed=True)
plt.show()[/mw_shl_code]
如您所见,0和1之间的所有中间值具有大致相同的频率。 这种行为被称为统一分配。 执行结果如下:
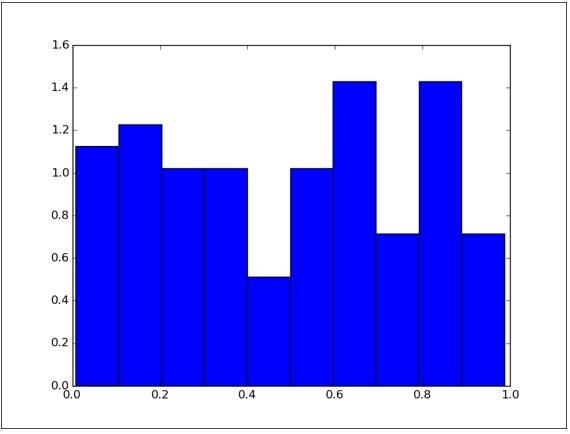
统一分配
Normal distribution
在某些特定情况下,您可能需要生成相差几个单位的随机数字。 在这种情况下,我们使用normal distribution of random numbers,也称为Gaussian distribution,增加了下一个问题提取0的概率。 每个整数代表标准偏差。 从未来的问题到范围的边缘显示,被提取的可能性非常低。 以下是TensorFlow的实现:
[mw_shl_code=python,true]import TensorFlow as tf
import matplotlib.pyplot as plt
norm = tf.random_normal([100], mean=0, stddev=2)
with tf.Session() as session:
plt.hist(norm.eval(),normed=True)
plt.show()[/mw_shl_code]
We created a 1d-tensor of shape [100] consisting of random normal values, with mean equal to 0 and standard deviation equal to 2, using the operator tf.random_normal. 以下是结果:
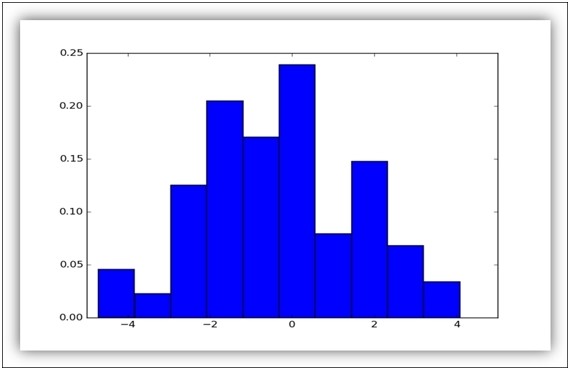
正态分布
Generating random numbers with seeds
我们记得我们的序列是pseudo-random,因为这些值是使用确定性算法计算出来的,而概率没有真正的作用。 种子只是序列的起点,如果你从同一个种子开始,你将会得到相同的序列。 例如,当您在程序中搜索错误时,调试代码非常有用,您必须能够重现问题,因为每次运行都会有所不同。
考虑下面的例子,我们有两个统一的分布:
[mw_shl_code=python,true]uniform_with_seed = tf.random_uniform([1], seed=1)
uniform_without_seed = tf.random_uniform([1])
[/mw_shl_code]
在第一个均匀分布中,我们从种子= 1开始。 This means that repeatedly evaluating the two distributions, the first uniform distribution will always generate the same sequence of values:
[mw_shl_code=python,true]print("First Run")
with tf.Session() as first_session:
print("uniform with (seed = 1) = {}"\
.format(first_session.run(uniform_with_seed)))
print("uniform with (seed = 1) = {}"\
.format(first_session.run(uniform_with_seed)))
print("uniform without seed = {}"\
.format(first_session.run(uniform_without_seed)))
print("uniform without seed = {}"\
.format(first_session.run(uniform_without_seed)))
print("Second Run")
with tf.Session() as second_session:
print("uniform with (seed = 1) = {}\
.format(second_session.run(uniform_with_seed)))
print("uniform with (seed = 1) = {}\
.format(second_session.run(uniform_with_seed)))
print("uniform without seed = {}"\
.format(second_session.run(uniform_without_seed)))
print("uniform without seed = {}"\
.format(second_session.run(uniform_without_seed)))[/mw_shl_code]
正如你所看到的,这是最终的结果。 seed = 1的均匀分布总是给出相同的结果:[mw_shl_code=python,true]
>>>
First Run
uniform with (seed = 1) = [ 0.23903739]
uniform with (seed = 1) = [ 0.22267115]
uniform without seed = [ 0.92157185]
uniform without seed = [ 0.43226039]
Second Run
uniform with (seed = 1) = [ 0.23903739]
uniform with (seed = 1) = [ 0.22267115]
uniform without seed = [ 0.50188708]
uniform without seed = [ 0.21324408]
>>>[/mw_shl_code]
Montecarlo's method
我们用一个关于Montecarlo方法的简单说明来结束随机数的部分。 它是在高性能科学计算应用中广泛使用的数值概率方法。 在我们的例子中,我们将计算π的值:
[mw_shl_code=python,true]import TensorFlow as tf
trials = 100
hits = 0[/mw_shl_code]
使用random_uniform函数在平方[ - 1,1]×[-1,1]内生成伪随机点:
[mw_shl_code=python,true]x = tf.random_uniform([1],minval=-1,maxval=1,dtype=tf.float32)
y = tf.random_uniform([1],minval=-1,maxval=1,dtype=tf.float32)
pi = [][/mw_shl_code]
开始会话:
[mw_shl_code=python,true]sess = tf.Session()[/mw_shl_code]
Inside the session, we calculate the value of π: the area of the circle is π and that of the square is 4. 圆内数与生成点总数之间的关系必须(非常缓慢地)收敛到π,并且我们计算有多少点落入圆方程x 2 + Y 2 T3> = 1 T1>。
[mw_shl_code=python,true]with sess.as_default():
for i in range(1,trials):
for j in range(1,trials):
if x.eval()**2 + y.eval()**2 < 1 :
hits = hits + 1
pi.append((4 * float(hits) / i)/trials)
plt.plot(pi)
plt.show()[/mw_shl_code]
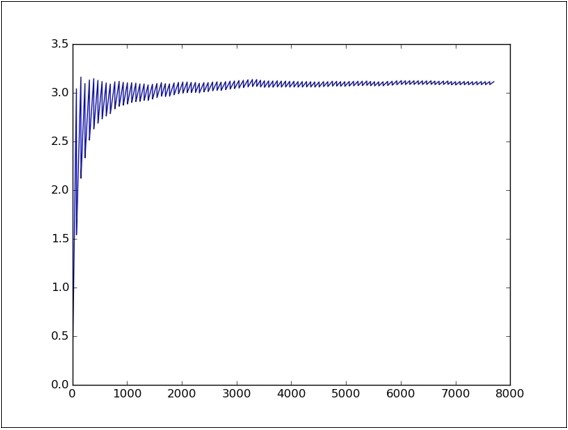
该图显示了在对π值进行测试的次数期间的收敛
Solving partial differential equations
A partial differential equation (PDE) is a differential equation involving partial derivatives of an unknown function of several independent variables. 偏微分方程常用于制定和解决从量子力学到金融市场等各个领域的重大物理问题。 在本节中,我们以https://www.TensorFlow.org/versions/r0.8/tutorials/pdes/index.html为例,展示了TensorFlow在二维PDE解决方案模拟了方形池塘的表面,上面有几个雨点。 其效果是在池塘上产生二维波浪。 我们不会把注意力放在问题的计算方面,因为这超出了本书的范围。相反,我们将专注于使用TensorFlow来定义问题。
起点是导入这些基础库:
[mw_shl_code=python,true]import TensorFlow as tf
import numpy as np
import matplotlib.pyplot as plt
[/mw_shl_code]
Initial condition
首先,我们必须定义问题的维度。 让我们想象我们的池塘是一个500x500平方米:
[mw_shl_code=python,true]N = 500
下面的二维张量就是我们问题的时间t = 0 的池塘,也就是initial condition
u_init = np.zeros([N, N], dtype=np.float32)
We have 40 random raindrops on it
for n in range(40):
a,b = np.random.randint(0, N, 2)
u_init[a,b] = np.random.uniform()
np.random.randint(0,N,2)是一个NumPy函数,返回一个二维形状从0到N的随机整数。
使用matplotlib,我们可以显示最初的方形池塘:
plt.imshow(U.eval())
plt.show()[/mw_shl_code]
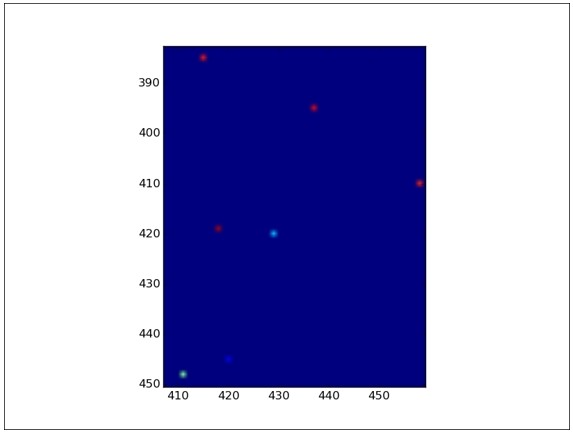
在初始状态下放大池塘:彩色点代表雨滴落下
然后我们定义下面的张量:
[mw_shl_code=python,true]ut_init = np.zeros([N, N], dtype=np.float32) [/mw_shl_code]
It is the temporal evolution of the pond. At time t = tend it will contain the final state of the pond.
Model building
我们必须定义一些基本参数(使用TensorFlow占位符)和模拟的时间步骤:
[mw_shl_code=python,true]eps = tf.placeholder(tf.float32, shape=())
我们还必须定义模型的物理参数,即阻尼系数:
damping = tf.placeholder(tf.float32, shape=())
然后,我们将起始张量重新定义为TensorFlow变量,因为它们的值在仿真过程中会发生变化:
U = tf.Variable(u_init)
Ut = tf.Variable(ut_init)
最后,我们建立我们的PDE模型。 它代表了雨滴落下之后池塘的进化:
U_ = U + eps * Ut
Ut_ = Ut + eps * (laplace(U) - damping * Ut)
正如你所看到的,我们引入了laplace(U)函数来解析PDE(将在本节的最后部分描述)。
Using the TensorFlow group operator, we define how our pond in time t should evolve:
step = tf.group(
U.assign(U_),
Ut.assign(Ut_))[/mw_shl_code]
让我们回顾一下,组运算符将多个操作分组为一个单独的操作。
Graph execution
In our session we will see the evolution in time of the pond by 1000 steps, where each time step is equal to 0.03s, while the damping coefficient is set equal to 0.04.
[mw_shl_code=python,true]让我们初始化TensorFlow变量:
tf.initialize_all_variables().run()
然后我们运行模拟:
for i in range(1000):
step.run({eps: 0.03, damping: 0.04})
if i % 50 == 0:
clear_output()
plt.imshow(U.eval())
plt.show()[/mw_shl_code]
每个50步模拟结果将显示如下:
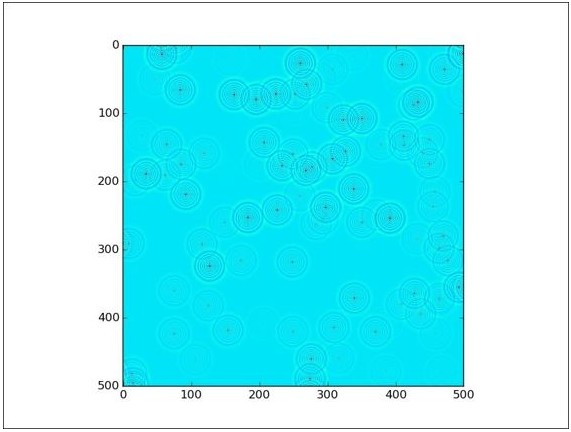
400个模拟步骤后的池塘
使用计算功能
Let's now see what is the Laplace(U) function and the ancillary functions used:
[mw_shl_code=python,true]def make_kernel(a):
a = np.asarray(a)
a = a.reshape(list(a.shape) + [1,1])
return tf.constant(a, dtype=1)
def simple_conv(x, k):
x = tf.expand_dims(tf.expand_dims(x, 0), -1)
y = tf.nn.depthwise_conv2d(x, k, [1, 1, 1, 1],padding='SAME')
return y[0, :, :, 0]
def laplace(x):
laplace_k = make_kernel([[0.5, 1.0, 0.5],
[1.0, -6., 1.0],
[0.5, 1.0, 0.5]])
return simple_conv(x, laplace_k)[/mw_shl_code]
这些函数描述了模型的物理学,也就是波浪在池塘中的生成和传播。 我不会详细介绍这些功能,这些功能的理解超出了本书的范围。
下图显示了雨滴落下后池塘上的波浪。
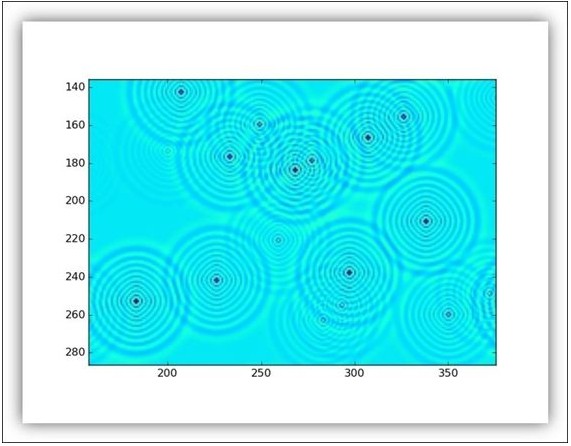
放大池塘
Summary
在本章中,我们考察了TensorFlow的一些数学潜力。 从一个tensor的基本定义,任何类型的计算的基本数据结构,我们看到一些例子如何使用TensorFlow的数学运算符来处理这些数据结构。 运用 复杂 数字,我们探索了分形的世界。 然后我们介绍了这个概念 随机 数字。 这些实际上是用于模型开发和测试的机器学习,所以本章以一个使用具有偏导数的微分方程来定义和解决数学问题的例子结束。
在下一章中,最后我们将开始看到TensorFlow正在开发的领域中 - 在机器学习中,解决诸如classification和data clustering
来源:http://usyiyi.cn/documents/getting-started-with-tf/ch2.html
作者:usyiyi.cn
|
 /2
/2 