日志
openstack零基础入门:OpenStack Grizzly安装指导
|
openstack并不是复杂,可是在我们学习的过程中为什么感觉不知所以然,其中的原因便是我们缺乏Linux知识。
一、环境介绍:
说明1: 使用 dpkg -s <packagename> to 确保 grizzly packages (version : 2013.1)
说明2: 你可以添加比较多的计算节点,下面是网络结构
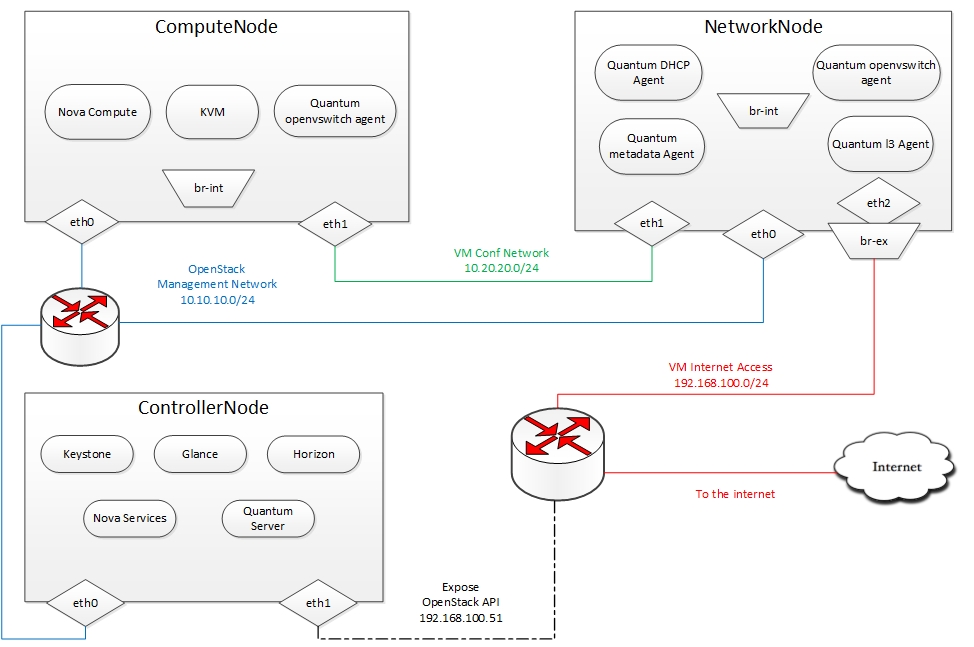
二、控制节点
2.1. Ubuntu准备
安装64位 Ubuntu 12.04 或则13.04 Server ,切换sudo模式
重新启动网络
配置mysql
2.5. 其他
安装其它服务:
使用CLI命令,测试使用安装成功
一、环境介绍:
| 控制节点 | eth0 (10.10.10.51), eth1 (192.168.100.51) |
| 网络节点 | eth0 (10.10.10.52), eth1 (10.20.20.52), eth2 (192.168.100.52) |
| 计算节点 | eth0 (10.10.10.53), eth1 (10.20.20.53) |
说明1: 使用 dpkg -s <packagename> to 确保 grizzly packages (version : 2013.1)
说明2: 你可以添加比较多的计算节点,下面是网络结构
二、控制节点
2.1. Ubuntu准备
安装64位 Ubuntu 12.04 或则13.04 Server ,切换sudo模式
sudo su
添加 Grizzly 源 [Only for Ubuntu 12.04]:
添加 Grizzly 源 [Only for Ubuntu 12.04]:
apt-get install -y ubuntu-cloud-keyring
echo deb http://ubuntu-cloud.archive.canonical.com/ubuntu precise-updates/grizzly main >> /etc/apt/sources.list.d/grizzly.list
更新系统:
更新系统:
apt-get update -y
apt-get upgrade -y
apt-get dist-upgrade -y
2.2. 网络配置
只有一个网卡接入互联网
2.2. 网络配置
只有一个网卡接入互联网
#For Exposing OpenStack API over the internet
auto eth1
iface eth1 inet static
address 192.168.100.51
netmask 255.255.255.0
gateway 192.168.100.1
dns-nameservers 8.8.8.8
#Not internet connected(used for OpenStack management)
auto eth0
iface eth0 inet static
address 10.10.10.51
netmask 255.255.255.0
重新启动网络
service networking restart
2.3. MySQL & RabbitMQ安装
安装 MySQL:
2.3. MySQL & RabbitMQ安装
安装 MySQL:
apt-get install -y mysql-server python-mysqldb
配置mysql
sed -i 's/127.0.0.1/0.0.0.0/g' /etc/mysql/my.cnf
service mysql restart
2.4. RabbitMQ
安装 RabbitMQ:
2.4. RabbitMQ
安装 RabbitMQ:
apt-get install -y rabbitmq-server
安装 NTP service:
安装 NTP service:
apt-get install -y ntp
创建数据库:
创建数据库:
mysql -u root -p
#Keystone
CREATE DATABASE keystone;
GRANT ALL ON keystone.* TO 'keystoneUser'@'%' IDENTIFIED BY 'keystonePass';
#Glance
CREATE DATABASE glance;
GRANT ALL ON glance.* TO 'glanceUser'@'%' IDENTIFIED BY 'glancePass';
#Quantum
CREATE DATABASE quantum;
GRANT ALL ON quantum.* TO 'quantumUser'@'%' IDENTIFIED BY 'quantumPass';
#Nova
CREATE DATABASE nova;
GRANT ALL ON nova.* TO 'novaUser'@'%' IDENTIFIED BY 'novaPass';
#Cinder
CREATE DATABASE cinder;
GRANT ALL ON cinder.* TO 'cinderUser'@'%' IDENTIFIED BY 'cinderPass';
quit;
2.5. 其他
安装其它服务:
apt-get install -y vlan bridge-utils
启动 IP_Forwarding:
启动 IP_Forwarding:
sed -i 's/#net.ipv4.ip_forward=1/net.ipv4.ip_forward=1/' /etc/sysctl.conf
# To save you from rebooting, perform the following
sysctl net.ipv4.ip_forward=1
2.6. Keystone
安装Keystone
2.6. Keystone
安装Keystone
apt-get install -y keystone
在文件 /etc/keystone/keystone.conf 中添加如下语句
在文件 /etc/keystone/keystone.conf 中添加如下语句
connection = mysql://keystoneUser:keystonePass@10.10.10.51/keystone
重新启动Keystone,同步数据库
service keystone restart
keystone-manage db_sync
下载keystone_basic.sh,keystone_endpoints_basic.sh并执行脚本
下载keystone_basic.sh,keystone_endpoints_basic.sh并执行脚本
#Modify the **HOST_IP** and **EXT_HOST_IP** variables before executing the scripts
wget https://raw.github.com/mseknibilel/OpenStack-Grizzly-Install-Guide/OVS_MultiNode/KeystoneScripts/keystone_basic.sh
wget https://raw.github.com/mseknibilel/OpenStack-Grizzly-Install-Guide/OVS_MultiNode/KeystoneScripts/keystone_endpoints_basic.sh
chmod +x keystone_basic.sh
chmod +x keystone_endpoints_basic.sh
./keystone_basic.sh
./keystone_endpoints_basic.sh
创建证书,后面不会遇到麻烦:(其实这里是环境变量的配置,我们在后面的操作中,就不需要每次都输入用户名密码等)
创建证书,后面不会遇到麻烦:(其实这里是环境变量的配置,我们在后面的操作中,就不需要每次都输入用户名密码等)
nano creds
#Paste the following:
export OS_TENANT_NAME=admin
export OS_USERNAME=admin
export OS_PASSWORD=admin_pass
export OS_AUTH_URL="http://192.168.100.51:5000/v2.0/"
# Load it:
source creds
使用CLI命令,测试使用安装成功
keystone user-list


 /2
/2 