问题导读:
1.Hive 是什么? 2.Hive 架构分哪几部分? 3.Hive 文件格式是怎样的?
一、Hive是什么?
Hive 是基于 Hadoop 构建的一套数据仓库分析系统,它提供了丰富的 SQL 查询方式来分析存储在 Hadoop 分布式文件系统中的数据, 可以将结构化的数据文件映射为一张数据库表,并提供完整的 SQL 查询功能,可以将 SQL 语句转换为 MapReduce 任务进行运行,通过自己的 SQL 去 查询分析需要的内容,这套 SQL 简称 Hive SQL。
二、理解Hive 架构
Hive 架构可以分为四部分。
Hive 对外提供了三种服务模式,即 Hive 命令行模式(CLI),Hive 的 Web 模式(WUI),Hive 的远程服务(Client)。下面介绍这些服务的用法。
1、 Hive 命令行模式
Hive 命令行模式启动有两种方式。执行这条命令的前提是要配置 Hive 的环境变量。
1) 进入 /home/hadoop/app/hive 目录,执行如下命令。
[mw_shl_code=shell,true]./hive[/mw_shl_code]
2) 直接执行命令。
[mw_shl_code=shell,true]hive - -service cli[/mw_shl_code]
Hive 命令行模式用于 Linux 平台命令行查询,查询语句基本跟 MySQL 查询语句类似,运行结果如下所示。
[mw_shl_code=shell,true][hadoop@ywendeng hive]$ hive
hive> show tables;
OK
stock
stock_partition
tst
Time taken: 1.088 seconds, Fetched: 3 row(s)
hive> select * from tst;
OK
Time taken: 0.934 seconds
hive> exit;
[hadoop@djt11 hive]$[/mw_shl_code]
2、Hive Web 模式
Hive Web 界面的启动命令如下。
[mw_shl_code=shell,true]hive - -service hwi[/mw_shl_code]
通过浏览器访问 Hive,默认端口为 9999。
[mw_shl_code=xml,true]异常:16/05/31 20:24:52 FATAL hwi.HWIServer: HWI WAR file not found at /home/hadoop/app/hive/home/hadoop/app/hive/lib/hive-hwi-0.12.0.war
解决办法:将hive-default.xml 文件中关于hwi的配置文件拷贝到hive-site.xml文件中
示例:
<property>
<name>hive.hwi.war.file</name>
<value>lib/hive-hwi-0.12.0-SNAPSHOT.war</value>
<description>This sets the path to the HWI war file, relative to ${HIVE_HOME}. </description>
</property>
<property>
<name>hive.hwi.listen.host</name>
<value>0.0.0.0</value>
<description>This is the host address the Hive Web Interface will listen on</description>
</property>
<property>
<name>hive.hwi.listen.port</name>
<value>9999</value>
<description>This is the port the Hive Web Interface will listen on</description>
</property> [/mw_shl_code]
3、 Hive 的远程服务
远程服务(默认端口号 10000)启动方式命令如下,“nohup…&” 是 Linux 命令,表示命令在后台运行。
[mw_shl_code=shell,true]nohup hive - -service hiveserver2 & //在Hive 0.11.0版本之后,提供了HiveServer2服务 [/mw_shl_code]
Hive 远程服务通过 JDBC 等访问来连接 Hive ,这是程序员最需要的方式。
[mw_shl_code=shell,true]hive --service hiveserver2 & //默认端口10000
hive --service hiveserver2 --hiveconf hive.server2.thrift.port 10002 & //可以通过命令行直接将端口号改为10002[/mw_shl_code]
hive的远程服务端口号也可以在hive-default.xml文件中配置,修改hive.server2.thrift.port对应的值即可。 [mw_shl_code=xml,true]< property> < name>hive.server2.thrift.port< /name>
< value>10000< /value>
< description>Port number of HiveServer2 Thrift interface when hive.server2.transport.mode is 'binary'.< /description>
< /property>[/mw_shl_code]
Hive 的 JDBC 连接和 MySQL 类似,如下所示。
[mw_shl_code=java,true]import java.sql.Connection;
import java.sql.DriverManager;
import java.sql.SQLException;
public class HiveJdbcClient {
private static String driverName = "org.apache.hive.jdbc.HiveDriver";//hive驱动名称 hive0.11.0之后的版本
//private static String driverName = "org.apache.hadoop.hive.jdbc.HiveDriver";//hive驱动名称 hive0.11.0之前的版本
public static void main(String[] args) throws SQLException {
try{
Class.forName(driverName);
}catch(ClassNotFoundException e){
e.printStackTrace();
System.exit(1);
}
//第一个参数:jdbc:hive://djt11:10000/default 连接hive2服务的连接地址
//第二个参数:hadoop 对HDFS有操作权限的用户
//第三个参数:hive 用户密码 在非安全模式下,指定一个用户运行查询,忽略密码
Connection con = DriverManager.getConnection("jdbc:hive://djt11:10000/default", "hadoop", "");
System.out.print(con.getClientInfo());
}
}[/mw_shl_code]
Hive 将元数据存储在 RDBMS 中,一般常用 MySQL 和 Derby。默认情况下,Hive 元数据保存在内嵌的 Derby 数据库中,只能允许一个会话连接,只适合简单的 测试。实际生产环境中不适用, 为了支持多用户会话,则需要一个独立的元数据库,使用 MySQL 作为元数据库,Hive 内部对 MySQL 提供了很好的支持,配置一个独立的元数据库需要增加以下步骤。 1) 安装 mysql 数据库。
准备工作 ,需要根据你的linux 系统版本下载对应的MySQL rpm 包。
[mw_shl_code=shell,true]rpm -qa | grep mysql//查看当前系统是否已经安装了mysql
rpm -e mysql-libs-5.1.66-2.el6_3.i686 --nodeps//如果已经安装则删除,否则滤过此步骤
rpm -ivh MySQL-server-5.1.73-1.glibc23.i386.rpm
rpm -ivh MySQL-client-5.1.73-1.glibc23.i386.rpm [/mw_shl_code]
2) 启动 mysql 服务。
[mw_shl_code=shell,true][root@ywendeng app]# service mysqld start
Initializing MySQL database: Installing MySQL system tables...
OK
Filling help tables...
OK
To start mysqld at boot time you have to copy
support-files/mysql.server to the right place for your system[/mw_shl_code]
3) 设置 mysql 的 root 密码。
MySQL在刚刚被安装的时候,它的 root 用户是没有被设置密码的。首先来设置 MySQL 的 root 密码。
[mw_shl_code=shell,true][root@ywendeng app]# mysql -u root -p
Enter password: //默认密码为空,输入后回车即可
Welcome to the MySQL monitor. Commands end with ; or \g.
Your MySQL connection id is 3
Server version: 5.1.73 Source distribution
Copyright (c) 2000, 2013, Oracle and/or its affiliates. All rights reserved.
mysql>set password for root@localhost=password('root'); 密码设置为root[/mw_shl_code]
4) 为 Hive 建立相应的 Mysql 账户,并赋予足够的权限。
[mw_shl_code=shell,true][root@ywendeng app]# mysql -u root -p root
mysql>create user 'hive' identified by 'hive'; //创建一个账号:用户名为hive,密码为hive
mysql> grant all on *.* to 'hive'@'localhost' identified by 'hive'; //将权限授予host为localhost的hive用户
//说明:(执行下面的语句 *.*:所有库下的所有表 %:任何IP地址或主机都可以连接)
//grant all on *.* to 'hive'@'%' identified by 'hive'; //将权限授予host为的hive用户
Query OK, 0 rows affected (0.00 sec)
mysql> flush privileges;
Query OK, 0 rows affected (0.00 sec)[/mw_shl_code]
备注:查看host 和user 之间的关系——在mysql 库中的user 表
[mw_shl_code=sql,true]use mysql;//使用数据库
select host,user from user;[/mw_shl_code]
如果 hive 账户无法登陆。为hive@ywendeng 设置密码。
[mw_shl_code=shell,true][root@ywendeng ~]#mysql -u root -p root
mysql>set password for hive@localhost=password('hive');[/mw_shl_code]
5) 建立 Hive 专用的元数据库,记得用刚才创建的 “hive” 账号登录,命令如下。
[mw_shl_code=shell,true][root@ywendeng ~]#mysql -u hive -p //用hive用户登录,密码hive
Enter password:
mysql> create database hive; //创建数据库的名称为hive
Query OK, 1 row affected (0.00 sec)[/mw_shl_code]
6) 找到Hive安装目录 conf/下的 hive-site.xml文件,修改以下几个属性。
[mw_shl_code=xml,true][hadoop@ywendeng conf]$ vi hive-site.xml
< property>
< name>javax.jdo.option.ConnectionDriverName< /name>
< value>com.mysql.jdbc.Driver< /value>
< description>Driver class name for a JDBC metastore< /description>
< /property>
< property>
< name>javax.jdo.option.ConnectionURL< /name>
< value>jdbc:mysql://localhost:3306/hive?characterEncoding=UTF-8< /value>
< description>JDBC connect string for a JDBC metastore< /description>
< /property>
< property>
< name>javax.jdo.option.ConnectionUserName< /name>
< value>hive< /value>
< description>Username to use against metastore database< /description>
< /property>
< property>
< name>javax.jdo.option.ConnectionPassword< /name>
< value>hive< /value>
< description>password to use against metastore database< /description>
< /property>[/mw_shl_code]
如果conf/目录下没有 hive-site.xml文件,则需要拷贝一个名为hive-site.xml的文件。
[mw_shl_code=shell,true][hadoop@ywendeng conf]$ cp hive-default.xml.template hive-site.xml
[/mw_shl_code]
7)将mysql-connector-Java-5.1.21.jar驱动包,拷贝到 $HIVE_HOME/lib 目录下。可点击下载 mysql驱动包
[mw_shl_code=shell,true][hadoop@ywendeng lib]#rz //回车,选择已经下载好的mysql驱动包即可
[hadoop@ywendeng lib]$ ls
mysql-connector-java-5.1.21.jar[/mw_shl_code]
8) 启动 Hive Shell,测试运行。
[mw_shl_code=shell,true][hadoop@ywendeng hive]$ hive
hive> show databases;[/mw_shl_code]
hive切换到mysql元数据库之后,hive启动时如果遇到以下错误:
解决方案:
在hive 安装目录下,创建一个临时的IO文件iotmp
[mw_shl_code=shell,true][hadoop@ywendeng hive]$ mkdir iotmp
[hadoop@ywendeng hive]$ ls
bin derby.log hcatalog lib metastore_db README.txt scripts
conf examples iotmp LICENSE NOTICE RELEASE_NOTES.txt[/mw_shl_code]
然后将路径配置到hive-site.xml文件的以下参数中:
[mw_shl_code=xml,true][hadoop@ywendeng conf]$ vi hive-site.xml < property>
< name>hive.querylog.location< /name>
< value>/home/hadoop/app/hive/iotmp< /value>
< description>Location of Hive run time structured log file< /description>
< /property>
< property>
< name>hive.exec.local.scratchdir< /name>
< value>/home/hadoop/app/hive/iotmp< /value>
< description>Local scratch space for Hive jobs< /description>
< /property>
< property>
< name>hive.downloaded.resources.dir< /name>
< value>/home/hadoop/app/hive/iotmp< /value>
< description>Temporary local directory for added resources in the remote file system.< /description>
< /property>[/mw_shl_code]
保存,重启hive即可。
[mw_shl_code=shell,true][hadoop@ywendeng hive]$ hive
hive> show databases;
OK
default
Time taken: 3.684 seconds, Fetched: 1 row(s)
hive>[/mw_shl_code]
Driver 调用解释器(Compiler)处理 HiveQL 字串,这些字串可能是一条 DDL、DML或查询语句。编译器将字符串转化为策略(plan)。策略仅由元数据操作 和 HDFS 操作组成,元数据操作只包含 DDL 语句,HDFS 操作只包含 LOAD 语句。对插入和查询而言,策略由 MapReduce 任务中的具有方向的非循环图(directedacyclic graph,DAG)组成,具体流程如下。
1)解析器(parser):将查询字符串转化为解析树表达式。
2)语义分析器(semantic analyzer):将解析树表达式转换为基于块(block-based)的内部查询表达式,将输入表的模式(schema)信息从 metastore 中进行恢复。用这些信息验证列名, 展开 SELECT * 以及类型检查(固定类型转换也包含在此检查中)。
3)逻辑策略生成器(logical plan generator):将内部查询表达式转换为逻辑策略,这些策略由逻辑操作树组成。
4)优化器(optimizer):通过逻辑策略构造多途径并以不同方式重写。优化器的功能如下。
[mw_shl_code=text,true]将多 multiple join 合并为一个 multi-way join;
对join、group-by 和自定义的 map-reduce 操作重新进行划分;
消减不必要的列;
在表扫描操作中推行使用断言(predicate);
对于已分区的表,消减不必要的分区;
在抽样(sampling)查询中,消减不必要的桶。[/mw_shl_code]
此外,优化器还能增加局部聚合操作用于处理大分组聚合(grouped aggregations)和 增加再分区操作用于处理不对称(skew)的分组聚合。
hive文件存储格式包括以下几类:
[mw_shl_code=text,true]1、TEXTFILE
2、SEQUENCEFILE
3、RCFILE
4、ORCFILE(0.11以后出现)[/mw_shl_code]
其中TEXTFILE为默认格式,建表时不指定默认为这个格式,导入数据时会直接把数据文件拷贝到hdfs上不进行处理。
SEQUENCEFILE,RCFILE,ORCFILE格式的表不能直接从本地文件导入数据,数据要先导入到textfile格式的表中, 然后再从表中用insert导入SequenceFile,RCFile,ORCFile表中。
1、TEXTFILE 格式
默认格式,数据不做压缩,磁盘开销大,数据解析开销大。 可结合Gzip、Bzip2使用(系统自动检查,执行查询时自动解压),但使用这种方式,hive不会对数据进行切分, 从而无法对数据进行并行操作。
[mw_shl_code=sql,true]示例:
create table if not exists textfile_table(
site string,
url string,
pv bigint,
label string)
row format delimited
fields terminated by '\t'
stored as textfile;
插入数据操作:
set hive.exec.compress.output=true;
set mapred.output.compress=true;
set mapred.output.compression.codec=org.apache.hadoop.io.compress.GzipCodec;
set io.compression.codecs=org.apache.hadoop.io.compress.GzipCodec;
insert overwrite table textfile_table select * from textfile_table; [/mw_shl_code]
2、SEQUENCEFILE 格式
SequenceFile是Hadoop API提供的一种二进制文件支持,其具有使用方便、可分割、可压缩的特点。 SequenceFile支持三种压缩选择:NONE,RECORD,BLOCK。Record压缩率低,一般建议使用BLOCK压缩。
[mw_shl_code=sql,true]示例:
create table if not exists seqfile_table(
site string,
url string,
pv bigint,
label string)
row format delimited
fields terminated by '\t'
stored as sequencefile;
插入数据操作:
set hive.exec.compress.output=true;
set mapred.output.compress=true;
set mapred.output.compression.codec=org.apache.hadoop.io.compress.GzipCodec;
set io.compression.codecs=org.apache.hadoop.io.compress.GzipCodec;
SET mapred.output.compression.type=BLOCK;
insert overwrite table seqfile_table select * from textfile_table; [/mw_shl_code]
3、RCFILE 文件格式
RCFILE是一种行列存储相结合的存储方式。首先,其将数据按行分块,保证同一个record在一个块上,避免读一个记录需要读取多个block。其次,块数据列式存储,有利于数据压缩和快速的列存取。
[mw_shl_code=sql,true]RCFILE文件示例:
create table if not exists rcfile_table(
site string,
url string,
pv bigint,
label string)
row format delimited
fields terminated by '\t'
stored as rcfile;
插入数据操作:
set hive.exec.compress.output=true;
set mapred.output.compress=true;
set mapred.output.compression.codec=org.apache.hadoop.io.compress.GzipCodec;
set io.compression.codecs=org.apache.hadoop.io.compress.GzipCodec;
insert overwrite table rcfile_table select * from textfile_table;[/mw_shl_code]
总结: 相比TEXTFILE和SEQUENCEFILE,RCFILE由于列式存储方式,数据加载时性能消耗较大,但是具有较好的压缩比和查询响应。数据仓库的特点是一次写入、多次读取,因此,整体来看,RCFILE相比其余两种格式具有较明显的优势。
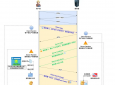
三、Hive 工作原理
Hive 工作原理如下图所示。
MapReduce 开发人员可以把自己写的 Mapper 和 Reducer 作为插件支持 Hive 做更复杂的数据分析。 它与关系型数据库的 SQL 略有不同,但支持了绝大多数的语句(如 DDL、DML)以及常见的聚合函数、连接查询、条件查询等操作。
Hive 不适合用于联机(online) 事务处理,也不提供实时查询功能。它最适合应用在基于大量不可变数据的批处理作业。Hive 的特点是可 伸缩(在Hadoop 的集群上动态的添加设备),可扩展、容错、输入格式的松散耦合。Hive 的入口是DRIVER ,执行的 SQL 语句首先提交到 DRIVER 驱动,然后调用 COMPILER 解释驱动, 最终解释成 MapReduce 任务执行,最后将结果返回。
四、Hive安装步骤
Hive 安装依赖 Hadoop 的集群,它是运行在 Hadoop 的基础上。 所以在安装 Hive 之前,保证 Hadoop 集群能够成功运行。Hive的安装详细流程如下所示。
1、 下载Hive
2、把Hive安装包apache-hive-1.0.0-bin.tar.gz移动到/home/hadoop/app/目录下并解压,然后将文件名称改为 hive。 [mw_shl_code=shell,true][hadoop@ywendeng app]$ tar -zxvf apache-hive-1.0.0-bin.tar.gz
[hadoop@ywendeng app]$ mv apache-hive-1.0.0-bin hive[/mw_shl_code]
3、 添加hive环境变量
在/etc/profile文件中增加如下内容:
[mw_shl_code=shell,true][root@ywendeng ~]$ vi /etc/profile
HIVE_HOME=/home/hadoop/app/hive
PATH=$JAVA_HOME/bin:$HADOOP_HOME/bin:$HIVE_HOME/bin:$PATH
export HIVE_HOME[/mw_shl_code]
保存退出后,通过source命令使配置文件生效
[mw_shl_code=shell,true][root@ywendeng ~]$ source /etc/profile[/mw_shl_code]
4、 启动 Hive
此时切换用户至 hadoop 用户,在命令行输入“hive”命令进行测试。
[mw_shl_code=shell,true][hadoop@ ywendeng ]$ hive
hive>[/mw_shl_code]
在启动hive的过程中可能遇到的错误及解决办法:
[mw_shl_code=shell,true][错误1]
Caused by: java.net.ConnectException: Connection refused
at sun.nio.ch.SocketChannelImpl.checkConnect(Native Method)
at sun.nio.ch.SocketChannelImpl.finishConnect(SocketChannelImpl.java:739)
at org.apache.hadoop.net.SocketIOWithTimeout.connect(SocketIOWithTimeout.java:206)
at org.apache.hadoop.net.NetUtils.connect(NetUtils.java:529)
at org.apache.hadoop.net.NetUtils.connect(NetUtils.java:493)
at org.apache.hadoop.ipc.Client$Connection.setupConnection(Client.java:604)
at org.apache.hadoop.ipc.Client$Connection.setupIOstreams(Client.java:699)
at org.apache.hadoop.ipc.Client$Connection.access$2800(Client.java:367)
at org.apache.hadoop.ipc.Client.getConnection(Client.java:1462)
at org.apache.hadoop.ipc.Client.call(Client.java:1381)
异常原因: hadoop 没有启动
解决办法:在hadoop 安装目录下启动hadoop: 使用命令 sbin/start-all.sh [/mw_shl_code]
[mw_shl_code=shell,true][错误2]
[ERROR] Terminal initialization failed; falling back to unsupported
java.lang.IncompatibleClassChangeError: Found class jline.Terminal, but interface was expected
at jline.TerminalFactory.create(TerminalFactory.java:101)
at jline.TerminalFactory.get(TerminalFactory.java:158)
at jline.console.ConsoleReader.<init>(ConsoleReader.java:229)
at jline.console.ConsoleReader.<init>(ConsoleReader.java:221)
at jline.console.ConsoleReader.<init>(ConsoleReader.java:209)
at org.apache.hadoop.hive.cli.CliDriver.setupConsoleReader(CliDriver.java:787)
at org.apache.hadoop.hive.cli.CliDriver.executeDriver(CliDriver.java:721)
at org.apache.hadoop.hive.cli.CliDriver.run(CliDriver.java:681)
at org.apache.hadoop.hive.cli.CliDriver.main(CliDriver.java:621)
at sun.reflect.NativeMethodAccessorImpl.invoke0(Native Method)
at sun.reflect.NativeMethodAccessorImpl.invoke(NativeMethodAccessorImpl.java:57)
at sun.reflect.DelegatingMethodAccessorImpl.invoke(DelegatingMethodAccessorImpl.java:43)
at java.lang.reflect.Method.invoke(Method.java:606)
at org.apache.hadoop.util.RunJar.main(RunJar.java:212)
Exception in thread "main" java.lang.IncompatibleClassChangeError: Found class jline.Terminal, but interface was expected
at jline.console.ConsoleReader.<init>(ConsoleReader.java:230)
at jline.console.ConsoleReader.<init>(ConsoleReader.java:221)
at jline.console.ConsoleReader.<init>(ConsoleReader.java:209)
at org.apache.hadoop.hive.cli.CliDriver.setupConsoleReader(CliDriver.java:787)
at org.apache.hadoop.hive.cli.CliDriver.executeDriver(CliDriver.java:721)
at org.apache.hadoop.hive.cli.CliDriver.run(CliDriver.java:681)
at org.apache.hadoop.hive.cli.CliDriver.main(CliDriver.java:621)
at sun.reflect.NativeMethodAccessorImpl.invoke0(Native Method)
at sun.reflect.NativeMethodAccessorImpl.invoke(NativeMethodAccessorImpl.java:57)
at sun.reflect.DelegatingMethodAccessorImpl.invoke(DelegatingMethodAccessorImpl.java:43)
at java.lang.reflect.Method.invoke(Method.java:606)
at org.apache.hadoop.util.RunJar.main(RunJar.java:212)
异常解决办法:
将hive下的新版本jline的JAR包拷贝到hadoop下:
cp /hive/apache-hive-1.2.1-bin/lib/jline-2.12.jar /cloud/hadoop-2.4.1/share/hadoop/yarn/lib[/mw_shl_code]
1) 测试 Hive 是否安装成功。
[mw_shl_code=shell,true]hive> show tables;
OK
Time taken: 0.043 seconds[/mw_shl_code]
2) 创建表。
[mw_shl_code=shell,true]hive> create table test_table (id int ,name string,no int);
OK
Time taken: 0.5 seconds[/mw_shl_code]
3) 查询表。
[mw_shl_code=shell,true]hive> select * from test_table;
OK
Time taken: 0.953 seconds[/mw_shl_code]
如果创建表和查询表操作没有出错,就说明 Hive 安装成功。
来源:csdn 作者:JimGray11
| 
 /2
/2 


 提升卡
提升卡 置顶卡
置顶卡 沉默卡
沉默卡 喧嚣卡
喧嚣卡 变色卡
变色卡 千斤顶
千斤顶 显身卡
显身卡