本帖最后由 pig2 于 2015-1-6 14:11 编辑
问题导读
1、本地读取和远程读取有什么区别?
2、什么是TachyonStore?
3、什么是楔子?

本文接前几篇
Apache Spark源码走读之1 -- Task运行期之函数调用关系分析
Apache Spark源码走读之2 -- DStream实时流数据处理
Apache Spark源码走读之3-- DStream处理的容错性分析
楔子
Spark计算速度远胜于Hadoop的原因之一就在于中间结果是缓存在内存而不是直接写入到disk,本文尝试分析Spark中存储子系统的构成,并以数据写入和数据读取为例,讲述清楚存储子系统中各部件的交互关系。
存储子系统概览

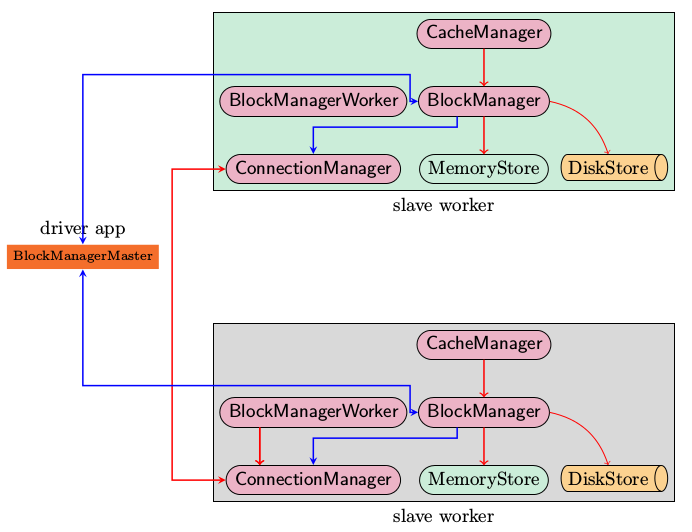
上图是Spark存储子系统中几个主要模块的关系示意图,现简要说明如下
- CacheManager RDD在进行计算的时候,通过CacheManager来获取数据,并通过CacheManager来存储计算结果
- BlockManager CacheManager在进行数据读取和存取的时候主要是依赖BlockManager接口来操作,BlockManager决定数据是从内存(MemoryStore)还是从磁盘(DiskStore)中获取
- MemoryStore 负责将数据保存在内存或从内存读取
- DiskStore 负责将数据写入磁盘或从磁盘读入
- BlockManagerWorker 数据写入本地的MemoryStore或DiskStore是一个同步操作,为了容错还需要将数据复制到别的计算结点,以防止数据丢失的时候还能够恢复,数据复制的操作是异步完成,由BlockManagerWorker来处理这一部分事情
- ConnectionManager 负责与其它计算结点建立连接,并负责数据的发送和接收
- BlockManagerMaster 注意该模块只运行在Driver Application所在的Executor,功能是负责记录下所有BlockIds存储在哪个SlaveWorker上,比如RDD Task运行在机器A,所需要的BlockId为3,但在机器A上没有BlockId为3的数值,这个时候Slave worker需要通过BlockManager向BlockManagerMaster询问数据存储的位置,然后再通过ConnectionManager去获取,具体参看“数据远程获取一节”
支持的操作
由于BlockManager起到实际的存储管控作用,所以在讲支持的操作的时候,以BlockManager中的public api为例
- put 数据写入
- get 数据读取
- remoteRDD 数据删除,一旦整个job完成,所有的中间计算结果都可以删除
启动过程分析
上述的各个模块由SparkEnv来创建,创建过程在SparkEnv.create中完成
- val blockManagerMaster = new BlockManagerMaster(registerOrLookup(
- "BlockManagerMaster",
- new BlockManagerMasterActor(isLocal, conf)), conf)
- val blockManager = new BlockManager(executorId, actorSystem, blockManagerMaster, serializer, conf)
-
- val connectionManager = blockManager.connectionManager
- val broadcastManager = new BroadcastManager(isDriver, conf)
- val cacheManager = new CacheManager(blockManager)
这段代码容易让人疑惑,看起来像是在所有的cluster node上都创建了BlockManagerMasterActor,其实不然,仔细看registerOrLookup函数的实现。如果当前节点是driver则创建这个actor,否则建立到driver的连接。
- def registerOrLookup(name: String, newActor: => Actor): ActorRef = {
- if (isDriver) {
- logInfo("Registering " + name)
- actorSystem.actorOf(Props(newActor), name = name)
- } else {
- val driverHost: String = conf.get("spark.driver.host", "localhost")
- val driverPort: Int = conf.getInt("spark.driver.port", 7077)
- Utils.checkHost(driverHost, "Expected hostname")
- val url = s"akka.tcp://spark@$driverHost:$driverPort/user/$name"
- val timeout = AkkaUtils.lookupTimeout(conf)
- logInfo(s"Connecting to $name: $url")
- Await.result(actorSystem.actorSelection(url).resolveOne(timeout), timeout)
- }
- }
初始化过程中一个主要的动作就是BlockManager需要向BlockManagerMaster发起注册
数据写入过程分析

数据写入的简要流程
- RDD.iterator是与storage子系统交互的入口
- CacheManager.getOrCompute调用BlockManager的put接口来写入数据
- 数据优先写入到MemoryStore即内存,如果MemoryStore中的数据已满则将最近使用次数不频繁的数据写入到磁盘
- 通知BlockManagerMaster有新的数据写入,在BlockManagerMaster中保存元数据
- 将写入的数据与其它slave worker进行同步,一般来说在本机写入的数据,都会另先一台机器来进行数据的备份,即replicanumber=1
序列化与否
写入的具体内容可以是序列化之后的bytes也可以是没有序列化的value. 此处有一个对scala的语法中Either, Left, Right关键字的理解。
数据读取过程分析
- def get(blockId: BlockId): Option[Iterator[Any]] = {
- val local = getLocal(blockId)
- if (local.isDefined) {
- logInfo("Found block %s locally".format(blockId))
- return local
- }
- val remote = getRemote(blockId)
- if (remote.isDefined) {
- logInfo("Found block %s remotely".format(blockId))
- return remote
- }
- None
- }
本地读取
首先在查询本机的MemoryStore和DiskStore中是否有所需要的block数据存在,如果没有则发起远程数据获取。
远程读取
远程获取调用路径, getRemote->doGetRemote, 在doGetRemote中最主要的就是调用BlockManagerWorker.syncGetBlock来从远程获得数据
- def syncGetBlock(msg: GetBlock, toConnManagerId: ConnectionManagerId): ByteBuffer = {
- val blockManager = blockManagerWorker.blockManager
- val connectionManager = blockManager.connectionManager
- val blockMessage = BlockMessage.fromGetBlock(msg)
- val blockMessageArray = new BlockMessageArray(blockMessage)
- val responseMessage = connectionManager.sendMessageReliablySync(
- toConnManagerId, blockMessageArray.toBufferMessage)
- responseMessage match {
- case Some(message) => {
- val bufferMessage = message.asInstanceOf[BufferMessage]
- logDebug("Response message received " + bufferMessage)
- BlockMessageArray.fromBufferMessage(bufferMessage).foreach(blockMessage => {
- logDebug("Found " + blockMessage)
- return blockMessage.getData
- })
- }
- case None => logDebug("No response message received")
- }
- null
- }
上述这段代码中最有意思的莫过于sendMessageReliablySync,远程数据读取毫无疑问是一个异步i/o操作,这里的代码怎么写起来就像是在进行同步的操作一样呢。也就是说如何知道对方发送回来响应的呢?
别急,继续去看看sendMessageReliablySync的定义
- def sendMessageReliably(connectionManagerId: ConnectionManagerId, message: Message)
- : Future[Option[Message]] = {
- val promise = Promise[Option[Message]]
- val status = new MessageStatus(
- message, connectionManagerId, s => promise.success(s.ackMessage))
- messageStatuses.synchronized {
- messageStatuses += ((message.id, status))
- }
- sendMessage(connectionManagerId, message)
- promise.future
- }
要是我说秘密在这里,你肯定会说我在扯淡,但确实在此处。注意到关键字Promise和Future没。
如果这个future执行完毕,返回s.ackMessage。我们再看看这个ackMessage是在什么地方被写入的呢。看一看ConnectionManager.handleMessage中的代码片段
- case bufferMessage: BufferMessage => {
- if (authEnabled) {
- val res = handleAuthentication(connection, bufferMessage)
- if (res == true) {
- // message was security negotiation so skip the rest
- logDebug("After handleAuth result was true, returning")
- return
- }
- }
- if (bufferMessage.hasAckId) {
- val sentMessageStatus = messageStatuses.synchronized {
- messageStatuses.get(bufferMessage.ackId) match {
- case Some(status) => {
- messageStatuses -= bufferMessage.ackId
- status
- }
- case None => {
- throw new Exception("Could not find reference for received ack message " +
- message.id)
- null
- }
- }
- }
- sentMessageStatus.synchronized {
- sentMessageStatus.ackMessage = Some(message)
- sentMessageStatus.attempted = true
- sentMessageStatus.acked = true
- sentMessageStaus.markDone()
- }
注意,此处的所调用的sentMessageStatus.markDone就会调用在sendMessageReliablySync中定义的promise.Success. 不妨看看MessageStatus的定义。
- class MessageStatus(
- val message: Message,
- val connectionManagerId: ConnectionManagerId,
- completionHandler: MessageStatus => Unit) {
-
- var ackMessage: Option[Message] = None
- var attempted = false
- var acked = false
-
- def markDone() { completionHandler(this) }
- }
我想至此调用关系搞清楚了,scala中的Future和Promise理解起来还有有点费劲。
TachyonStore
在Spark的最新源码中,Storage子系统引入了TachyonStore. TachyonStore是在内存中实现了hdfs文件系统的接口,主要目的就是尽可能的利用内存来作为数据持久层,避免过多的磁盘读写操作。
有关该模块的功能介绍,可以参考http://www.meetup.com/spark-users/events/117307472/
小结
一点点疑问,目前在Spark的存储子系统中,通信模块里传递的数据即有“心跳检测消息”,“数据同步的消息”又有“数据获取之类的信息流”。如果可能的话,要将心跳检测与数据同步即数据获取所使用的网卡分离以提高可靠性。
相关内容
Apache Spark源码走读之1 -- Spark论文阅读笔记
Apache Spark源码走读之2 -- Job的提交与运行
Apache Spark源码走读之3-- Task运行期之函数调用关系分析
Apache Spark源码走读之4 -- DStream实时流数据处理
Apache Spark源码走读之5-- DStream处理的容错性分析
Apache Spark源码走读之7 -- Standalone部署方式分析
Apache Spark源码走读之8 -- Spark on Yarn
Apache Spark源码走读之9 -- Spark源码编译
Apache Spark源码走读之10 -- 在YARN上运行SparkPi
Apache Spark源码走读之11 -- sql的解析与执行
Apache Spark源码走读之12 -- Hive on Spark运行环境搭建
Apache Spark源码走读之13 -- hiveql on spark实现详解
Apache Spark源码走读之14 -- Graphx实现剖析
Apache Spark源码走读之15 -- Standalone部署模式下的容错性分析
Apache Spark源码走读之16 -- spark repl实现详解
Apache Spark源码走读之17 -- 如何进行代码跟读
Apache Spark源码走读之18 -- 使用Intellij idea调试Spark源码
Apache Spark源码走读之19 -- standalone cluster模式下资源的申请与释放
Apache Spark源码走读之20 -- ShuffleMapTask计算结果的保存与读取
Apache Spark源码走读之21 -- WEB UI和Metrics初始化及数据更新过程分析
Apache Spark源码走读之22 -- 浅谈mllib中线性回归的算法实现
Apache Spark源码走读之23 -- Spark MLLib中拟牛顿法L-BFGS的源码实现
Apache Spark源码走读之24 -- Sort-based Shuffle的设计与实现
http://www.cnblogs.com/hseagle/p/3673138.html
|  /2
/2 