本帖最后由 levycui 于 2018-1-2 11:39 编辑
问题导读:
1、如何最好地连接各种图层?
2、如何计算卷积层的输出大小?
3、有哪些损失函数?
4、不同损失函数之间的差异有哪些?

上一篇:TensorFlow ML cookbook 第二章1、2节 计算图中的运算和分层嵌套操作
使用多个图层
现在我们已经涵盖了多个操作,我们将介绍如何连接通过它们传播数据的各个图层。
准备
在这个章节中,我们将介绍如何最好地连接各种图层,包括自定义图层。
我们将生成和使用的数据将代表小的随机图像。 最好通过一个简单的例子来理解这些类型的操作,以及如何使用一些内置的层来执行计算。 我们将在2D图像上执行一个小的移动窗口平均值,然后通过自定义操作层来传递结果输出。
在这一节中,我们将看到,计算图可能会变得很大,很难看。 为了解决这个问题,我们还将介绍如何命名操作并为图层创建范围。 要开始,加载numpy和tensorflow并创建一个图形,使用以下内容:
[mw_shl_code=python,true]import tensorflow as tf
import numpy as np
sess = tf.Session()[/mw_shl_code]
如何做
1.首先我们用numpy创建我们的二维图像样本。 这个图像将是一个4x4像素的图像。 我们将在四个方面创造它; 第一个和最后一个维度将有一个大小。 请注意,一些TensorFlow图像功能将在四维图像上运行。 这四个维度是图像编号,高度,宽度和通道,并且使其具有一个通道的一个图像,我们将两个维度设置为1,如下所示:
[mw_shl_code=python,true]x_shape = [1, 4, 4, 1]
x_val = np.random.uniform(size=x_shape)[/mw_shl_code]
2. 现在,我们必须在我们的图中创建占位符,在这里我们可以提供示例图像,如下所示:
[mw_shl_code=python,true]x_data = tf.placeholder(tf.float32, shape=x_shape)[/mw_shl_code]
3.为了在我们的4x4图像上创建一个移动的窗口平均值,我们将使用一个内置的函数,它将在一个形状为2x2的窗口上卷积一个常量。 这个函数在图像处理和TensorFlow中使用相当普遍,我们将使用的函数是conv2d()。 这个函数采用窗口和我们指定的过滤器的分段产品。 我们还必须指明双向移动窗口的步伐。 这里我们将计算四个移动窗口平均值,即左上角,右上角,左下角和右下角四个像素。 我们通过创建一个2×2窗口并在每个方向上有2个步长来实现这一点。 为了取平均值,我们将以0.25的常数来卷积2x2窗口,如下所示:
[mw_shl_code=python,true]my_filter = tf.constant(0.25, shape=[2, 2, 1, 1])
my_strides = [1, 2, 2, 1]
mov_avg_layer= tf.nn.conv2d(x_data, my_filter, my_strides,
padding='SAME''', name='Moving'_Avg_ Window')[/mw_shl_code]
要计算卷积层的输出大小,我们可以使用下面的公式:输出=(W-F + 2P)/ S + 1,其中W是输入大小,F是过滤器大小,P是 零,S是迈步。
4.注意我们也使用函数的name参数来命名这个图层Moving_Avg_Window。
5.现在我们定义一个自定义层,它将在移动窗口平均值的2x2输出上进行操作。 自定义函数首先将输入乘以另一个2×2矩阵张量,然后为每个条目添加一个。 在此之后,我们采取每个元素的sigmoid并返回2x2矩阵。 由于矩阵乘法只能在二维矩阵上运行,所以我们需要删除尺寸为1的图像的额外尺寸.TensorFlow可以使用内置函数squeeze()来实现。 在这里我们定义新的图层:
[mw_shl_code=python,true]def custom_layer(input_matrix):
input_matrix_sqeezed = tf.squeeze(input_matrix)
A = tf.constant([[1., 2.], [-1., 3.]])
b = tf.constant(1., shape=[2, 2])
temp1 = tf.matmul(A, input_matrix_sqeezed)
temp = tf.add(temp1, b) # Ax + b
return(tf.sigmoid(temp)) [/mw_shl_code]
6.现在我们必须在图表上放置新图层。 我们将使用一个命名的范围来做到这一点,以便它在计算图上是可识别的,可折叠/可展开的,如下所示:
[mw_shl_code=python,true]with tf.name_scope('Custom_Layer') as scope:
custom_layer1 = custom_layer(mov_avg_layer)
[/mw_shl_code]
7.现在我们只是在占位符中的4x4图像中进行提示,并告诉TensorFlow运行图形,如下所示:
[mw_shl_code=python,true]print(sess.run(custom_layer1, feed_dict={x_data: x_val}))
[[ 0.91914582 0.96025133]
[ 0.87262219 0.9469803 ]] [/mw_shl_code]
如何运行
可视化的图形看起来更好的命名的操作和层的范围。 我们可以折叠并展开自定义图层,因为我们在一个命名范围内创建了它。 在下图中,请参阅左侧的折叠版本和右侧的展开版本:

图3:两层的计算图。 第一层被命名为Moving_Avg_Window,第二层是一个名为Custom_Layer的操作集合。 它在左侧折叠并在右侧展开。
实施损失函数
损失函数对机器学习算法非常重要。他们测量模型输出和目标(真值)之间的距离。在这个配方中,我们展示了TensorFlow中的各种损失函数的实现。
准备
为了优化我们的机器学习算法,我们需要评估结果。在TensorFlow中评估结果取决于指定一个损失函数。损失函数告诉TensorFlow预测与预期结果的好坏。在大多数情况下,我们将有一组数据和一个目标来训练我们的算法。损失函数将目标与预测进行比较,并给出两者之间的数字距离。
对于这方面,我们将介绍我们可以在TensorFlow中实现的主要损失函数。
要看看不同的损失函数如何运作,我们将在这个配方中绘制它们。我们将首先启动一个计算图并加载一个python绘图库matplotlib,如下所示:
import matplotlib.pyplot as plt
import tensorflow as tf
如何做
首先我们将讨论回归的损失函数,即预测一个连续的因变量。 首先,我们将创建一系列我们的预测和目标作为一个张量。 我们将在-1和1之间输出500个x值的结果。请参阅下一部分的输出图。 使用下面的代码:
[mw_shl_code=python,true]x_vals = tf.linspace(-1., 1., 500)
target = tf.constant(0.) [/mw_shl_code]
1.L2范数损失也称为欧几里得损失函数。 这只是距离目标的距离的平方。 这里我们将计算损失函数,就好像目标是零。 L2范数是一个很大的损失函数,因为它在目标附近是非常弯曲的,算法可以用这个事实来更慢地收敛到目标,它越接近它,如下:
l2_y_vals = tf.square(target - x_vals)
l2_y_out = sess.run(l2_y_vals)
TensorFlow具有L2标准的内置形式,称为nn.l2_loss()。 这个函数实际上是上面L2范数的一半。 换句话说,它与以前相同,除以2。
2.L1范数损失也称为绝对损失函数。 而不是平衡差异,我们取绝对值。 L1范数比L2范数更适合异常值,因为对于更大的值而言,它并不是很陡。 需要注意的一个问题是,L1范数在目标上并不平滑,这可能导致算法不能很好地收敛。 它显示如下:
l1_y_vals = tf.abs(target - x_vals)
l1_y_out = sess.run(l1_y_vals)
3. Pseudo-Huber loss是Huber损失函数的连续和平滑的近似。 这种损失函数试图通过在目标附近凸出来取得L1和L2准则中的最好的结果,而对于极值而言则不太陡峭。 表格取决于一个额外的参数,三角洲,这决定了它将是多么陡峭。 我们将绘制两种形式,delta1 = 0.25和delta2 = 5来表示差异,如下所示:
[mw_shl_code=python,true]delta1 = tf.constant(0.25)
phuber1_y_vals = tf.mul(tf.square(delta1), tf.sqrt(1. +
tf.square((target - x_vals)/delta1)) - 1.)
phuber1_y_out = sess.run(phuber1_y_vals)
delta2 = tf.constant(5.)
phuber2_y_vals = tf.mul(tf.square(delta2), tf.sqrt(1. +
tf.square((target - x_vals)/delta2)) - 1.)
phuber2_y_out = sess.run(phuber2_y_vals) [/mw_shl_code]
4.预测分类结果时,使用分类损失函数来评估损失。
5.我们需要重新定义我们的预测(x_vals)和目标。 我们将保存输出并将其绘制在下一节中。 使用以下内容:
[mw_shl_code=python,true]x_vals = tf.linspace(-3., 5., 500)
target = tf.constant(1.)
targets = tf.fill([500,], 1.) [/mw_shl_code]
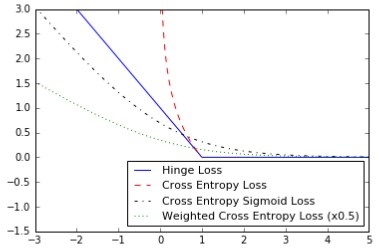
6.损失主要用于支持向量机,但也可用于神经网络。 这意味着计算两个目标类别1和-1之间的损失。 在下面的代码中,我们使用的是目标值1,所以我们的预测越接近1,损失值越低:
[mw_shl_code=python,true]hinge_y_vals = tf.maximum(0., 1. - tf.mul(target, x_vals))
hinge_y_out = sess.run(hinge_y_vals)[/mw_shl_code]
7.二元情况下的交叉熵损失有时也被称为逻辑损失函数。 它是关于什么时候我们预测两个类别0或1.我们希望测量从实际类别(0或1)到预测值的距离,这通常是一个介于0和1之间的实数。要测量这个距离,我们可以使用
从信息论交叉熵公式如下:
[mw_shl_code=python,true]xentropy_y_vals = - tf.mul(target, tf.log(x_vals)) - tf.mul((1. -target), tf.log(1. - x_vals))
xentropy_y_out = sess.run(xentropy_y_vals)[/mw_shl_code]
8.S形交叉熵损失与前面的损失函数非常相似,除了我们在将它们置于交叉熵损失之前,用sigmoid函数来转换x值如下:
[mw_shl_code=python,true]xentropy_sigmoid_y_vals = tf.nn.sigmoid_cross_entropy_with_logits(x_vals, targets)
xentropy_sigmoid_y_out = sess.run(xentropy_sigmoid_y_vals)[/mw_shl_code]
9.加权交叉熵损失是S形交叉熵损失的加权版本。 我们对积极的目标给予了重视。 举一个例子,我们将把正面目标加权0.5,如下:
[mw_shl_code=python,true]weight = tf.constant(0.5)
xentropy_weighted_y_vals = tf.nn.weighted_cross_entropy_with_logits(x_vals, targets, weight)
xentropy_weighted_y_out = sess.run(xentropy_weighted_y_vals)[/mw_shl_code]
10. Softmax交叉熵损失对非归一化输出进行操作。 当只有一个目标类别而不是多个目标时,该功能用于测量损失。 因此,函数通过softmax函数将输出转换成概率分布,然后从真实概率分布计算损失函数,如下所示:
[mw_shl_code=python,true]unscaled_logits = tf.constant([[1., -3., 10.]])
target_dist = tf.constant([[0.1, 0.02, 0.88]])
softmax_xentropy = tf.nn.softmax_cross_entropy_with_logits(unscaled_logits, target_dist)
print(sess.run(softmax_xentropy))
[ 1.16012561][/mw_shl_code]
11.softmax交叉熵损失与以前相同,除了目标是一个概率分布,它是一个真实的指标。 我们只需传入索引中哪些类别是真值,而不是一个稀疏的全零目标矢量,如下所示:
[mw_shl_code=python,true]unscaled_logits = tf.constant([[1., -3., 10.]])
sparse_target_dist = tf.constant([2])
sparse_xentropy = tf.nn.sparse_softmax_cross_entropy_with_ logits(unscaled_logits, sparse_target_dist)
print(sess.run(sparse_xentropy))
[ 0.00012564] [/mw_shl_code]
如何运行
以下是如何使用matplotlib绘制回归损失函数:
[mw_shl_code=python,true]x_array = sess.run(x_vals)
plt.plot(x_array, l2_y_out, 'b-', label='L2 Loss')
plt.plot(x_array, l1_y_out, 'r--', label='L1 Loss')
plt.plot(x_array, phuber1_y_out, 'k-.', label='P-Huber Loss (0.25)')
plt.plot(x_array, phuber2_y_out, 'g:', label='P'-Huber Loss (5.0)')
plt.ylim(-0.2, 0.4)
plt.legend(loc='lower right', prop={'size': 11})
plt.show()[/mw_shl_code]
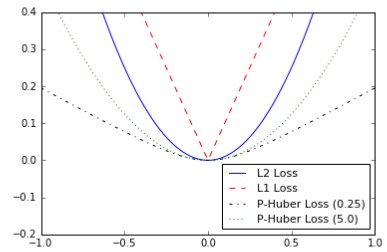
图4:绘制各种回归损失函数
这里是如何使用matplotlib绘制各种分类损失函数:
[mw_shl_code=python,true]x_array = sess.run(x_vals)
plt.plot(x_array, hinge_y_out, 'b-', label='Hinge Loss')
plt.plot(x_array, xentropy_y_out, 'r--', label='Cross Entropy Loss')
plt.plot(x_array, xentropy_sigmoid_y_out, 'k-.', label='Cross Entropy Sigmoid Loss')
plt.plot(x_array, xentropy_weighted_y_out, g:', label='Weighted Cross Enropy Loss (x0.5)')
plt.ylim(-1.5, 3)
plt.legend(loc='lower right', prop={'size': 11})
plt.show()[/mw_shl_code]
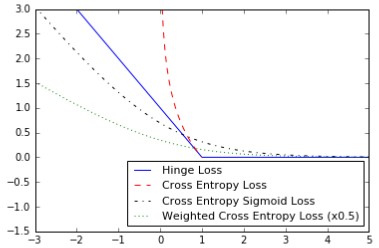
图5:分类损失函数图。
参考更多
下面是一张总结我们所描述的不同损失函数的表格:
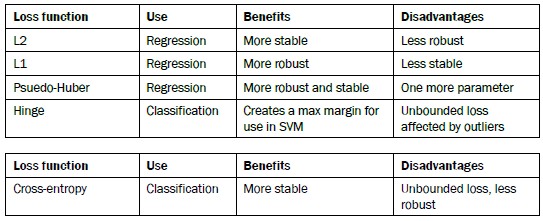
剩余的分类损失函数都与交叉熵损失的类型有关。 交叉熵sigmoid损失函数用于未缩放的logits,优于计算sigmoid,然后是交叉熵,因为TensorFlow具有更好的内置方式来处理数值边缘情况。 softmax交叉熵和softmax交叉熵也是一样。
这里描述的大多数分类损失函数是用于两个类别的预测。 这可以通过在每个预测/目标上叠加交叉熵项来扩展到多个类别。
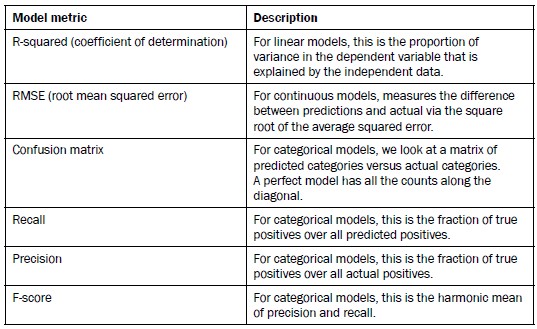
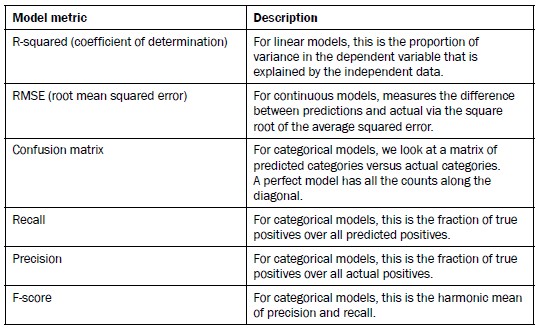
评估模型时还有许多其他指标需要考虑。 以下是一些需要考虑的事项:
原文:
Working with Multiple Layers
Now that we have covered multiple operations, we will cover how to connect various layers that have data propagating through them.
Getting ready
In this recipe, we will introduce how to best connect various layers, including custom layers.
The data we will generate and use will be representative of small random images. It is best to
understand these types of operation on a simple example and how we can use some built-in
layers to perform calculations. We will perform a small moving window average across a 2D
image and then flow the resulting output through a custom operation layer.
In this section, we will see that the computational graph can get large and hard to look at. To
address this, we will also introduce ways to name operations and create scopes for layers. To
start, load numpy and tensorflow and create a graph, using the following:
import tensorflow as tf
import numpy as np
sess = tf.Session()
How to do it…
1. First we create our sample 2D image with numpy. This image will be a 4x4 pixel
image. We will create it in four dimensions; the first and last dimension will have
a size of one. Note that some TensorFlow image functions will operate on fourdimensional
images. Those four dimensions are image number, height, width, and
channel, and to make it one image with one channel, we set two of the dimensions to 1, as follows:
x_shape = [1, 4, 4, 1]
x_val = np.random.uniform(size=x_shape)
2. Now we have to create the placeholder in our graph where we can feed in the sample
image, as follows:
x_data = tf.placeholder(tf.float32, shape=x_shape)
3.To create a moving window average across our 4x4 image, we will use a built-in function that will convolute a constant across a window of the shape 2x2. This function is quite common to use in image processing and in TensorFlow, the function we will use is conv2d(). This function takes a piecewise product of the window and a filter we specify. We must also specify a stride for the moving window in both directions. Here we will compute four moving window averages, the top left, top right, bottom left, and bottom right four pixels. We do this by creating a 2x2 window and having strides of length 2 in each direction. To take the average, we will convolute the 2x2 window with a constant of 0.25., as follows:
my_filter = tf.constant(0.25, shape=[2, 2, 1, 1])
my_strides = [1, 2, 2, 1]
mov_avg_layer= tf.nn.conv2d(x_data, my_filter, my_strides,
padding='SAME''', name='Moving'_Avg_ Window')
To figure out the output size of a convolutional layer, we can use the following formula: Output = (W-F+2P)/S+1, where W is the input size, F is the filter size, P is the padding of zeros, and S is the stride.
4.Note that we are also naming this layer Moving_Avg_Window by using the name argument of the function.
5.Now we define a custom layer that will operate on the 2x2 output of the moving window average. The custom function will first multiply the input by another 2x2 matrix tensor, and then add one to each entry. After this we take the sigmoid of each element and return the 2x2 matrix. Since matrix multiplication only operates on two-dimensional matrices, we need to drop the extra dimensions of our image that are of size 1. TensorFlow can do this with the built-in function squeeze(). Here we define the new layer:
def custom_layer(input_matrix):
input_matrix_sqeezed = tf.squeeze(input_matrix)
A = tf.constant([[1., 2.], [-1., 3.]])
b = tf.constant(1., shape=[2, 2])
temp1 = tf.matmul(A, input_matrix_sqeezed)
temp = tf.add(temp1, b) # Ax + b
return(tf.sigmoid(temp))
6.Now we have to place the new layer on the graph. We will do this with a named scope so that it is identifiable and collapsible/expandable on the computational graph, as follows:
with tf.name_scope('Custom_Layer') as scope:
custom_layer1 = custom_layer(mov_avg_layer)
7.Now we just feed in the 4x4 image in the placeholder and tell TensorFlow to run the graph, as follows:
print(sess.run(custom_layer1, feed_dict={x_data: x_val}))
[[ 0.91914582 0.96025133]
[ 0.87262219 0.9469803 ]]
How it works…
The visualized graph looks better with the naming of operations and scoping of layers. We can collapse and expand the custom layer because we created it in a named scope. In the following figure, see the collapsed version on the left and the expanded version on the right:
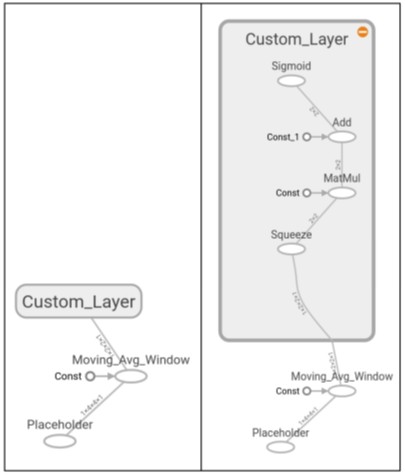
Figure 3: Computational graph with two layers. The first layer is named as Moving_Avg_Window, and the second is a collection of operations called Custom_Layer. It is collapsed on the left and expanded on the right.
Implementing Loss Functions
Loss functions are very important to machine learning algorithms. They measure the distance between the model outputs and the target (truth) values. In this recipe, we show various loss function implementations in TensorFlow.
Getting ready
In order to optimize our machine learning algorithms, we will need to evaluate the outcomes. Evaluating outcomes in TensorFlow depends on specifying a loss function. A loss function tells TensorFlow how good or bad the predictions are compared to the desired result. In most cases, we will have a set of data and a target on which to train our algorithm. The loss function compares the target to the prediction and gives a numerical distance between the two.
For this recipe, we will cover the main loss functions that we can implement in TensorFlow.
To see how the different loss functions operate, we will plot them in this recipe. We will first start a computational graph and load matplotlib, a python plotting library, as follows:
import matplotlib.pyplot as plt
import tensorflow as tf
How to do it…
First we will talk about loss functions for regression, that is, predicting a continuous dependent variable. To start, we will create a sequence of our predictions and a target as a tensor. We will output the results across 500 x-values between -1 and 1. See the next section for a plot of the outputs. Use the following code:
x_vals = tf.linspace(-1., 1., 500)
target = tf.constant(0.)
1.The L2 norm loss is also known as the Euclidean loss function. It is just the square of the distance to the target. Here we will compute the loss function as if the target is zero. The L2 norm is a great loss function because it is very curved near the target and algorithms can use this fact to converge to the target more slowly, the closer it gets., as follows:
l2_y_vals = tf.square(target - x_vals)
l2_y_out = sess.run(l2_y_vals)
TensorFlow has a built -in form of the L2 norm, called nn.l2_loss(). This function is actually half the L2-norm above. In other words, it is same as previously but divided by 2.
2.The L1 norm loss is also known as the absolute loss function. Instead of squaring the difference, we take the absolute value. The L1 norm is better for outliers than the L2 norm because it is not as steep for larger values. One issue to be aware of is that the L1 norm is not smooth at the target and this can result in algorithms not converging well. It appears as follows:
l1_y_vals = tf.abs(target - x_vals)
l1_y_out = sess.run(l1_y_vals)
3.Pseudo-Huber loss is a continuous and smooth approximation to the Huber loss function. This loss function attempts to take the best of the L1 and L2 norms by being convex near the target and less steep for extreme values. The form depends on an extra parameter, delta, which dictates how steep it will be. We will plot two forms, delta1 = 0.25 and delta2 = 5 to show the difference, as follows:
delta1 = tf.constant(0.25)
phuber1_y_vals = tf.mul(tf.square(delta1), tf.sqrt(1. +
tf.square((target - x_vals)/delta1)) - 1.)
phuber1_y_out = sess.run(phuber1_y_vals)
delta2 = tf.constant(5.)
phuber2_y_vals = tf.mul(tf.square(delta2), tf.sqrt(1. +
tf.square((target - x_vals)/delta2)) - 1.)
phuber2_y_out = sess.run(phuber2_y_vals)
4.Classification loss functions are used to evaluate loss when predicting categorical outcomes.
5.We will need to redefine our predictions (x_vals) and target. We will save the outputs and plot them in the next section. Use the following:
x_vals = tf.linspace(-3., 5., 500)
target = tf.constant(1.)
targets = tf.fill([500,], 1.)
6.Hinge loss is mostly used for support vector machines, but can be used in neural networks as well. It is meant to compute a loss between with two target classes, 1 and -1. In the following code, we are using the target value 1, so the as closer our predictions as near are to 1, the lower the loss value:
hinge_y_vals = tf.maximum(0., 1. - tf.mul(target, x_vals))
hinge_y_out = sess.run(hinge_y_vals)
7. Cross-entropy loss for a binary case is also sometimes referred to as the logistic loss
function. It comes about when we are predicting the two classes 0 or 1. We wish to
measure a distance from the actual class (0 or 1) to the predicted value, which is
usually a real number between 0 and 1. To measure this distance, we can use the
cross entropy formula from information theory, as follows:
xentropy_y_vals = - tf.mul(target, tf.log(x_vals)) - tf.mul((1. -target), tf.log(1. - x_vals))
xentropy_y_out = sess.run(xentropy_y_vals)
8. Sigmoid cross entropy loss is very similar to the previous loss function
except we transform the x-values by the sigmoid function before we put them in
the cross entropy loss, as follows:
xentropy_sigmoid_y_vals = tf.nn.sigmoid_cross_entropy_with_logits(x_vals, targets)
xentropy_sigmoid_y_out = sess.run(xentropy_sigmoid_y_vals)
9. Weighted cross entropy loss is a weighted version of the sigmoid cross entropy
loss. We provide a weight on the positive target. For an example, we will weight the
positive target by 0.5, as follows:
weight = tf.constant(0.5)
xentropy_weighted_y_vals = tf.nn.weighted_cross_entropy_with_logits(x_vals, targets, weight)
xentropy_weighted_y_out = sess.run(xentropy_weighted_y_vals)
10. Softmax cross-entropy loss operates on non-normalized outputs. This function
is used to measure a loss when there is only one target category instead of multiple.
Because of this, the function transforms the outputs into a probability distribution via
the softmax function and then computes the loss function from a true probability
distribution, as follows:
unscaled_logits = tf.constant([[1., -3., 10.]])
target_dist = tf.constant([[0.1, 0.02, 0.88]])
softmax_xentropy = tf.nn.softmax_cross_entropy_with_logits(unscaled_logits, target_dist)
print(sess.run(softmax_xentropy))
[ 1.16012561]
11.Sparse softmax cross-entropy loss is the same as previously, except instead of the target being a probability distribution, it is an index of which category is true. Instead of a sparse all-zero target vector with one value of one, we just pass in the index of which category is the true value, as follows:
unscaled_logits = tf.constant([[1., -3., 10.]])
sparse_target_dist = tf.constant([2])
sparse_xentropy = tf.nn.sparse_softmax_cross_entropy_with_ logits(unscaled_logits, sparse_target_dist)
print(sess.run(sparse_xentropy))
[ 0.00012564]
How it works…
Here is how to use matplotlib to plot the regression loss functions:
x_array = sess.run(x_vals)
plt.plot(x_array, l2_y_out, 'b-', label='L2 Loss')
plt.plot(x_array, l1_y_out, 'r--', label='L1 Loss')
plt.plot(x_array, phuber1_y_out, 'k-.', label='P-Huber Loss (0.25)')
plt.plot(x_array, phuber2_y_out, 'g:', label='P'-Huber Loss (5.0)')
plt.ylim(-0.2, 0.4)
plt.legend(loc='lower right', prop={'size': 11})
plt.show()
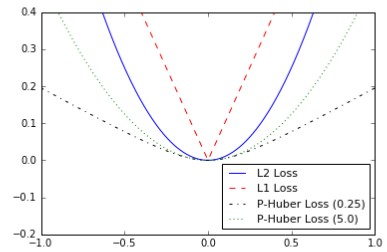
Figure 4: Plotting various regression loss functions
And here is how to use matplotlib to plot the various classification loss functions:
x_array = sess.run(x_vals)
plt.plot(x_array, hinge_y_out, 'b-', label='Hinge Loss')
plt.plot(x_array, xentropy_y_out, 'r--', label='Cross Entropy Loss')
plt.plot(x_array, xentropy_sigmoid_y_out, 'k-.', label='Cross Entropy Sigmoid Loss')
plt.plot(x_array, xentropy_weighted_y_out, g:', label='Weighted Cross Enropy Loss (x0.5)')
plt.ylim(-1.5, 3)
plt.legend(loc='lower right', prop={'size': 11})
plt.show()
There's more…
Here is a table summarizing the different loss functions that we have described:
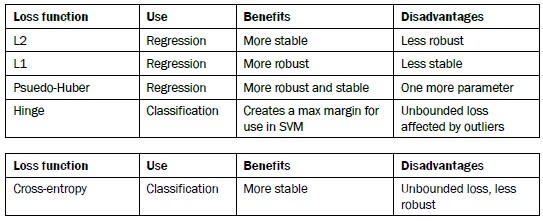
The remaining classification loss functions all have to do with the type of cross-entropy loss. The cross-entropy sigmoid loss function is for use on unscaled logits and is preferred over computing the sigmoid, and then the cross entropy, because TensorFlow has better built-in ways to handle numerical edge cases. The same goes for softmax cross entropy and sparse softmax cross entropy.
Most of the classification loss functions described here are for two class predictions. This can be extended to multiple classes via summing the cross entropy terms over each prediction/target.
There are also many other metrics to look at when evaluating a model. Here is a list of some more to consider:
|
 /2
/2 