问题导读
1.CNN使用哪三种基本思想?
2.如何用TensorFlow来实现CNN?
3.实现的模型支持哪三种类型的配置?

上一篇TensorFlow教程:4神经网络入门详解
http://www.aboutyun.com/forum.php?mod=viewthread&tid=23925
在本章中,我们将介绍以下主题: - 深入的学习技巧
- 卷积神经网络(CNN)
- 递归神经网络(RNN)
Deep learning techniques
深度学习技术是机器学习研究人员近几十年来迈出的重要一步,在许多应用领域(如图像识别和语音识别)提供了成功的结果。 有几个原因导致了深度学习的发展,并将其置于机器学习领域的中心。 One of these reasons is represented by the progress in hardware, with the availability of new processors, such as graphics processing units (GPUs), which have greatly reduced the time needed for training networks, lowering them 10/20 times. Another reason is certainly the increasing ease of finding ever more numerous datasets on which to train a system, needed to train architectures of a certain depth and with high dimensionality of the input data. 深度学习由一系列方法组成,这些方法允许系统获得多级数据的hierarchical representation。 This is achieved by combining simple units (not linear), each of which transforms the representation at its own level, starting from the input level, to a representation at a higher, level slightly more abstract. 有了足够数量的这些转换,可以学习相当复杂的输入输出功能。 参照分类问题,例如最高级别的表示,强调与分类相关的输入数据的方面,抑制对分类目的没有影响的方面。
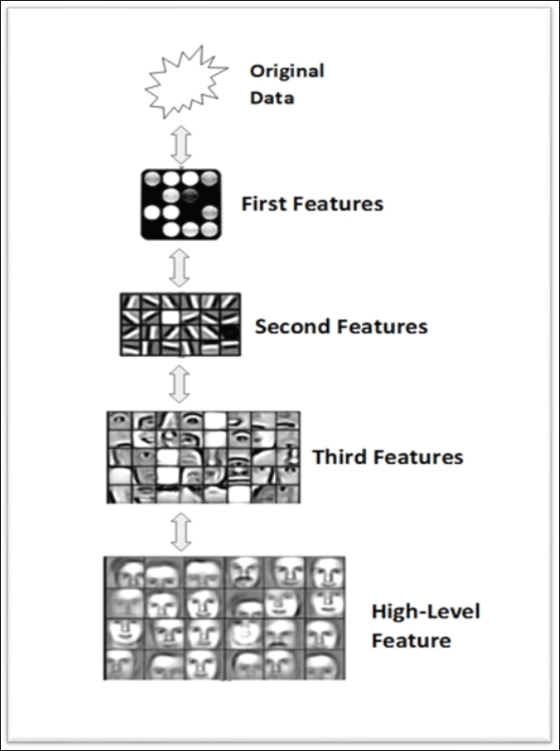
图像分类系统中的分层特征提取
前面的方案描述了图像分类系统(一个人脸识别器)的特征:每个块逐渐提取输入图像的特征,去处理已经从前面的块中预处理的数据,提取输入图像的越来越复杂的特征,从而建立表征深度学习型系统的分级数据表示。 层次结构的特征的可能表示如下: pixel --> edge --> texture --> motif --> part --> object然而,在文本识别问题中,分层表示可以如下构造: character --> word --> word group --> clause --> sentence --> storyA deep learning architecture is, therefore, a multi-level architecture, consisting of simple units, all subject to training, many of which carry non-linear transformations. Each unit transforms its input to improve its properties to select and amplify only the relevant aspects for classification purposes, and its invariance, namely its propensity to ignore the irrelevant aspects and negligible. With multiple levels of non-linear transformations, therefore, with a depth approximately between 5 and 20 levels, a deep learning system can learn and implement extremely intricate and complex functions, simultaneously very sensitive to the smallest relevant details, and extremely insensitive and indifferent to large variations of irrelevant aspects of the input data which can be, in the case of object recognition: image's background, brightness, or the position of the represented object. The following sections will illustrate, with the aid of TensorFlow, two important types of deep neural networks: the convolutional neural networks ( 细胞神经网络 T0> ), mainly addressed to the classification problems, and then the recurrent neural networks (RNNs), targeting Natural Language Processing (NLP) issues.
Convolutional neural networks
Convolutional neural networks (CNNs) are a particular type of neural network-oriented deep learning that have achieved excellent results in many practical applications, in particular the object recognition in images. 实际上,CNN被设计用于处理以多个数组形式表示的数据,例如,可以通过包含像素的颜色强度的三个二维数组表示的color images。 The substantial difference between CNNs and ordinary neural networks is that the former operate directly on the images while the latter on features extracted from them. The input of a CNN, therefore, unlike that of an ordinary neural network, will be two-dimensional, and the features will be the pixels of the input image. CNN几乎是所有认识问题的主导方式。 这种类型的网络提供的壮观业绩实际上促使了谷歌和Facebook等技术领域最大的公司投资于此类网络的研发项目,并开发和分销基于CNN的产品图像识别。
CNN architecture
CNN使用三种基本思想:local receptive fields,convolution和pooling。 在卷积网络中,我们将输入视为类似于下图所示的输入:
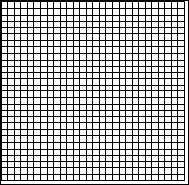
输入神经元
CNN背后的概念之一是local connectivity。 事实上,CNN利用输入数据中可能存在的空间相关性。 Each neuron of the first subsequent layer connects only some of the input neurons. 这个区域被称为local receptive field。In the following figure, it is represented by the black 5x5 square that converges to a hidden neuron:
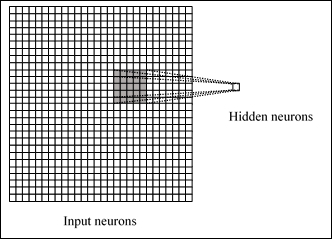
从输入到隐藏的神经元
当然,hidden neuron ,只会处理其感受域内的输入数据,而不会实现其以外的变化。 However, it is easy to see that, by superimposing several layers, that are locally connected, leveling up you will have units that process more and more global data compared to input, in accordance with the basic principle of deep learning, to bring the performance to a level of abstraction that is always growing.
T0>注意本地连接的原因在于,在阵列形式的数据(例如图像)中,值通常高度相关,形成可以容易地识别的不同组数据。
每个连接学习一个权重(所以它会得到5x5 = 25),而不是与关联连接的隐藏的神经元学习一个总的偏见,然后我们要连接区域的个别神经元时不时地进行转移,作为在下图中:
 卷积操作 卷积操作
这个操作被称为convolution . 这样做,如果我们有一个28x28输入和5x5区域的图像,我们将在隐藏层中获得24x24的神经元。 我们说每个神经元都有一个偏倚和5x5的权重连接到该地区:我们将使用这些权重和偏见的所有24x24神经元。 这意味着第一个隐藏层中的所有神经元将识别相同的特征,只是在输入图像中放置不同。 为此,调用从输入层到隐藏的特征映射的连接的映射 共享权重 and bias is called shared bias , since they are in fact shared. 很明显,我们需要识别一幅超过特征图的图像,所以一个完整的卷积图层是由multiple feature maps构成的。
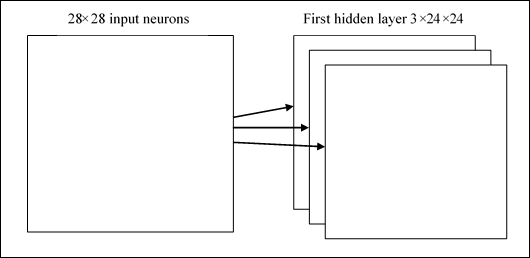
多个功能地图
在上图中,我们看到三个特征图;当然,它的数量在实际中可以增加,并且可以使用甚至具有20或40个特征图的卷积图层。 A great advantage in the sharing of weights and bias is the significant reduction of the parameters involved in a convolutional network. 考虑我们的例子,对于每个特征映射,我们需要25个权重(5x5)和一个偏差(共享)。总共是26个参数。 假设我们有20个特征地图,我们将有520个参数被定义。 通过完全连接的网络,784个输入神经元和30个隐藏层神经元,我们需要30个更多的784×30个偏置权重,总共达到23.550个参数。
差别是显而易见的。 The convolutional networks also use pooling layers, which are layers immediately positioned after the convolutional layers; these simplify the output information of the previous layer to it (the convolution). 它从卷积层出来输入特征映射,并准备一个condensed特征映射。 例如,我们可以说,在所有的单元中,汇聚层可以在前一层的2×2区域的神经元中加总。
这种技术被称为池,可以用以下方案进行总结:

池操作有助于简化层到下一层的信息
显然,我们通常会有更多的特征映射,我们将最大的连接池分别应用于每个特征映射。
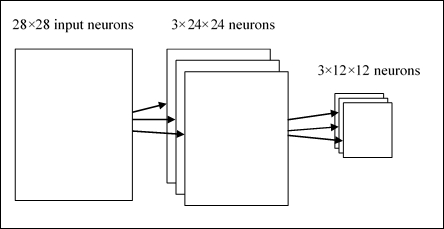
从输入层到第二个隐藏层 所以我们有第一个隐藏层的大小为24x24的三个特征地图,第二个隐藏层的大小为12x12,因为我们假设每个单元总结了一个2×2的地区。 结合这三个思想,我们形成一个完整的卷积网络。 其架构可以显示如下:
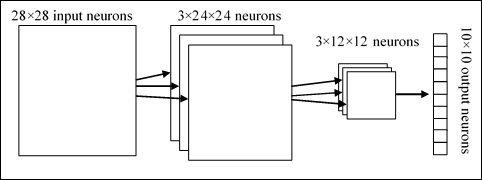
一个CNN的架构模式
我们总结一下:有一个28x28的输入神经元,跟着一个convolutional layer,带有一个局部感受域5x5和3个特征映射。 We obtain as a result of a hidden layer of neurons 3x24x24. 然后在特征映射的3个区域上应用2×2的最大池,得到隐藏层3×12×12。 最后一层是fully connected:它将最大共享层的所有神经元连接到所有10个输出神经元,有助于识别相应的输出。 然后这个网络将通过梯度下降和反向传播算法进行训练。
一个CNN的TensorFlow实现
在下面的例子中,我们将看到CNN在运行中的一个图像分类问题。 我们要展示建立一个CNN网络的过程:执行什么步骤以及如何推理整个网络的适当尺寸,以及如何用TensorFlow来实现。
初始化步骤
- 加载并准备MNIST数据:[mw_shl_code=python,true]import tensorflow as tf
import input_data
mnist = input_data.read_data_sets("/tmp/data/", one_hot=True)[/mw_shl_code] - 定义所有的CNN参数:[mw_shl_code=python,true]learning_rate = 0.001
training_iters = 100000
batch_size = 128
display_step = 10[/mw_shl_code] - MNIST数据输入(每个形状为28x28阵列像素):
[mw_shl_code=python,true]n_input = 784
[/mw_shl_code]MNIST总分类(0-9数字) - [mw_shl_code=python,true]n_classes = 10
[/mw_shl_code]为了减少过度拟合,我们使用dropout技术。 这个术语是指在神经网络中放弃单位(隐藏,输入和输出)。 决定哪些神经元消除是随机的;一种方法是应用概率,就像我们在代码中看到的那样。 出于这个原因,我们定义了以下参数(将被调整): - [mw_shl_code=python,true]dropout = 0.75
[/mw_shl_code]为输入图定义占位符。 x占位符包含MNIST数据输入(正好为728像素): - [mw_shl_code=python,true]x = tf.placeholder(tf.float32, [None, n_input])
[/mw_shl_code]然后我们使用TensorFlow reshape运算符将4D输入图像的形式更改为张量:
[mw_shl_code=python,true]_X = tf.reshape(x, shape=[-1, 28, 28, 1])
[/mw_shl_code]第二和第三个尺寸对应于图像的宽度和高度,而后一个尺寸是颜色通道的总数(在我们的例子中是1)。因此,我们可以将输入图像显示为尺寸为28x28的二维张量:
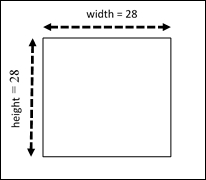
我们的问题的输入张量
输出张量将包含要分类的每个数字的output probability: [mw_shl_code=python,true]y = tf.placeholder(tf.float32, [None, n_classes]).
[/mw_shl_code]First convolutional layer
隐藏层的每个神经元连接到尺寸为5×5的输入张量的小子集。 这意味着隐藏层将有一个24x24大小。 我们还定义和初始化共享权重和共享偏差的张量: [mw_shl_code=python,true]wc1 = tf.Variable(tf.random_normal([5, 5, 1, 32]))
bc1 = tf.Variable(tf.random_normal([32]))[/mw_shl_code]回想一下,为了识别一个图像,我们需要的不仅仅是特征图。 这个数字就是我们正在考虑的第一层功能地图的数量。 在我们的例子中,卷积层由32个特征图组成。 The next step is the construction of the first convolution layer, conv1: [mw_shl_code=python,true]conv1 = conv2d(_X,wc1,bc1)
[/mw_shl_code]这里,conv2d是以下函数:[mw_shl_code=python,true]def conv2d(img, w, b):
return tf.nn.relu(tf.nn.bias_add\
(tf.nn.conv2d(img, w,\
strides=[1, 1, 1, 1],\
padding='SAME'),b))[/mw_shl_code]为此,我们使用了TensorFlow tf.nn.conv2d函数。 它计算从input tensor和shared weights的2D卷积。 The result of this operation will be then added to the biases bc1 matrix. 为此,我们使用函数tf.nn.conv2d来计算输入张量和共享权重张量的二维卷积。 The result of this operation will be then added to the biases bc1 matrix. While tf.nn.relu is the Relu function (Rectified linear unit) that is the usual activation function in the hidden layer of a deep neural network. 我们将这个激活函数应用于我们用卷积函数得到的返回值。 填充值是'SAME',这表示输出张量输出将具有相同的输入张量大小the output tensor output will have the same size of input tensor 表示卷积层的一种方式,即conv1如下:
 第一个隐藏层 第一个隐藏层
卷积操作之后,我们施加简化先前创建的卷积层的输出信息的pooling步骤。 在我们的例子中,让我们取一个2x2区域的卷积层,我们将汇总池中每个点的信息。 [mw_shl_code=python,true]conv1 = max_pool(conv1, k=2)
[/mw_shl_code]在这里,对于池化操作,我们已经实现了以下功能:[mw_shl_code=python,true]def max_pool(img, k):
return tf.nn.max_pool(img, \
ksize=[1, k, k, 1],\
strides=[1, k, k, 1],\
padding='SAME')[/mw_shl_code]tf.nn.max_pool函数在输入上执行最大池化。 当然,我们为每个卷积层应用最大池,并且会有许多层和卷积。 At the end of the pooling phase, we'll have 12x12x32 convolutional hidden layers. 下图显示了合并和卷积操作之后的CNN层:
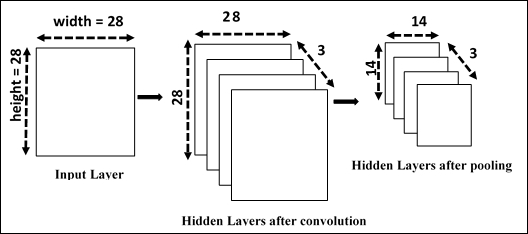
经过第一次卷积和合并操作后的CNN
The last operation is to reduce the overfitting by applying the tf.nn.dropout TensorFlow operators on the convolutional layer. To do this, we create a placeholder for the probability (keep_prob) that a neuron's output is kept during the dropout: [mw_shl_code=python,true]keep_prob = tf. placeholder(tf.float32)
conv1 = tf.nn.dropout(conv1,keep_prob)[/mw_shl_code]
Second convolutional layer
For the second hidden layer, we must apply the same operations as the first layer, and so we define and initialize the tensors of shared weights and shared bias: [mw_shl_code=python,true]wc2 = tf.Variable(tf.random_normal([5, 5, 32, 64]))
bc2 = tf.Variable(tf.random_normal([64]))[/mw_shl_code]正如你可以注意到的,第二个隐藏层将有64个特征用于5x5窗口,而输入层的数量将从第一卷积获得的层给出。 We next apply a second layer to the convolutional conv1 tensor, but this time we apply 64 sets of 5x5 filters each to the 32 conv1 layers: [mw_shl_code=python,true]conv2 = conv2d(conv1,wc2,bc2)
[/mw_shl_code]它给我们64个14x14阵列,我们减少了最大池到64个7x7阵列:[mw_shl_code=python,true]conv2 = max_pool(conv2, k=2)
[/mw_shl_code]最后,我们再次使用dropout操作:[mw_shl_code=python,true]conv2 = tf.nn.dropout(conv2, keep_prob)
[/mw_shl_code]由于我们从输入张量12x12和5x5的滑动窗口开始,考虑到步长为1,所得到的层是7×7×64卷积张量。
 构建第二个隐藏层 构建第二个隐藏层
密集连接层
在这一步中,我们建立了一个密集的连接层,用来处理整个图像。 权重和偏差张量如下: [mw_shl_code=python,true]wd1 = tf.Variable(tf.random_normal([7*7*64, 1024]))
bd1 = tf.Variable(tf.random_normal([1024]))[/mw_shl_code]As you can note, this layer will be formed by 1024 neurons. 然后我们将第二个卷积层的张量重塑为一批向量: [mw_shl_code=python,true]dense1 = tf.reshape(conv2, [-1, wd1.get_shape().as_list()[0]])
[/mw_shl_code]Multiply this tensor by the weight matrix, wd1, add the tensor bias, bd1, and apply a RELU operation:[mw_shl_code=python,true]dense1 = tf.nn.relu(tf.add(tf.matmul(dense1, wd1),bd1))
[/mw_shl_code]我们再次使用dropout操作符来完成这一层:[mw_shl_code=python,true]dense1 = tf.nn.dropout(dense1, keep_prob)
[/mw_shl_code]读出图层
最后一层定义张量wout和bout: [mw_shl_code=python,true]wout = tf.Variable(tf.random_normal([1024, n_classes]))
bout = tf.Variable(tf.random_normal([n_classes]))[/mw_shl_code]在应用softmax函数之前,我们必须计算图像属于某个类的evidence: [mw_shl_code=python,true]pred = tf.add(tf.matmul(dense1, wout), bout)
[/mw_shl_code]测试和训练模型
The evidence must be converted into probabilities for each of the 10 possible classes (the method is identical to what we saw in Chapter 4, Introducing Neural Networks). 所以我们通过应用softmax函数来定义成本函数来评估模型的质量: [mw_shl_code=python,true]cost = tf.reduce_mean(tf.nn.softmax_cross_entropy_with_logits(pred, y))
[/mw_shl_code]而且它的功能优化,使用TensorFlow AdamOptimizer函数:[mw_shl_code=python,true]optimizer = tf.train.AdamOptimizer(learning_rate=learning_rate).minimize(cost)
[/mw_shl_code]下面的张量将在模型的评估阶段:[mw_shl_code=python,true]correct_pred = tf.equal(tf.argmax(pred,1), tf.argmax(y,1))
accuracy = tf.reduce_mean(tf.cast(correct_pred, tf.float32))[/mw_shl_code]
启动会话
初始化变量: [mw_shl_code=python,true]init = tf.initialize_all_variables()
[/mw_shl_code]构建评估图:[mw_shl_code=python,true]with tf.Session() as sess:
sess.run(init)
step = 1[/mw_shl_code]让我们训练网直到training_iters: [mw_shl_code=python,true] while step * batch_size < training_iters:
batch_xs, batch_ys = mnist.train.next_batch(batch_size) [/mw_shl_code] 使用批次数据进行适合的训练: [mw_shl_code=python,true]sess.run(optimizer, feed_dict={x: batch_xs,\ y: batch_ys,\
keep_prob: dropout})
if step % display_step == 0:[/mw_shl_code]计算准确性: [mw_shl_code=python,true] acc = sess.run(accuracy, feed_dict={x: batch_xs,\ y: batch_ys,\
keep_prob: 1.})[/mw_shl_code]计算损失: [mw_shl_code=python,true] loss = sess.run(cost, feed_dict={x: batch_xs,\ y: batch_ys,\
keep_prob: 1.})
print "Iter " + str(step*batch_size) +\
", Minibatch Loss= " + \
"{:.6f}".format(loss) + \
", Training Accuracy= " + \
"{:.5f}".format(acc)
step += 1
print "Optimization Finished!"[/mw_shl_code]我们打印了256 MNIST测试图像的准确性: [mw_shl_code=python,true]print "Testing Accuracy:",\
sess.run(accuracy,\
feed_dict={x: mnist.test.images[:256], \
y: mnist.test.labels[:256],\
keep_prob: 1.})[/mw_shl_code]运行代码,我们有以下输出: [mw_shl_code=bash,true]Extracting /tmp/data/train-images-idx3-ubyte.gz
Extracting /tmp/data/train-labels-idx1-ubyte.gz
Extracting /tmp/data/t10k-images-idx3-ubyte.gz
Extracting /tmp/data/t10k-labels-idx1-ubyte.gz
Iter 1280, Minibatch Loss= 27900.769531,
Training Accuracy= 0.17188
Iter 2560, Minibatch Loss= 17168.949219, Training Accuracy= 0.21094
Iter 3840, Minibatch Loss= 15000.724609, Training Accuracy= 0.41406
Iter 5120, Minibatch Loss= 8000.896484, Training Accuracy= 0.49219
Iter 6400, Minibatch Loss= 4587.275391, Training Accuracy= 0.61719
Iter 7680, Minibatch Loss= 5949.988281, Training Accuracy= 0.69531
Iter 8960, Minibatch Loss= 4932.690430, Training Accuracy= 0.70312
Iter 10240, Minibatch Loss= 5066.223633, Training Accuracy= 0.70312 . . . . . . . . . . . . . . . . . . . .
. . . . . . . . . . . . . . . . . . . .
Iter 81920, Minibatch Loss= 442.895020, Training Accuracy= 0.93750
Iter 83200, Minibatch Loss= 273.936676, Training Accuracy= 0.93750
Iter 84480, Minibatch Loss= 1169.810303, Training Accuracy= 0.89062
Iter 85760, Minibatch Loss= 737.561157, Training Accuracy= 0.90625
Iter 87040, Minibatch Loss= 583.576965, Training Accuracy= 0.89844
Iter 88320, Minibatch Loss= 375.274475, Training Accuracy= 0.93750
Iter 89600, Minibatch Loss= 183.815613, Training Accuracy= 0.94531
Iter 90880, Minibatch Loss= 410.157867, Training Accuracy= 0.89844
Iter 92160, Minibatch Loss= 895.187683, Training Accuracy= 0.84375
Iter 93440, Minibatch Loss= 819.893555, Training Accuracy= 0.89062
Iter 94720, Minibatch Loss= 460.179779, Training Accuracy= 0.90625
Iter 96000, Minibatch Loss= 514.344482, Training Accuracy= 0.87500
Iter 97280, Minibatch Loss= 507.836975, Training Accuracy= 0.89844
Iter 98560, Minibatch Loss= 353.565735, Training Accuracy= 0.92188
Iter 99840, Minibatch Loss= 195.138626, Training Accuracy= 0.93750
Optimization Finished!
Testing Accuracy: 0.921875[/mw_shl_code]它提供了大约99.2%的准确度。 显然,这并不代表最新的技术水平,因为这个例子的目的就是看如何建立一个CNN。 该模型可以进一步细化,以提供更好的结果。
源代码
[mw_shl_code=python,true]# Import MINST data
import input_data
mnist = input_data.read_data_sets("/tmp/data/",one_hot=True)
import tensorflow as tf
# Parameters
learning_rate = 0.001
training_iters = 100000
batch_size = 128
display_step = 10
# Network Parameters
n_input = 784 # MNIST data input (img shape: 28*28)
n_classes = 10 # MNIST total classes (0-9 digits)
dropout = 0.75 # Dropout, probability to keep units
# tf Graph input
x = tf.placeholder(tf.float32, [None, n_input])
y = tf.placeholder(tf.float32, [None, n_classes])
#dropout (keep probability)
keep_prob = tf.placeholder(tf.float32)
# Create model
def conv2d(img, w, b):
return tf.nn.relu(tf.nn.bias_add\
(tf.nn.conv2d(img, w,\
strides=[1, 1, 1, 1],\
padding='SAME'),b))
def max_pool(img, k):
return tf.nn.max_pool(img, \
ksize=[1, k, k, 1],\
strides=[1, k, k, 1],\
padding='SAME')
# Store layers weight & bias
# 5x5 conv, 1 input, 32 outputs
wc1 = tf.Variable(tf.random_normal([5, 5, 1, 32]))
bc1 = tf.Variable(tf.random_normal([32]))
# 5x5 conv, 32 inputs, 64 outputs
wc2 = tf.Variable(tf.random_normal([5, 5, 32, 64]))
bc2 = tf.Variable(tf.random_normal([64]))
# fully connected, 7*7*64 inputs, 1024 outputs
wd1 = tf.Variable(tf.random_normal([7*7*64, 1024]))
# 1024 inputs, 10 outputs (class prediction)
wout = tf.Variable(tf.random_normal([1024, n_classes]))
bd1 = tf.Variable(tf.random_normal([1024]))
bout = tf.Variable(tf.random_normal([n_classes]))
# Construct model
_X = tf.reshape(x, shape=[-1, 28, 28, 1])
# Convolution Layer
conv1 = conv2d(_X,wc1,bc1)
# Max Pooling (down-sampling)
conv1 = max_pool(conv1, k=2)
# Apply Dropout
conv1 = tf.nn.dropout(conv1,keep_prob)
# Convolution Layer
conv2 = conv2d(conv1,wc2,bc2)
# Max Pooling (down-sampling)
conv2 = max_pool(conv2, k=2)
# Apply Dropout
conv2 = tf.nn.dropout(conv2, keep_prob)
# Fully connected layer
# Reshape conv2 output to fit dense layer input
dense1 = tf.reshape(conv2, [-1, wd1.get_shape().as_list()[0]])
# Relu activation
dense1 = tf.nn.relu(tf.add(tf.matmul(dense1, wd1),bd1))
# Apply Dropout
dense1 = tf.nn.dropout(dense1, keep_prob)
# Output, class prediction
pred = tf.add(tf.matmul(dense1, wout), bout)
# Define loss and optimizer
cost = tf.reduce_mean\
(tf.nn.softmax_cross_entropy_with_logits(pred, y))
optimizer =\
tf.train.AdamOptimizer\
(learning_rate=learning_rate).minimize(cost)
# Evaluate model
correct_pred = tf.equal(tf.argmax(pred,1), tf.argmax(y,1))
accuracy = tf.reduce_mean(tf.cast(correct_pred, tf.float32))
# Initializing the variables
init = tf.initialize_all_variables()
# Launch the graph
with tf.Session() as sess:
sess.run(init)
step = 1
# Keep training until reach max iterations
while step * batch_size < training_iters:
batch_xs, batch_ys = mnist.train.next_batch(batch_size)
# Fit training using batch data
sess.run(optimizer, feed_dict={x: batch_xs,\
y: batch_ys,\
keep_prob: dropout})
if step % display_step == 0:
# Calculate batch accuracy
acc = sess.run(accuracy, feed_dict={x: batch_xs,\
y: batch_ys,\
keep_prob: 1.})
# Calculate batch loss
loss = sess.run(cost, feed_dict={x: batch_xs,\
y: batch_ys,\
keep_prob: 1.})
print "Iter " + str(step*batch_size) +\
", Minibatch Loss= " + \
"{:.6f}".format(loss) + \
", Training Accuracy= " + \
"{:.5f}".format(acc)
step += 1
print "Optimization Finished!"
# Calculate accuracy for 256 mnist test images
print "Testing Accuracy:",\
sess.run(accuracy,\
feed_dict={x: mnist.test.images[:256], \
y: mnist.test.labels[:256],\
keep_prob: 1.})[/mw_shl_code]
Recurrent neural networks
Another deep learning-oriented architecture is that of the so-called recurrent neural networks (RNNs). RNN的基本思想是利用输入中的sequential information类型。 在神经网络中,我们通常假设每个输入和输出都是独立于其他所有输入和输出的。 然而,对于许多类型的问题,这个假设并不是积极的。 例如,如果要预测短语的下一个单词,那么了解它之前的单词肯定非常重要。 These neural nets are called recurrent because they perform the same computations for all elements of a sequence of inputs, and the output each element depends, in addition to the current input, on all previous computations.
RNN architecture
RNN一次处理顺序输入项目,维持包含有关all past elements of the sequence的信息的一种updated state vector。 通常,RNN具有以下类型的形状:
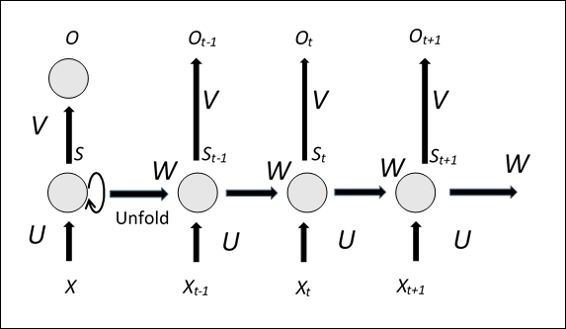
RNN体系结构模式
上图显示了RNN的一个方面,它的unfolded版本解释了整个输入序列在每个时刻的网络结构。 It becomes clear that, differently from the typical multi-level neural networks, which use several parameters at each level, an RNN always uses the same parameters, denominated U, V, and W (see the previous figure). 此外,RNN在each instant,在输入的相同序列的multiple of the same sequence in input 共享相同的参数,大大减少了网络在训练阶段必须学习的参数数量,从而也提高了训练时间。
It is also evident how you can train networks of this type, in fact, because the parameters are shared for each instant of time, the gradient calculated for each output depends not only from the current computation but also from the previous ones. For example, to calculate the gradient at time t = 4, it is necessary to back propagate the gradient for the three previous instants of time and then sum the gradients thus obtained.Also, the entire input sequence is typically considered to be a single element of the training set.
However, the training of this type of network suffers from the so-called vanishing/exploding gradient problem; the gradients, computed and back propagated, tend to increase or decrease at each instant of time and then, after a certain number of instants of time, diverge to infinity or converge to zero.
现在让我们来看看RNN如何运作。 Xt; is the network input at instant t, which could be, for example, a vector that represents a word of a sentence, while St; is the state vector of the net. 它可以被认为是系统的一种memory,其包含关于输入序列的所有先前元素的信息。 The state vector at instant t is evaluated starting from the current input (time t) and the status evaluated at the previous instant (time t-1) through the U and Wparameters: St = f ([U] Xt + [W] St-1) The function f is a non linear function such as rectified linear unit (ReLu), while Ot; is the output at instant t, calculated using the parameter V. 输出将取决于网络使用的问题的类型。 For example, if you want to predict the next word of a sentence, it could be a probability vector with respect to each word in the vocabulary of the system.
LSTM网络
Long Shared Term Memory (LSTM) networks are an extension of the basic model of RNN architectures. 主要思想是改善网络,为它提供一个明确的记忆。 实际上,LSTM网络尽管与RNN没有本质上不同的架构,但装备有特殊的隐藏单元,称为存储单元,其行为是长时间记忆以前的输入。

一个LSTM)单位
The LSTM unit has three gates and four input weights, xt (from the data to the input and three gates), while ht is the output of the unit. 一个LSTM块包含确定输入是否足够重要以保存的门。 这个块由四个单元组成: - Input gate: Allows the value input in the structure
- Forget gate: Goes to eliminate the values contained in the structure
- Output gate: Determines when the unit will output the values trapped in structure
- Cell: Enables or disables the memory cell
在下一个示例中,我们将看到语言处理问题中的LSTM网络的TensorFlow实现。
NLP with TensorFlow
已经证明RNN在预测文本中的下一个字符或类似地预测句子中的下一个序列字符等问题方面具有优异的性能。 但是,它们也用于更复杂的问题,如Machine Translation。 在这种情况下,网络将以源语言的形式输入一个单词序列,而您希望以语言target输出相应的单词序列。 最后,RNN被广泛使用的另一个非常重要的应用是 言语 recognition 在下文中,我们将开发一个计算模型,可以根据前面的单词的顺序来预测文本中的下一个单词。 To measure the accuracy of the model, we will use the Penn Tree Bank (PTB) dataset, which is the benchmark used to measure the precision of these models.
本示例引用您在TensorFlow分配的/ rnn / ptb目录中找到的文件。 它包含以下两个文件: - ptb_word_lm.py:在PTB数据集上训练语言模型的队列
- reader.py: The code to read the dataset
与以前的例子不同的是,我们将只介绍实现过程的伪代码,以便了解模型构建背后的主要思想,而不会陷入不必要的实现细节。 源代码很长,并且逐行解释代码会太麻烦。 T0>注意
下载数据
要用tar提取.tgz文件,需要使用以下命令: [mw_shl_code=bash,true] tar -xvzf /path/to/yourfile.tgz
[/mw_shl_code]
Building the model
该模型使用LSTM实现了RNN的体系结构。 事实上,它计划通过包含允许保存关于长期时间依赖关系的信息的存储单元来增加RNN的架构。 TensorFlow库允许您通过以下命令创建一个LSTM: [mw_shl_code=python,true]lstm = rnn_cell.BasicLSTMCell(size)
[/mw_shl_code]这里大小应该是要使用的单位数量LSTM。 LSTM存储器被初始化为零:[mw_shl_code=python,true]state = tf.zeros([batch_size, lstm.state_size])
[/mw_shl_code]在计算过程中,每个单词检查状态值用输出值更新后,下面是实现步骤的伪代码清单:[mw_shl_code=python,true]loss = 0.0
for current_batch_of_words in words_in_dataset:
output, state = lstm(current_batch_of_words, state)
output is then used to make predictions on the prediction of the next word:
logits = tf.matmul(output, softmax_w) + softmax_b
probabilities = tf.nn.softmax(logits)
loss += loss_function(probabilities, target_words)[/mw_shl_code]loss函数使目标单词的平均负对数概率最小化,它是TensorFow函数: [mw_shl_code=python,true]tf.nn.seq2seq.sequence_loss_by_example
[/mw_shl_code]It computes the average per-word perplexity, its value measures the accuracy of the model (to lower values correspond best performance) and will be monitored throughout the training process.
Running the code
实现的模型支持三种类型的配置:小,中和大。 它们之间的区别在于LSTM的大小和用于训练的超参数集合。 模型越大,应该得到的结果就越好。 小型模型应该能够在测试集合上达到120以下,在80以下的大于,但是训练可能需要几个小时。 要执行模型,只需输入以下内容: [mw_shl_code=text,true]python ptb_word_lm --data_path=/tmp/simple-examples/data/ --model small
[/mw_shl_code]在/ tmp / simple-examples / data /中,您必须从PTB数据集中下载数据。The following list shows the run after 8 hours of training (13 epochs for a small configuration): [mw_shl_code=bash,true]Epoch: 1 Learning rate: 1.000
0.004 perplexity: 5263.762 speed: 391 wps
0.104 perplexity: 837.607 speed: 429 wps
0.204 perplexity: 617.207 speed: 442 wps
0.304 perplexity: 498.160 speed: 438 wps
0.404 perplexity: 430.516 speed: 436 wps
0.504 perplexity: 386.339 speed: 427 wps
0.604 perplexity: 348.393 speed: 431 wps
0.703 perplexity: 322.351 speed: 432 wps
0.803 perplexity: 301.630 speed: 431 wps
0.903 perplexity: 282.417 speed: 434 wps
Epoch: 1 Train Perplexity: 268.124
Epoch: 1 Valid Perplexity: 180.210
Epoch: 2 Learning rate: 1.000
0.004 perplexity: 209.082 speed: 448 wps
0.104 perplexity: 150.589 speed: 437 wps
0.204 perplexity: 157.965 speed: 436 wps
0.304 perplexity: 152.896 speed: 453 wps
0.404 perplexity: 150.299 speed: 458 wps
0.504 perplexity: 147.984 speed: 462 wps
0.604 perplexity: 143.367 speed: 462 wps
0.703 perplexity: 141.246 speed: 446 wps
0.803 perplexity: 139.299 speed: 436 wps
0.903 perplexity: 135.632 speed: 435 wps
Epoch: 2 Train Perplexity: 133.576
Epoch: 2 Valid Perplexity: 143.072
............................................................
Epoch: 12 Learning rate: 0.008
0.004 perplexity: 57.011 speed: 347 wps
0.104 perplexity: 41.305 speed: 356 wps
0.204 perplexity: 45.136 speed: 356 wps
0.304 perplexity: 43.386 speed: 357 wps
0.404 perplexity: 42.624 speed: 358 wps
0.504 perplexity: 41.980 speed: 358 wps
0.604 perplexity: 40.549 speed: 357 wps
0.703 perplexity: 39.943 speed: 357 wps
0.803 perplexity: 39.287 speed: 358 wps
0.903 perplexity: 37.949 speed: 359 wps
Epoch: 12 Train Perplexity: 37.125
Epoch: 12 Valid Perplexity: 123.571
Epoch: 13 Learning rate: 0.004
0.004 perplexity: 56.576 speed: 365 wps
0.104 perplexity: 40.989 speed: 358 wps
0.204 perplexity: 44.809 speed: 358 wps
0.304 perplexity: 43.082 speed: 356 wps
0.404 perplexity: 42.332 speed: 356 wps
0.504 perplexity: 41.694 speed: 356 wps
0.604 perplexity: 40.275 speed: 357 wps
0.703 perplexity: 39.673 speed: 356 wps
0.803 perplexity: 39.021 speed: 356 wps
0.903 perplexity: 37.690 speed: 356 wps
Epoch: 13 Train Perplexity: 36.869
Epoch: 13 Valid Perplexity: 123.358
Test Perplexity: 117.171[/mw_shl_code]正如你所看到的,在每个时代之后,困惑就会降低。
Summary
在这一章中,我们对深度学习技术进行了概述,考察了两个正在使用的深度学习架构,CNN和RNN。 通过TensorFlow库,我们开发了一个用于图像分类问题的卷积神经网络体系结构。 本章的最后一部分是关于RNN的,在这里我们描述了RNNs的TensorFlow教程,在这个教程中构建了一个LSTM网络来预测英语句子中的下一个单词。
http://usyiyi.cn/documents/getting-started-with-tf/ch5.html
|
 /2
/2 