本帖最后由 hanyunsong 于 2020-8-13 20:58 编辑
问题导读:
1. Atlas是什么?
2. Atlas安装前准备及注意事项有哪些?
3. Atlas常见的问题解决方法有哪些?
Atlas是一套可扩展和可扩展的核心基本治理服务,使企业能够有效和高效地满足Hadoop内的法规遵从性要求,并允许与整个企业数据生态系统进行集成。ApacheAtlas为组织提供了开放的元数据管理和治理功能,以构建其数据资产的目录,对这些资产进行分类和管理,并为数据科学家、分析师和数据治理团队提供围绕这些数据资产的协作能力。
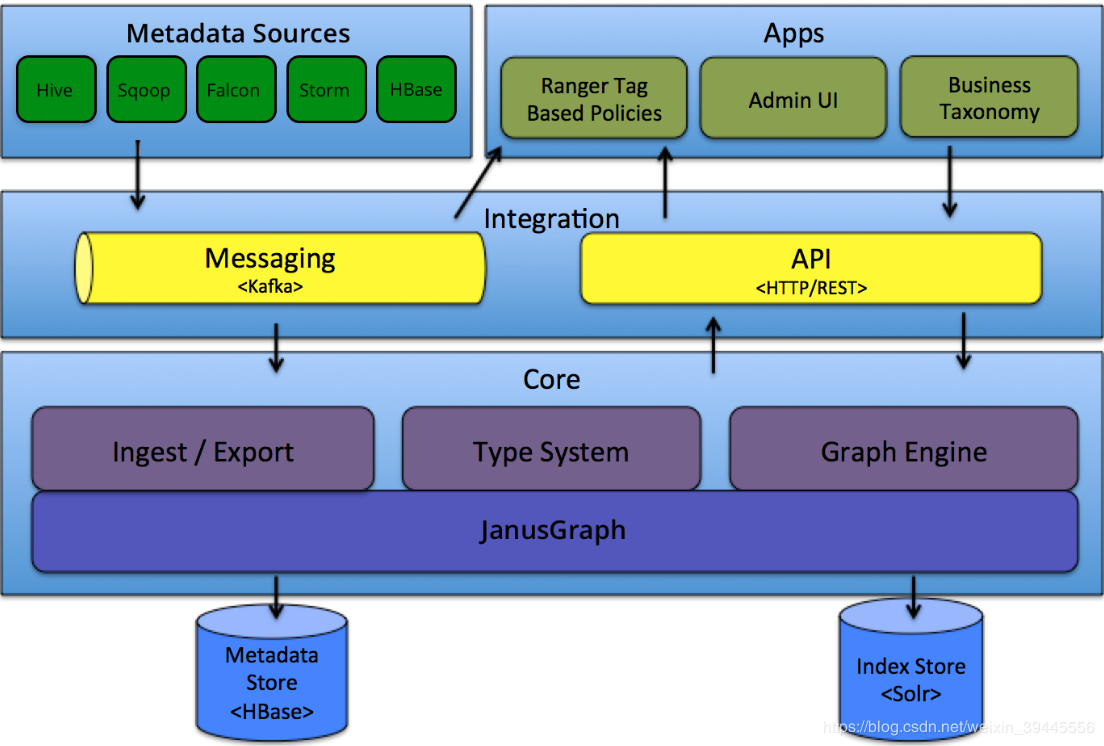
Atlas可以完成元数据信息展示、hive表数据传递血缘关系展示的逻辑为:读取hive meta store和hive hook的信息,meta store的数据用来展示元数据信息,hive hook的主要数据存储对象为hive context,其中包含了源表,目标表,传递字段等信息,解析这些数据用来描述表之间数据传递的血缘关系。读取到的数据以事件的形式进行封装,发送到kafka消息队列。守护进程定时读取/解析kafka消息存储到Hbase。通过solr或者ES进行前端的数据展示。架构图如下:

基于如上逻辑关系描述可知,Atlas需要集成的组件有以下几项
1) -数据源Hive
2) -消息队列Kafka
3) -图信息存储HBase
4) -前端展示及全文索引Solr or ES
因Atlas1.1.0版本集成的kafka/hbase/solr版本较高,经过测试,当前生产环境CDH集群所集成的低版本组件不能满足Atlas的版本需要,所以Kafka & Zookeeper / HBase / Solr 需要单独安装。Atlas的元数据展示并不需要强HA,所以以上组件预定义先安装单机版。具体安装步骤如下
0- 安装前准备及注意事项
在不影响集群目前角色运行的情况下,需要考虑现有组件和预安装组件端口冲突的情况。
根据目前集群资源及组件角色分部,暂定将atlas及所需组件安装在wxxx2(10.xx.xx.115)服务器上。目前该服务器上的角色进程只有spark thrift server(101 client 分支),运行端口为10000.预安装的组件同该端口无冲突。该服务器内存和磁盘资源充足。
CDH运行角色和硬件资源如下图(灰色进程没有影响):

安装中需要注意,集群中已有的角色如zookeeper不可以注册为系统角色,也不可以设置相应的角色Home到环境变量中。角色的操作均以安装目录的绝对路径方式访问操作脚本。
举例:
zookeeper安装在/opt/software/zookeeper-3.5.5目录下,启动zookeeper需要运行命令/opt/software/zookeeper-3.5.5/bin/zkServer.sh start
不可以在环境变量中设置ZOOKEEPER_HOME,免除影响生产环境当前角色的可能性。
其他需要配置的环境变量用单独的文件记录
touch /etc/atlas-env.sh
在/etc/profile最后一行添加 source /etc/atlas-env.sh
1- Zookeeper-3.5.5安装
wget http://apache.communilink.net/zo ... er-3.5.5-bin.tar.gz 下载安装包
cd /opt/software
tar -zxvf zookeeper-3.5.5.tar.gz解压安装文件
mv apache-zookeeper-3.5.5-bin zookeeper-3.5.5
cd zookeeper-3.5.5
bin/zkServer.sh start
运行检查命令bin/zkServer.sh status 显示为“Standalone”为安装成功。出现“xxx not running”为安装失败,需要查看日志解决。
zookeeper默认运行端口为2181
2-scala-2.11.8安装
Atlas依赖于kafka_2.11-1.0.0,2.11为scala版本,1.0.0为kafka版本。本次选择的Scala版本为2.11.8,安装过程如下
cd /opt/software/
wget https://downloads.lightbend.com/scala/2.11.8/scala-2.11.8.tgz 下载安装包
tar -zxvf scala-2.11.8.tgz 解压文件
添加如下内容到/etc/atlas-env.sh:

source /etc/profile
检查安装是否成功:命令行运行 scala ,出现如下画面为OK

3- Kafka_2.11-1.0.0安装
安装完Scala之后可以开始安装Kafka
cd /opt/software
wget https://archive.apache.org/dist/kafka/1.1.0/kafka_2.11-1.1.0.tgz 下载安装包
tar -zxvf kafka_2.11-1.0.0.tgz
因为默认kafka会访问2181端口的zookeeper,启动zookeeper之后就可以运行启动命令启动kafka了。命令如下:
cd /opt/softeare/kafka_2.11.8-1.0.0/bin/
nohup bin/kafka-server-start.sh config/server.properties &
查看日志验证启动是否成功
4- Solr-5.5.1安装
Atlas依赖的最低版本solr为5.x,本次选择安装solr-5.5.1
cd /opt/software
wget https://archive.apache.org/dist/ ... /solr-5.5.1-src.tgz 下载安装包
tar -zxvf solr-5.5.1.tgz 解压文件
vim /etc/atlas-env.sh 添加如下内容

运行启动命令 /opt/software/solr-5.5.1/bin/start
访问http://10.xx.xx.115:8983 如可以正常访问则OK
5- HBase-2.0.2安装
Atlas依赖于HBase的2.0.2版本,经过测试,对CDH5.7.1集成的HBase同样支持。所有此处有两个可选方案。本次采用单独安装HBase的方式
cd /opt/software
wget http://archive.apache.org/dist/hbase/2.0.2/hbase-2.0.2-bin.tar.gz 下载安装包
tar -zxvf hbase-2.0.2-bin.tar.gz
因当前生产环境没有安装集成HBase,所以可以配置HBase的Home环境变量
vim /etc/atlas-env.sh 添加如下内容

修改hbase-env.sh文件
export JAVA_HOME=/opt/jdk1.8.0_91
export HBASE_MANAGES_ZK=false
export HBASE_CLASSPATH=/opt/software/hbase-2.0.2
修改hbase-site.xml文件
[mw_shl_code=bash,true]<configuration>
<property>
<name>hbase.master</name>
<value>127.0.0.1</value>
</property>
<property>
<name>hbase.rootdir</name>
<value>hdfs://nameservice1/hbase</value>
</property>
<property>
<name>hbase.cluster.distributed</name>
<value>true</value>
</property>
<property>
<name>hbase.zookeeper.quorum</name>
<value>127.0.0.1</value>
</property>
<property>
<name>hbase.zookeeper.property.dataDir</name>
<value>/data/tmp/zookeeper-hbase</value>
</property>
</configuration>[/mw_shl_code]创建hbase的数据存储文件mkdir -p /data/tmp/zookeeper-hbase
运行启动命令/opt/software/hbase/bin/start-all.sh
查看日志和进程验证安装是否成功。
6- maven-3.5.4安装
Atlas需要编译安装,其本身使用maven进行依赖管理,如果服务器没有安装maven,则需要提前安装。
其对maven的版本也有要求,此次安装选择3.5.4
cd /usr/local
mkdir maven
cd maven
wget http://ftp.cuhk.edu.hk/pub/packa ... en-3.5.4-bin.tar.gz 下载安装包
tar -zxvf apache-maven-3.5.4-bin.tar.gz 解压
添加以下信息到/etc/atlas-env.sh

source /etc/profile 加载环境变量
运行命令 mvn -version 正常显示maven版本则安装成功
6- Atlas-1.1.0编译安装
安装完前置的依赖组件,可以开始编译安装atlas,安装过程参考地址:http://atlas.apache.org/1.1.0/InstallationSteps.html
cd /opt/software
wget https://archive.apache.org/dist/ ... .1.0-sources.tar.gz 下载atlas源码文件
tar xvfz apache-atlas-1.1.0-sources.tar.gz
cd apache-atlas-sources-1.1.0/
export MAVEN_OPTS="-Xms2g -Xmx2g"
我们要安装的是集成外部hbase等组件的版本,所以运行命令mvn clean -DskipTests package -Pdist,embedded-hbase-solr
【问题1】
此处跟随官方文档编译会报错。atlas的pom文件中对Java和其他依赖组件的版本做了限制。修改apache-atlas-sources-1.1.0/ pom.xml文件

将上边两处修改为服务器安装的版本,重新运行编译命令
【问题2】
Failed to execute goal org.apache.rat:apache-rat-plugin:0.12:check (rat-check) on project apache-atlas: Too many files with unapproved license: 1 See RAT report in: /opt/software/atlas-1.0.0/target/rat.txt -> [Help 1]
命令中增加-Drat.skip=true
【问题3】
Failed to execute goal org.apache.maven.plugins:maven-remote-resources-plugin:1.5:process (default) on project apache-atlas: Execution default of goal org.apache.maven.plugins:maven-remote-resources-plugin:1.5:process failed: Plugin org.apache.maven.plugins:maven-remote-resources- plugin:1.5 or one of its dependencies could not be resolved: The following artifacts could not be resolved: org.apache.maven.shared:maven-common-artifact-filters:jar:1.4, org.codehaus.plexus:plexus-utils:jar:1.5.15: Could not transfer artifact org.apache.maven.shared:maven-common-artifact-filters:jar:1.4 from/to central (https://repo.maven.apache.org/maven2): Remote host closed connection during handshake: SSL peer shut down incorrectly -> [Help 1]
网络连接问题。类似于这种的remote host closed都可以通过重试来解决。
【问题4】
Plugin com.github.eirslett:frontend-maven-plugin:1.4 or one of its dependencies could not be resolved: Could not transfer artifact com.github.eirslett:frontend-maven-plugin:jar:1.4 from/to central (https://repo.maven.apache.org/maven2): GET request of: com/github/eirslett/frontend-maven-plugin/1.4/frontend-maven-plugin-1.4.jar from central failed: SSL peer shut down incorrectly
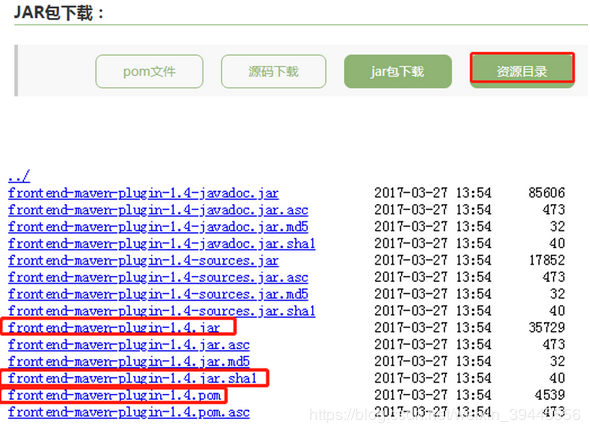
重试多次不成功的jar包,手动下载(若网络条件OK,多重试几次也会下载好,无需按照此步骤操作)
下载地址:https://www.kumapai.com/open/11059-frontend-maven-plugin/1-4

编辑对应的remote文件
[root@office01 1.4]# pwd
/root/.m2/repository/com/github/eirslett/frontend-maven-plugin/1.4
[root@office01 1.4]# ls
frontend-maven-plugin-1.4.jar frontend-maven-plugin-1.4-javadoc.jar.sha1 frontend-maven-plugin-1.4.pom frontend-maven-plugin-1.4.pom.sha1 _remote.repositories
[root@office01 1.4]# vim _remote.repositories
增加如下内容:
#NOTE: This is a Maven Resolver internal implementation file, its format can be changed without prior notice.
#Mon Aug 05 15:10:21 CST 2019
frontend-maven-plugin-1.4.jar>central=
frontend-maven-plugin-1.4.pom>central=
类似的问题有很多。需要重复尝试。如果进行的顺利没有网络问题,编译过程在2h左右。
编译成功后,安装包在/opt/software/atlas-1.0.0/distro/target路径下,atlas会自动解压,可以直接mv他解压的文件使用,也可以cp 安装包自己解压。解压后,开始进行细节配置
cp atlas-application.properties /etc/hive/conf 拷贝atlas的配置文件到hive的配置文件目录下。此处经常出现的问题是atlas启动一次之后,该配置文件自动删除掉了。解决办法:建立软连接
更改hive的配置文件。因生产环境使用的是CDH版本,所以配置项在CDH页面中更改.如下图

注意,此处hive需要重新部署配置项。配置过程中可能涉及到重启。
在配置文件/etc/atlas-env.sh中显示的给出hive的配置项,如下图

设置atlas的 配置文件atlas-env.sh,更新内容如下:

设置atlas配置文件atlas-application.properties.以下配置项中,需要一一核查。
[mw_shl_code=bash,true]atlas.graph.storage.backend=hbase
atlas.graph.storage.hbase.table=atlas
#apache_atlas_janus
#Hbase
#For standalone mode , specify localhost
#for distributed mode, specify zookeeper quorum here
atlas.graph.storage.hostname=10.xx.xx.115
atlas.graph.storage.hbase.regions-per-server=1
atlas.graph.storage.lock.wait-time=10000
atlas.EntityAuditRepository.impl=org.apache.atlas.repository.audit.HBaseBasedAuditRepository
atlas.graph.index.search.backend=solr
#Solr http mode properties
atlas.graph.index.search.solr.mode=http
atlas.graph.index.search.solr.http-urls=http://localhost:8983/solr
######### Notification Configs #########
atlas.notification.embedded=false
atlas.kafka.data=${sys:atlas.home}/data/kafka
atlas.kafka.zookeeper.connect=10.xx.xx.115:2181
atlas.kafka.bootstrap.servers=10.xx.xx.115:9092
atlas.kafka.zookeeper.session.timeout.ms=400
atlas.kafka.zookeeper.connection.timeout.ms=200
atlas.kafka.zookeeper.sync.time.ms=20
atlas.kafka.auto.commit.interval.ms=1000
atlas.kafka.hook.group.id=atlas
######### Server Properties #########
atlas.rest.address=http://10.xx.xx.89:21000
# If enabled and set to true, this will run setup steps when the server starts
#atlas.server.run.setup.on.start=false
######### Entity Audit Configs #########
atlas.audit.hbase.tablename=apache_atlas_entity_audit
atlas.audit.zookeeper.session.timeout.ms=1000
atlas.audit.hbase.zookeeper.quorum=10.xx.xx.115:2181
atlas.server.ha.enabled=false
#Hive
atlas.hook.hive.synchronous=false
atlas.hook.hive.numRetries=3
atlas.hook.hive.queueSize=10000
atlas.cluster.name=primary[/mw_shl_code]将atlas-application.properties拷贝到${atlas_home}/hook/hive中,将该文件添加到atlas-plugin-classloader-1.1.0.jar和hive-bridge-shim-1.1.0.jar中。
将${atlas_home}/hook/hive/atlas-hive-plugin-impl 中的jersey-json-1.19.jar 换成jersey-json-1.9.1.jar,网上自行下载。。
以上,atlas配置完毕、启动命令如下
/opt/software/atlas-1.0.0/atlas_start.py
访问地址http://10.xx.xx.115:21000 显示如下内容为安装成功

初始用户名和密码为admin。
文章来源:https://blog.csdn.net/weixin_39445556/article/details/107244973
|
 /2
/2 