|
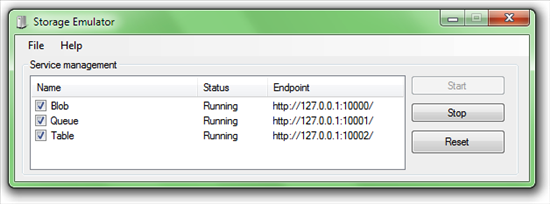
由于云端的特殊性,通常情况下,对文件系统的读写建议使用Blob Storage来代替。这就产生了一个问题:对于一个已经写好的本地应用程序,其中使用了NTFS API对本地文件系统读写的代码是否需要进行完全重写以便迁移到Windows Azure平台上呢?答案是否定的。Windows Azure平台提供了Drive的功能。 在1.1版本的SDK中提供了CloudDrive类,能够将本地NTFS文件系统Mount到Blob Storage上。我们只要添加一小段代码来表明我们希望Mount Drive到Blob Storage上就能重用大部分已有的对本地文件系统访问的代码。这样,我们已有的程序能够无缝地迁移到Windows Azure上而不需要做大的改动。 步骤一:创建解决方案和项目 由于我们要在本地模拟环境下测试Windows Azure Drive,首先,请确保Storage Emulator已经启动。我们可以找到管理器的进程手动启动或者让Visual Studio 2010帮助我们启动他。 右击工具栏中Windows Azure模拟器的图标,选择”Show Storage Emulator UI”。弹出如下图所示的窗口:
 我们要关注的是Service management中Blob所在的一行。要确保Status为Running。
 确认完毕后启动Visual Studio 2010,新建一个Cloud Service项目并为之添加一个Web Role。 步骤二:添加SDK程序集引用 请在项目属性页里确认项目的Target framework的值是.NET Framework 4或.NET Framework 3.5。然后在Web Role项目中添加对C:\Program Files\Windows Azure SDK\v1.3\ref\Microsoft.WindowsAzure.CloudDrive.dll的引用。该路径为SDK默认安装路径,如果你不能在这个路径中找到Microsoft.WindowsAzure.CloudDrive.dll请从SDK安装路径中寻找。 步骤三:添加代码 删除并重新创建Default.aspx 页面,然后在Default.aspx.cs中引用命名空间: using Microsoft.WindowsAzure; using Microsoft.WindowsAzure.StorageClient; using System.IO;
然后添加下列代码:
public partial class Default : System.Web.UI.Page { string _driveLetter = WebRole.DriveLetter;
protected void Page_Load(object sender, EventArgs e) { if (!IsPostBack) { Bind(); } }
void Bind() { // 显示被Mount的Drive根目录下的所有文件 DirectoryInfo di = new DirectoryInfo(string.Format("{0}\\", _driveLetter)); this.GridView1.DataSource = di.GetFiles(); this.GridView1.DataBind(); }
protected void Button1_Click(object sender, EventArgs e) { // 在被Mount的Drive根目录下保存文件 if (this.FileUpload1.HasFile) { File.WriteAllBytes(string.Format("{0}\\{1}", _driveLetter, this.FileUpload1.FileName), this.FileUpload1.FileBytes); Bind(); } } }
在Default.aspx中添加下列代码: <form id="form1" runat="server">
<asp:FileUpload ID="FileUpload1" runat="server" /> <asp:Button ID="Button1" runat="server" Text="Upload" />
<asp:GridView AllowPaging="true" PageSize="20" ID="GridView1" runat="server"> </asp:GridView>
</form>
接下来在WebRole.cs中引用命名空间: using Microsoft.WindowsAzure.StorageClient;
然后添加下列代码: public class WebRole : RoleEntryPoint { public static string DriveLetter { get; private set; } CloudDrive myCloudDrive;
public override bool OnStart() { // 当用配置文件中ConfigurationSettings时必须调用CloudStorageAccount.SetConfigurationSettingPublisher // 来说明当配置文件在发布后被更改时将采取何种操作 CloudStorageAccount.SetConfigurationSettingPublisher((configName, configSetter) => {
configSetter(RoleEnvironment.GetConfigurationSettingValue(configName));
RoleEnvironment.Changed += (sender, arg) => { if(arg.Changes.OfType<RoleEnvironmentConfigurationSettingChange>() .Any((change) => (change.ConfigurationSettingName == configName))) {
if(!configSetter(RoleEnvironment.GetConfigurationSettingValue(configName))) { RoleEnvironment.RequestRecycle(); } } }; });
// For information on handling configuration changes
return base.OnStart(); }
public override void Run() { CloudStorageAccount storageAccount = CloudStorageAccount.FromConfigurationSetting("DataConnectionString");
LocalResource localCache = RoleEnvironment.GetLocalResource("InstanceDriveCache"); CloudDrive.InitializeCache(localCache.RootPath, localCache.MaximumSizeInMegabytes);
// 检查Container是否存在,不存在则创建 CloudBlobClient blobClient = storageAccount.CreateCloudBlobClient(); blobClient.GetContainerReference("drives").CreateIfNotExist();
// 创建Cloud Drive myCloudDrive = storageAccount.CreateCloudDrive( blobClient .GetContainerReference("drives") .GetPageBlobReference("mydrive.vhd") .Uri.ToString() );
try { myCloudDrive.Create(64);
} catch (CloudDriveException) {
} DriveLetter = myCloudDrive.Mount(0, DriveMountOptions.Force);
base.Run(); }
public override void OnStop() { myCloudDrive.Unmount();
base.OnStop(); } }
最后,修改配置文件。在Cloud Service项目的ServiceConfiguration.cscfg中添加下列配置: <?xml version="1.0" encoding="utf-8"?> <ServiceConfiguration serviceName="WindowsAzureDriveDemonstration"xmlns="http://schemas.microsoft.com/ServiceHosting/2008/10/ServiceConfiguration" osFamily="1" osVersion="*"> <Role name="WebRole1"> <Instances count="1" /> <ConfigurationSettings> <Setting name="Microsoft.WindowsAzure.Plugins.Diagnostics.ConnectionString" value="UseDevelopmentStorage=true" /> <Settingname="DataConnectionString" value="UseDevelopmentStorage=true" /> </ConfigurationSettings> </Role> </ServiceConfiguration>
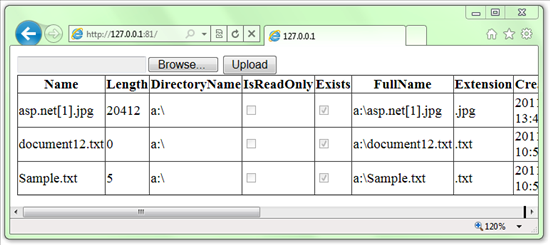
在ServiceDefinition.csdef中添加下列配置(注意将Sites部分的内容删除或注释掉): <?xml version="1.0" encoding="utf-8"?> <ServiceDefinition name="WindowsAzureDriveDemonstration" xmlns="http://schemas.microsoft.com/ServiceHosting/2008/10/ServiceDefinition"> <WebRole name="WebRole1"> <Sites> <Site name="Web"> <Bindings> <Binding name="Endpoint1" endpointName="Endpoint1" /> </Bindings> </Site> </Sites> <Endpoints> <InputEndpoint name="Endpoint1" protocol="http" port="80" /> </Endpoints> <Imports> <Import moduleName="Diagnostics" /> </Imports> <LocalResources> <LocalStoragename="InstanceDriveCache" cleanOnRoleRecycle="false" sizeInMB="300" /> </LocalResources> <ConfigurationSettings> <Settingname="DataConnectionString" /> </ConfigurationSettings> </WebRole> </ServiceDefinition> 步骤四:观察并分析代码 步骤三中的代码中,Default.aspx.cs的代码跟普通的ASP.NET项目代码没什么区别。我们把盘符抽离出来以便迁移到Windows Azure上。Default.aspx.cs中的代码跟Windows Azure唯一相关的一句语句就是string driveLetter = WebRole.DriveLetter。我们如果把WebRole.DriveLetter替换为本机盘符该ASP.NET程序将能够正常运行。 后面的代码示范了如何Mount Drive到Blob Storage。此外我们使用了本地缓存来缓存尚未被传递到Blob Storage的文件。 通过上面的例子可以看到,只需额外添加一小段代码,已有的使用NTFS API的程序能够很方便地迁移到Windows Azure平台上。 步骤五:运行程序 运行程序。上传几个文件。如果一切顺利你将看到下图所示的结果。可以看到文件的DirectoryName为“a:\”。这就是被Mount到Blob Storage上的Drive的盘符。
 需要注意的是,本例中我们并未修改WebRole的实例数,因此只有1个WebRole(发布到云端后将只有一个虚拟机被使用)。如果有两个实例,并且要让两个实例共享一个”网络硬盘“的话,本例中代码将不能正常工作。因为对于同一个Blob同时只能有一个虚拟机Mount。一个可能的解决方案是额外维护一个Web Service来管理Mount和UnMount Drive。
 about云提供以上资料来源互联网,希望对网友有所帮助 |  /2
/2 