这段时间在想办法入门IOS native的开发,想找一个比较快速有效的办法,看书或者看文章都不太合适,主要是现在确实没有这么好的书能让你看完后就完成了从Java转到IOS的跨越,并且看完后就容易忘记,不深刻。后来发现一个非常不错的资源,就是IOS Library中的Sample code,基本掌握Xcode后直接从这些samples的code入手,debug->code->document,这样的学习方式不但深刻,更重要的是可以把这些code直接转变为将来的武器库,感觉不错,今天就从CURD开始。
互联网或企业级应用的基础组成部分就是CURD,而普通的IOS应用特别是那些以信息管理的为核心的app也是以CURD为基础,因此入门IOS当然得把CURD的各个环节搞清楚,官方samples CoreDataBooks给了我们想知道的细节。对我而言,我最想搞清楚这么几块:
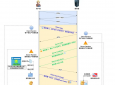
整体流转模式
页面流程图如下所示:

对于这么一个常规的CURD流程,从中可以学习到的关键点有如下几点:
基于MainStoryBoard来控制页面流 基于CoreData来管理数据 TableView与CoreData的结合 以数据为驱动的MVC操作模型 基于UndoManager来做撤销或重做 基于Delegate的代码组织结构 程序退出时及时保存数据基于MainStoryBoard来控制页面流
MainStoryBoard是个好东西,直观的图形操作是一方面,最重要的是它基于stack的模型把IOS页面流转的模式给固化下来,不但方便了开发者按照固定的模式来组织页面,也固化了用户的使用习惯。http://www.raywenderlich.com/513 ... rds-in-ios-5-part-1,这篇文章非常详细地讲解了如何开始MainStoryBoard,这里我就不重复,这个例子中学到的关键点有两点:
1)override方法
- (void)prepareForSegue:(UIStoryboardSegue *)segue sender:(id)sender
为下个页面做准备
2)调用UINavigationController的方法popViewControllerAnimated从子页面回到主页面
基于CoreData来管理数据
CoreData是Cocoa最核心的数据持久层框架,主要用途就是把提供统一数据操作的API来处理各种不同持久化方式的数据,框架主要提供两块,持久层和数据操作层,
持久层:
NSManagedObjectContext:是从持久层到数据操作的中介
NSManagedObjectModel:构建数据的具体格式
NSPersistentStoreCoordinator:提供数据实际的存储方式
三者的依赖关系是NSManagedObjectContext->NSPersistentStoreCoordinator->NSManagedObjectModel,本例子的是通过一个文件来持久化app中操作的数据,具体初始化这三者的代码可见sample中CoreDataBooksAppDelegate.
数据操作层:
NSFetchedResultsController:数据查找的调用接口
NSFetchRequest:数据查找方式的包装
NSEntityDescription:数据实体的包装
NSSortDescriptor:排序规则的包装
NSFetchedResultsControllerDelegate:数据变更的通知
具体如何初始化这些对象可见sample中RootViewController
TableView与CoreData的结合
本例中是基于tableview来展现列表和detail数据,对于tableview的用法一般都是把UITableViewController的datasource和delegate设置为UITableViewController自身后,然后override UITableViewDatasource和UITableViewDelegate的相关方法,从而填充,渲染和监听tableview的数据。因此结合CoreData,就是在这些方法里调用NSFetchedResultsController把数据塞到tableview中,以一下代码为例:
- (NSInteger)numberOfSectionsInTableView:(UITableView *)tableView
{
return [[self.fetchedResultsController sections] count];
}
// Customize the number of rows in the table view.
- (NSInteger)tableView:(UITableView *)tableView numberOfRowsInSection:(NSInteger)section {
id sectionInfo = [[self.fetchedResultsController sections] objectAtIndex:section];
return [sectionInfo numberOfObjects];
}
// Customize the appearance of table view cells.
- (void)configureCell:(UITableViewCell *)cell atIndexPath:(NSIndexPath *)indexPath
{
// Configure the cell to show the book's title
Book *book = [self.fetchedResultsController objectAtIndexPath:indexPath];
cell.textLabel.text = book.title;
}
- (UITableViewCell *)tableView:(UITableView *)tableView cellForRowAtIndexPath:(NSIndexPath *)indexPath
{
static NSString *CellIdentifier = @"Cell";
UITableViewCell *cell = [tableView dequeueReusableCellWithIdentifier:CellIdentifier];
// Configure the cell.
[self configureCell:cell atIndexPath:indexPath];
return cell;
}
这几个方法就设置了tableview的组,行和每行具体数据,并且数据都来源与NSFetchedResultsController,从而与CoreData相结合
以数据为驱动的MVC操作模型
由上一部分可知,tableview的UI与数据已相分割,而整套程序各个页面之间的流转也是基于数据而驱动,这也是IOS强调的MVC模式的体现,每个页面都有controller对应,每个controller都维护一个data,当data变动时,监听器会随之改变UI的展现,比如本例中实现了NSFetchedResultsControllerDelegate,以此监听data的变动,从而刷新tableview,这样就不需要在其他页面改变数据时,而外地修改与此数据相关的UI,具体代码如下所示:
/*
NSFetchedResultsController delegate methods to respond to additions, removals and so on.
*/
- (void)controllerWillChangeContent:(NSFetchedResultsController *)controller
{
// The fetch controller is about to start sending change notifications, so prepare the table view for updates.
[self.tableView beginUpdates];
}
- (void)controller:(NSFetchedResultsController *)controller didChangeObject:(id)anObject atIndexPath:(NSIndexPath *)indexPath forChangeType:(NSFetchedResultsChangeType)type newIndexPath:(NSIndexPath *)newIndexPath
{
UITableView *tableView = self.tableView;
switch(type) {
case NSFetchedResultsChangeInsert:
[tableView insertRowsAtIndexPaths:[NSArray arrayWithObject:newIndexPath] withRowAnimation:UITableViewRowAnimationFade];
break;
case NSFetchedResultsChangeDelete:
[tableView deleteRowsAtIndexPaths:[NSArray arrayWithObject:indexPath] withRowAnimation:UITableViewRowAnimationFade];
break;
case NSFetchedResultsChangeUpdate:
[self configureCell:[tableView cellForRowAtIndexPath:indexPath] atIndexPath:indexPath];
break;
case NSFetchedResultsChangeMove:
[tableView deleteRowsAtIndexPaths:[NSArray arrayWithObject:indexPath] withRowAnimation:UITableViewRowAnimationFade];
[tableView insertRowsAtIndexPaths:[NSArray arrayWithObject:newIndexPath] withRowAnimation:UITableViewRowAnimationFade];
break;
}
}
- (void)controller:(NSFetchedResultsController *)controller didChangeSection:(id )sectionInfo atIndex:(NSUInteger)sectionIndex forChangeType:(NSFetchedResultsChangeType)type
{
switch(type) {
case NSFetchedResultsChangeInsert:
[self.tableView insertSections:[NSIndexSet indexSetWithIndex:sectionIndex] withRowAnimation:UITableViewRowAnimationFade];
break;
case NSFetchedResultsChangeDelete:
[self.tableView deleteSections:[NSIndexSet indexSetWithIndex:sectionIndex] withRowAnimation:UITableViewRowAnimationFade];
break;
}
}
- (void)controllerDidChangeContent:(NSFetchedResultsController *)controller
{
// The fetch controller has sent all current change notifications, so tell the table view to process all updates.
[self.tableView endUpdates];
}
基于UndoManager来做撤销或重做
IOS提供了一个UndoManager,提供了undo和redo相关功能,UndoManager也是和NSManagedObjectContext相结合,从而实现以数据为中心的undo和redo,具体说来,UndoManager为维护一个NSNotificationCenter,并为此提供Observer的回调,从而达到对undo和redo的监听的目的,使用方法见如下代码:
- (void)setUpUndoManager
{
/*
If the book's managed object context doesn't already have an undo manager, then create one and set it for the context and self.
The view controller needs to keep a reference to the undo manager it creates so that it can determine whether to remove the undo manager when editing finishes.
*/
if (self.book.managedObjectContext.undoManager == nil) {
NSUndoManager *anUndoManager = [[NSUndoManager alloc] init];
[anUndoManager setLevelsOfUndo:3];
self.undoManager = anUndoManager;
self.book.managedObjectContext.undoManager = self.undoManager;
}
// Register as an observer of the book's context's undo manager.
NSUndoManager *bookUndoManager = self.book.managedObjectContext.undoManager;
NSNotificationCenter *dnc = [NSNotificationCenter defaultCenter];
[dnc addObserver:self selector:@selector(undoManagerDidUndo:) name:NSUndoManagerDidUndoChangeNotification object:bookUndoManager];
[dnc addObserver:self selector:@selector(undoManagerDidRedo:) name:NSUndoManagerDidRedoChangeNotification object:bookUndoManager];
}- (void)undoManagerDidUndo:(NSNotification *)notification {
// Redisplay the data.
[self updateInterface];
[self updateRightBarButtonItemState];
}
- (void)undoManagerDidRedo:(NSNotification *)notification {
// Redisplay the data.
[self updateInterface];
[self updateRightBarButtonItemState];
}
回调很简单,实际上就是在数据变更时更新一下UI
基于Delegate的代码组织结构
Delegate是IOS用得最广的设计模式,这也是很多Java程序员不习惯的一点,本例中AddViewController中定义了AddViewControllerDelegate,从而把save数据的事情给委派出去,并在RootViewController中进行具体实现,所以RootViewController就是AddViewController的delegate,从而可以把数据操作的代码集中到一块儿,想自己实现一套delegate模式的代码的话可以参考本部分的例子
程序退出时及时保存数据
IOS或者android的app都存在进入background的操作,并且内存清理的模型会导致background里的app非持久化数据丢失的问题,所以当程序退出(进入background)时要及时持久化数据,本例也实现了这个特性:
- (void)applicationWillTerminate:(UIApplication *)application
{
[self saveContext];
}
- (void)applicationWillResignActive:(UIApplication *)application
{
[self saveContext];
}
- (void)applicationDidEnterBackground:(UIApplication *)application
{
[self saveContext];
}
- (void)saveContext
{
NSError *error;
if (_managedObjectContext != nil) {
if ([_managedObjectContext hasChanges] && ![_managedObjectContext save:&error]) {
/*
Replace this implementation with code to handle the error appropriately.
abort() causes the application to generate a crash log and terminate. You should not use this function in a shipping application, although it may be useful during development.
*/
NSLog(@"Unresolved error %@, %@", error, [error userInfo]);
abort();
}
}
} |

 /2
/2 

 提升卡
提升卡 置顶卡
置顶卡 沉默卡
沉默卡 喧嚣卡
喧嚣卡 变色卡
变色卡 千斤顶
千斤顶 显身卡
显身卡